
Subscribe to Our Youtube Channel
Related Manuals for Precisionary RF-600


Summary of Contents for Precisionary RF-600
- Page 1 PRECISIONARY INSTRUMENTS ROTARY MICROTOME RF-600 For Research & Clinical Studies User Manual...
-
Page 2: Table Of Contents
Table of Contents ..........................2 Thank You! ................................. 3 Safety .................................. 3 Instrument Type & Use .............................. 4 Intended Use of the Instrument .......................... 4 Safety Devices .................................. 4 Model Description ..........................5 RF-600 Rotary Microtome General Information ................... 5 Technical Specifications .............................. 5 RF-600 Rotary Microtome Components .................... 6 RF-600 Rotary Microtome Anatomy ........................ 7 RF-600 Specimen Head Clamp Anatomy ....................... 8 RF-600 Knife Holder Base Anatomy ........................ 9 Installation ............................ 1 0 Installation General Information ......................10 Delivery of the Rotary Microtome RF-600 ................... 11... -
Page 3: Thank You
Caution! Follow the accompanying documentation. This user manual is a key part of the Precisionary Rotary Microtome RF-600, therefore make sure to keep it on hand and as close as possible to the instrument itself for future reference. -
Page 4: Instrument Type & Use
Please only refer to this user manual when handling the Precisionary RF-600 rotary microtome. The Precisionary RF-600 is meant to be used by trained laboratory personnel only, and is intended only for professional use. Please read this manual thoroughly and understand all instructions BEFORE operating this instrument. -
Page 5: Model Description
Model Description RF-600 Rotary Microtome General Information The Precisionary RF-600 rotary microtome is a manual model that is ideal for routine histology tissue sectioning. This microtome provides high precision cutting and stability, which gives you reproducible, high-quality wax-embedded and fixed tissue sections. -
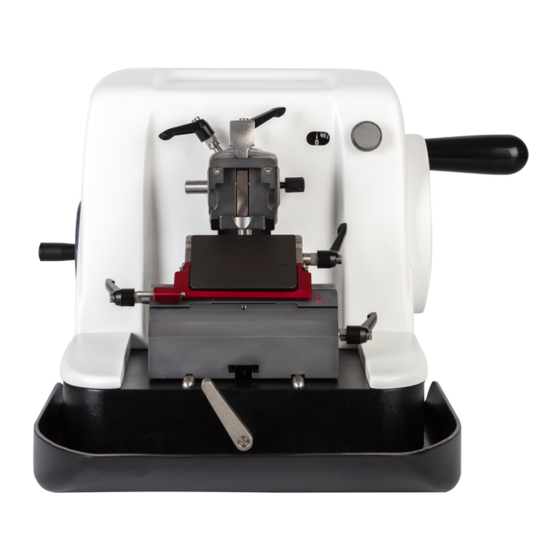
Page 6: Rf-600 Rotary Microtome Components
RF-600 Rotary Microtome Components The Precisionary RF-600 is delivered with everything you need to get started right away to use your new rotary microtome for cutting experiments. The following items are included with your RF-600 rotary microtome: Item Name Quantity Part Number (Catalog Number) -
Page 7: Rf-600 Rotary Microtome Anatomy
RF-600 Rotary Microtome Anatomy Name Function Course Feed Wheel Allows for manual rapid fast forward and fast backward movement of the specimen head. Specimen Head Rotation When loosened, allows for X- and Y- axis rotation Locking Lever adjustments of the specimen head. -
Page 8: Rf-600 Specimen Head Clamp Anatomy
RF-600 Specimen Head Clamp Anatomy Name Function Specimen Head Rotation Locking When loosened, allows for X- and Y- axis rotation Lever adjustments of the specimen head. Cassette Clamp Level Allows cassettes to be inserted and tightly clamped for slicing. Cassette Holder Front holder of the specimen head for cassettes. -
Page 9: Rf-600 Knife Holder Base Anatomy
RF-600 Knife Holder Base Anatomy Name Function Blade Ejector Safety feature to help easily eject cutting blades for safe removal. Blade Guard Safety feature to cover the cutting blade. Clamping Knob for Cutting Blade Loosens/tightens the cutting stage slot to allow for insertion and removable of cutting blade. -
Page 10: Installation
Installation Installation General Information Do not operate the instrument in rooms with an explosion hazard. The following restrictions apply: • The instrument is for indoor use only. • Keep the machine in a location with a vibration-free floor that has sufficient load capacity and rigidity for the weight of the instrument (30 kg). -
Page 11: Delivery Of The Rotary Microtome Rf-600
Delivery of the Rotary Microtome RF-600 The Precisionary Rotary Microtome RF-600 is delivered with all safety precautions using freight shipment. Your rotary microtome will be delivered in a secure wooden crate that will require disassembly before installation of the instrument. Upon receipt of your rotary microtome delivery, please complete the following steps: •... -
Page 12: Unpacking & Installing The Rotary Microtome Rf-600
Unpacking & Installing the Rotary Microtome RF-600 Begin by unpacking the wooden crate containing the rotary microtome for freight shipment. • There are 8 total large metal screws on the top lid of the wooden crate. • Using the included uncrating tool, shown below, loosen and remove the metal screws. • Lift off the top wooden lid and set aside. The rotary microtome will be carefully packaged inside the wooden crate: • Remove the top foam cushion. •... - Page 13 You’re now done installing the basics of the rotary microtome! Let’s get you started on operating the rotary microtome. Additional questions? Need assistance? We have multiple ways for you to contact us, including: E-mail: info@precisionary.com Website: www.precisionary.com Phone: (617) 682-0586...
-
Page 14: Operation
Operation Working with the Rotary Microtome RF-600 This section covers the operational procedures of the Precisionary Rotary Microtome RF-600. Always remember to wear safety gloves while operating the instrument. Microtome knives • Take extreme caution when handling microtome knives/disposable blades as mishandling sharp objects may cause serious injury. - Page 15 Starting from the bottom-most piece, here is what each component does: Base Component The base component has a groove opening on the bottom that allows it to slide onto the microtome unit. The handle on the right side of the base component allows the angle of the knife holder base to be adjusted for cutting.
-
Page 16: Step 2. Install The Knife Holder To The Microtome Base
Step 2. Install the knife holder to the microtome base Match the grooves on the microtome base (1 and 2 in the image below) to the openings on the knife holder base (4). Once the knife holder base is installed, lock it securely in place by turning the handle (3) clockwise. -
Page 17: Step 3. Select And Install The Specimen Head Clamp
Step 3. Select and install the specimen head clamp We include two types of specimen head clamps for the RF-600: 1. Specimen head clamp for standard sized cassettes. 2. Specimen head clamp for paraffin blocks (called “universal size”). To switch between the different specimen head clamps, loosen the release knob for the cassette clamp (3 in the left image below), then slide the specimen head horizontally to remove it (right image). -
Page 18: Step 5. Install A Rotary Microtome Cutting Blade
(2 in the image below). Finally, tighten the clamping knob. You can choose to use either low-profile or high-profile cutting blades with the RF-600 rotary microtome. Please select the correct cutting stage and knife holder for each type of blade. -
Page 19: Step 6. Use The Coarse Handwheel
Step 6. Use the coarse handwheel To get your tissue sample close to the blade to begin cutting, first use the coarse feed wheel to rapidly fast forward the specimen head. • Turning the coarse handwheel clockwise = moves the specimen closer to you. •... -
Page 20: Step 7. Adjust The Tissue Slice Thickness And Begin Slicing
Step 7. Adjust the tissue slice thickness and begin slicing Using the tissue thickness dial, select your desired tissue thickness by turning the knob (3 in the image below). The tissue thickness will be shown in the thickness display window (1 and 2 in the image below). -
Page 21: Cleaning & Maintenance
Cleaning & Maintenance Cleaning & Disinfecting The RF-600 has been designed to facilitate easy cleaning. Upkeeping the proper maintenance and cleaning of your instrument is essential in reducing machine degradation. Personal protective wear such as gloves and mask should be worn throughout this process. -
Page 22: Troubleshooting
Troubleshooting Are you the proud owner of a Precisionary Rotary Microtome RF-600, but are having problems? This is our “Troubleshooting Guide,” which we wrote to help you troubleshoot the most commonly encountered issues. Jump right in! If you cannot find the solution below, or if you are... -
Page 23: Warranty & Services
Shipping fees incurred from repairs for under-warranty service in the first year under warranty will be paid by Precisionary Instruments. All shipping fees both to and from Precisionary Instruments following this one year period must be paid by the customer.
Need help?
Do you have a question about the RF-600 and is the answer not in the manual?
Questions and answers