Advertisement
Table of Contents
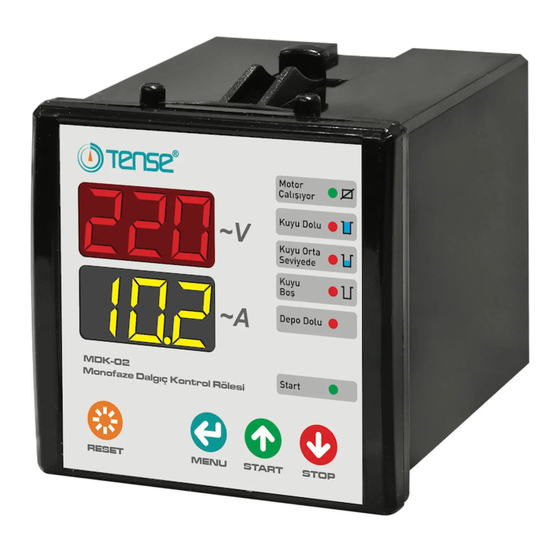
MONO-PHASE RELAY FOR CONTROLLING PUMP MOTOR
General:
It has been designed for controlling submersible pump motors and protecting them against adverse situations that can be arising from dry operation, high
or low voltage and high or low current.
Usage and Operating Principle of the Device:
Before connecting the device, be sure to read the warning section. Connect the device in accordance with the connection diagram. After connecting the
device, energize it. Check whether the operating values of your motor conform to the factory values in the device menu. If they do not conform to the
factory values, you can respectively adjust; High-voltage set (P1), high current (thermic) set (P2), low-voltage set (P3), low current set (P4), current error
waiting time (P5), current auto reset time (P6), if we want it to reset itself automatically after current errors, demurrage multiplier (P7) for demurrage
(starting) flow, demurrage time (P8), current auto reset number the number (P9) in order to prevent the faults in the system and upper electrode waiting
time (P11) in order to decrease stop-start frequency of the motor.
After the device is energized, it stands-by 4 seconds in the first starting time. Then, it checks the system by considering the voltage values which are
adjusted via the menu and whether there is water in the well and whether the tank which will be filled with water is empty or not. If the water level is at the
top or in the middle, if the voltage value is within the normal values, if the tank is empty and if the device is in start position, the device starts to operate and
the led lights up which shows the motor is running. The motor starts to operate and demurrage current is observed for a few seconds. Then the motor
continues to operate under normal working current. On the monitor, the current values are displayed on the red display group and the current values are
displayed on the yellow display group.
On the Start Position: If the device is on the start position, start led (yellow) lights up on the front panel. In order to set the device to the start position,
press the start button.
On the Stop Position: When the device is on the stop position, start led does not light up. In order to set the device to the stop position, press the stop
button. When the device is on the stop position, it does not operate in any way.
As the Well is being Drained: When the water inside the well reaches to the upper electrode, the led showing that the well is full of water lights up and
the motor starts to operate. When the water level drops below the upper electrode and touches to the lower electrode, the medium level led lights up. The
motor operates. When the water level drops below the lower electrode, the led showing the well is empty lights up and the motor stops.
As the Well is being Filled: If the water level inside the well is below the lower electrode, the led showing the well is empty lights up and the motor does
not operate. When the water level reaches to the lower electrode, medium level led lights up and motor does not operate. When the water level reaches to
the upper electrode, the device stands by for the upper electrode waiting time and the led showing that the well is full of water blinks. After the time is up,
the led showing that the well is full of water lights up constantly and the motor starts to operate.
Tank: Connect the floater while the tank is empty and short out its connection. Never energize the floater terminals of the device. If you do not use the
device as a tank, please short out the floater terminals.
Tank is Empty: If the floater terminals are shorted out, the device detects the tank is empty and the led showing that the tank is full of water does
not light up.
Tank is Full: If the floater terminals are open-circuit, the device detects that the tank is full and the led showing that the tank is full of water lights up.
The device does not operate the motor in any way while the tank is full.
If the Motor does not Operate: If the led showing that the motor is operating does not light up, respectively control whether the motor is on the start
position (start led must be on) and the tank is empty; the led showing that the tank is full must not be light up, the led showing the well is full must be light
up constantly (if it blinks, the device counts the upper electrode waiting time).
Reset Button: It provides to reset the submersible pump manually after high or low current error and to exit from the menu.
Menu Button: It provides to enter to the menu, to browse the menu, to save the value changes and to exit from the menu.
Start/Up Button: Sets the device to the start position. It is used as the up scroll button in the menu.
Stop/Down Button: Sets the device to the start position. It is used as the
down scroll button.
Warnings:
The device is connected in accordance with the connection diagram.
Make sure that the liquid is not flammable or explosive.
When two electrodes are in use, the upper and lower electrodes are shorted
out and used together with the base electrode.
Make sure that the temperature is above 0°C in the place where the
device is mounted.
Never energize the floater (Tank) terminals.
Connect the motor casing to the ground line. Otherwise, the device may
break down
Maintenance of the Device:
Cut the energy of the device and disconnect its connections. Clean
the device casing with a slightly damp cloth. Do not use conducting or
other substances as cleaning agents that can harm to the device.
After the cleaning of the device is completed, make the connections of
it and be sure that it operates by energizing it.
Tecnical Specifications:
Operating Voltage(Un):
.:
140V - 260V AC
Operating Frequency....:
50 Hz.
Operating Power...........:
<6VA
Operating Temperature.:
-20°C.....+55°C
Measurement Range....:
1A - 60A
Sensitivity.....................:
<50KÙ
Contact........................:
5A / 250V AC (Resistive Load)
Display.........................:
2x 3digit 14mm display
Plug-in terminal
Connection Type..........:
1,5mm²
Cable Diameter............:
Weight...........................:
0,325Kg.
Panel Hole Sizes..........:
91x91mm
Mounting.......................:
Panel front mounted
Protection Class............:
IP20
Operating Altitude.........:
<2000meter
www.tense.com.tr info@tense.com.tr
Contacts:
N
L1
Tank is Full
Tank is Empty
L
13
MDK-02
N
14
k
15
I
16
Bottom Elect.
17
Low Elect.
18
Upper Elect.
19
Floater
20
Floater
21
NO
22
COM
23
MDK-02
Dimensions:
65,6 mm
96,4 mm
76,1 mm
Connection Diagrams:
2A
2A
Upper Electrode
Low Electrode
Bottom Electrode
MADE IN TURKEY
ENG
14 mm
M
~
Pump
Advertisement
Table of Contents

Related Manuals for Tense MDK-02


Summary of Contents for Tense MDK-02
- Page 1 MDK-02 MONO-PHASE RELAY FOR CONTROLLING PUMP MOTOR General: It has been designed for controlling submersible pump motors and protecting them against adverse situations that can be arising from dry operation, high or low voltage and high or low current. Usage and Operating Principle of the Device: Before connecting the device, be sure to read the warning section.
- Page 2 Menu Usage: Press menu button in order to enter menu. Firstly, (P1) will be displayed on the screen. On the menu, the red display group shows the parameter value and the yellow display group shows the adjusted value. On the menu, you can change the value by pressing on the up and down keys. Then, by pressing the menu button you can slide the menu forward and save the previous value if you have changed it.
Need help?
Do you have a question about the MDK-02 and is the answer not in the manual?
Questions and answers