Table of Contents
Advertisement
Quick Links
THE NEXT GENERATION
OF 3D PRINTING
IS HERE
DISPOSAL INSTRUCTIONS
Do not throw this electronic device into the waste when discarding. To minimize
pollution and ensure utmost protection of the global environment, please recycle or
return to Photocentric for recycling.
UK
USA
Titan House, 20 Titan Drive
Avondale 107 - Building 'A' 855 N. 107th Ave., Suite
Peterborough, PE1 5XN
A110, Avondale, Arizona 85353
info@photocentric.co.uk
www.photocentricgroup.com
www.photocentricgroup.us
LC MAGNA
USER MANUAL
Revision 1
20/04/2022
Advertisement
Table of Contents

Related Manuals for PhotoCentric LC MAGNA


Summary of Contents for PhotoCentric LC MAGNA
- Page 1 Do not throw this electronic device into the waste when discarding. To minimize pollution and ensure utmost protection of the global environment, please recycle or return to Photocentric for recycling. Titan House, 20 Titan Drive Avondale 107 - Building ‘A’ 855 N. 107th Ave., Suite...
-
Page 2: Table Of Contents
Contents 1. EU Declaration of Conformity 2. General Information 3. Safety Information 4. Box Contents 5. Installation 5.1. First Look at LC Magna 5.2. Printer Setup 5.3. GUI Introduction 5.4. Photocentric Studio Setup 9-10 5.5. Connecting to a Network 10-12 5.6. -
Page 3: Eu Declaration Of Conformity
INFORMATION LIQUID CRYSTAL 3D-PRINTER Liquid Crystal Magna is an innovative 3D printer, designed and manufactured in the UK by Photocentric Ltd. Model: Liquid Crystal Magna This printer uses visible light to cure photo-polymer resin and build objects layer by layer. Equipped with a powerful patented peel-release system, ‘Blow-Peel’... -
Page 4: Safety Information
Liquid is inside the casing of the 3D printer. - Always plug the power cable into the mains socket 1. Power Cord- to connect LC Magna to the mains 5. Paper Filter (x5) - to filter solid debris or cured o The 3D printer has been dropped. -
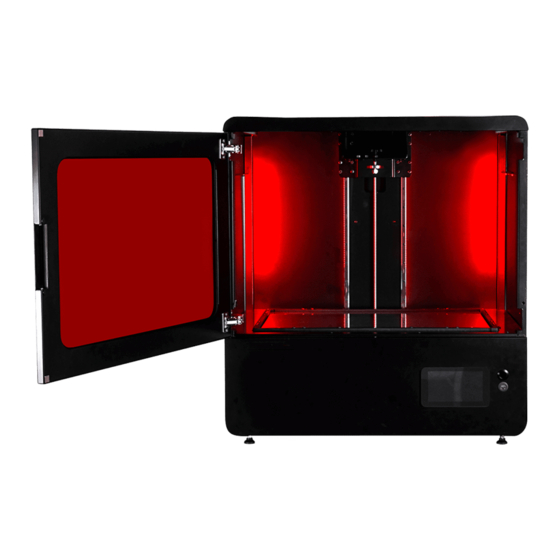
Page 5: Installation
Magna Resource Hub. 16. Pipette (x4)- To flush/clean vat leak sensors. b. Volume gauge which indicates the amount of 6. Power Button- to turn LC Magna ON and OFF, resin inside the vat. 11. Pozi 1 Screwdriver- to remove small screws can be used to power the printer or in case of when changing the vat film. -
Page 6: Printer Setup
NOTE: 1. Close the printer door. When selecting the ‘Maintain Page’ button, the LC Magna logo on the front panel will turn from red to blue. To navigate through to loaded files and 2. Select ‘Maintain’ from the Main Page on the GUI. -
Page 7: Photocentric Studio Setup
‘Apply’ for the software to load. * LC Magna V.2 Fast Printing machine profile only works for specific applications and resin. For more information, visit the Magna V.2 Fast Printing section on the Magna resource hub. - Page 8 5.6.3 HTTP Upload to Machine to include the new file. 1. To transfer a print file to LC Magna, copy it 1. Once the file has been prepared and sliced on to a USB flash drive, insert the USB drive into Photocentric Studio, it can be uploaded to the the USB port on the front of the LC Magna.
-
Page 9: Printing
8. During the print, the touchscreen will display 3. Add the required resin volume reported on various information including: Photocentric Studio in addition to the 1.5l minimum 2. Ensure that the print platform is completely clean • Time Elapsed level of the resin vat. -
Page 10: Cleaning Prints
2. Grip the handles of the print platform securely and The cleaning process is imperative for the quality of platforms, they will need to be cleaned. Photocentric gently pull towards you to remove it. surface finish and texture after post exposure. For recommends using the Photocentric Air Wash L. -
Page 11: Finishing Prints
External dimensions are: 6. Once most of the resin has poured away, use the 1. If any Photocentric Resin Cleaner or residual resin 700 (W) x 600 (D) x 700 (H) mm. vat cleaning tool to guide the remaining resin to the... -
Page 12: Maintenance
1x Vat Gasket European & Asia Pacific Customers: 17. Apply a new vat gasket to the frame of the vat Pozi 1 Screwdriver support@photocentric.co.uk and ensure the holes are aligned. Pozi 2 Screwdriver North & South American Customers: 1. Find a clean, flat surface to work on. -
Page 13: General Maintenance
*Vat film may need to be replaced sooner in the case of damage or piercing or becomes too loose Download the latest version of Studio & read through the software guide Best Practices for Supporting- Guidelines for supporting your part in Photocentric Studio Planned Maintenance Daylight Resin & Resin Cleaner Technical Data. Task...
Need help?
Do you have a question about the LC MAGNA and is the answer not in the manual?
Questions and answers