Table of Contents
Advertisement
Quick Links
Advertisement
Table of Contents

Related Manuals for AUDAC R2DIS


Summary of Contents for AUDAC R2DIS
- Page 1 R2DIS User Manual www.audac.eu...
-
Page 3: Table Of Contents
Index Introduction Caution servicing User interface Login screen Main screen Zone settings Sound settings Test signals Settings screen Digital input selection Time settings Display configuration Address settings Password settings Factory settings Notes... -
Page 4: Introduction
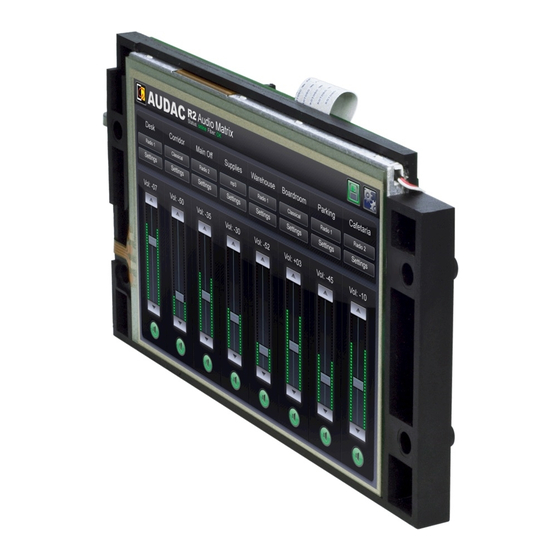
Introduction 7” Touchscreen display kit R2 The R2DIS is an optional display unit with touchscreen which can be installed internally in the front panel of the R2 digital audio matrix system. This unit consists of a 7” TFT display panel with a resolution of 800 x 480 px that is fitted with a resistive touch-screen panel. -
Page 5: User Interface
User interface Login screen... - Page 6 A password should be entered to get access to the R2 amplifier. There are two different access levels, administrator level and user level. If you log-in with the administrator password, you get access to all functions and configuration options. (The factory default password for administrator access is “R2”).
-
Page 7: Main Screen
Main screen The main screen displays all 8 output zones of the R2 with fader volume controls Volume control: The volume of each zone can be changed by moving the fader. At the bottom is a “Mute” button to mute the volume of the corresponding output zone. - Page 8 Press the “Save” button and confirm to save the zone settings. Input channel selection: This option is available if logged in as “ADMINISTRATOR” or “USER”. The desired input signal for a zone can be selected by pressing the button below the zone name.
- Page 9 This option is only available if logged in as “ADMINISTRATOR”. In the top right corner is a “Setup” button displayed. After pressing this button, you will be redirected to the configuration menu of the R2. Info Info: Pressing the AUDAC logo will show the info screen.
-
Page 10: Zone Settings
Zone Settings This option is only available if logged in as “ADMINISTRATOR”. By pressing the “Settings” button, above a slider, the “Zone Settings” screen is displayed. In this window you can select an input channel for the selected zone. Input channel selection: The screen gives an overview of all input channels that can be patched to the output zone. -
Page 11: Sound Settings
Zone settings >> Sound settings The “Sound Settings” window offers the possibility to apply a digital filter to the selected output zone, and to adjust the sound with a two-band tone control. Digital Filter: Press the “Enable Filter” checkbox to enable the filter and select the desired filter type “High-Pass”, “Low-Pass”... -
Page 12: Test Signals
Zone settings >> Test signals The R2 has an internal digital signal generator which can generate white noise, pink noise and sinusoidal signals with a selectable frequency. Each of those signals can be patched to any output zone. When one of the test signals is selected, “Other” will appear in the ‘Input Selection” box on the main screen. -
Page 13: Settings Screen
Settings screen The settings screen is displayed by pressing the “Setup” button. This button is always shown in the upper right corner of every window. (Only on Administrator level). In this window, the next settings can be changed: • Select the digital input source. •... -
Page 14: Digital Input Selection
Settings >> Digital input selection In this window, the desired digital S/PDIF audio input can be selected. The S/PDIF input can be: • Coaxial implemented with an RCA connector. • Optical implemented with a Toslink connector. Settings >> Time settings In this window, the time and date of the R2 can be set. -
Page 15: Display Configuration
Settings >> Display configuration This window configures the display unit screen, not the R2. The settings must be save by pressing the “SAVE” button. The next items can be set: • Panel brightness: Sets the brightness of the backlight. • Auto Logoff: When enabled, the system logs off after some time of no activity. - Page 16 • Screensaver 2 types can be selected: “Off” “Clock” If Clock is selected, after some time an analog clock is shown. The time can be configured in ”Screensaver time”. • Update software With this button the firmware of the display unit will be updated, not the firmware of the R2.
- Page 17 • Calibration If the touchscreen isn’t working accurate, it must be calibrated. The calibration must be done by a stylus which is meant for use with touchscreens. The cross shown in the diplay needs to be touched three times in a row to calibrate the touchscreen correctly.
- Page 18 The touchscreen can be tested by making a drawing in the white field. Use the “Clear” button to erase the field. Use the “Update software” button to update the software of R2DIS. Use the “Calibration” button to calibrate the touchscreen.
-
Page 19: Address Settings
Settings >> Address settings In this menu, the address of the R2 can be set. This address default is “001” and is selectable between “001” and “999”. When only one R2 is available, the default address can be left to its default value. When two or more R2’s are cascaded through the fibre interconnection bus, they need to have a unique address. -
Page 20: Password Settings
Settings >> Password settings In this window the passwords for the R2 can be changed. There are two different password levels: Administrator level which has full access to all functions and User level, which has only access to the basic functions. On the left side of the window the settings for the Administrator password can be changed, while on the right side the settings for the User password can be changed. -
Page 21: Factory Settings
Settings >> Factory settings BE CAREFULL to press this button. It will recall the ORIGINAL factory settings !!! It does not recall the previously saved settings, but it recalls the original factory setting and the previous made settings will be lost. Click the “OK”... -
Page 22: Notes
Notes... - Page 23 Notes...
- Page 24 Notes...
Need help?
Do you have a question about the R2DIS and is the answer not in the manual?
Questions and answers