Table of Contents
Advertisement
Quick Links
34 OPERATION
OPERATION
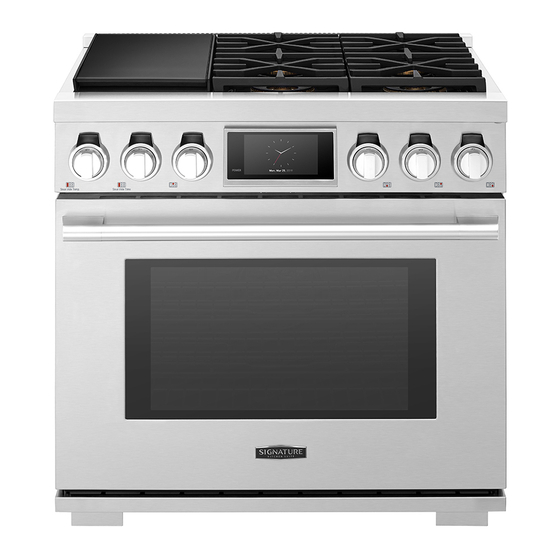
Control Panel Overview
The position of the control knobs and buttons varies by model.
Model: SKSDR360GS
1
1 Left Front Burner Control
2 Left Rear Burner Control
3 LCD Touchscreen for Oven
4 Griddle Control
Model: SKSDR360SS
1
1 Sous Vide Temperature Control
2 Sous Vide Cooking Time Control
3 Left Rear Burner Control
4 LCD Touchscreen for Oven
5 Left Front Burner Control
8
2
9
2
3
3
4
5 Right Rear Burner Control
6 Right Front Burner Control
7 Night Light On/Off
8 LCD Display On/Off
4
5
6 Right Rear Burner Control
7 Right Front Burner Control
8 Night Light On/Off
9 LCD Display On/Off
7
5
6
8
6
7
Advertisement
Table of Contents

Subscribe to Our Youtube Channel
Related Manuals for Signature Kitchen Suite SKSDR360GS


Summary of Contents for Signature Kitchen Suite SKSDR360GS
- Page 1 34 OPERATION OPERATION Control Panel Overview The position of the control knobs and buttons varies by model. Model: SKSDR360GS 1 Left Front Burner Control 5 Right Rear Burner Control 2 Left Rear Burner Control 6 Right Front Burner Control 3 LCD Touchscreen for Oven...
-
Page 2: Display Icons
OPERATION Model: SKSDR360SIS 1 Sous Vide Temperature Control 7 Front Induction Element Control 2 Sous Vide Cooking Time Control 8 Flexible On/Off Used to heat large containers on the induction 3 Center Rear Burner Control surface. 4 LCD Touchscreen for Oven 9 Night Light On/Off 5 Center Front Burner Control 10 LCD Display On/Off... -
Page 3: Getting Started
36 OPERATION Getting Started Changing Oven Settings Settings After turning on the range for the first time, adjust the settings to suit your preferences. To adjust settings after the initial setup, touch the If needed, touch POWER to wake up the display. display to open the Main screen. -
Page 4: Sabbath Mode
OPERATION Date & Time Sabbath Mode The date and time show in the LCD display when the Sabbath mode is used on the Jewish Sabbath and ovens are not in use. Holidays. While the oven is in Sabbath mode, the temperature cannot be changed and the timer, light, and alarm Setting Date functions are disabled. -
Page 5: Remote Start
38 OPERATION Wi-Fi Display Connect the appliance to a home Wi-Fi network to Set the length of time before the display sleeps. use Remote Start and other smart functions. See the There are three options you can select. Smart Functions section for more details. •... -
Page 6: Language Selection
OPERATION Language Selection Thermostat Adjustment Set the display language to English, Spanish, or Your new oven may cook differently from the one French. it replaced. Use your new oven for a few weeks to become more familiar with it before adjusting the thermostat. -
Page 7: Program Update
40 OPERATION Smart Diagnosis™ Factory Data Reset Smart Diagnosis™ can be run through a smartphone This function returns all settings to the factory application or by calling for support. Place your defaults. smartphone's mouthpiece near the top left corner of Touch Settings at the center bottom of the Main the screen. -
Page 8: Using The Cooktop
Turn the LED ring right or left and hold it to increase or decrease the time. Cooktop Layouts Release the LED ring when the desired time appears in the knob display. Model: SKSDR360GS The knob display shows the time counting down. A chime sounds when the time ends. Small Small To cancel a timer, turn the LED ring to the left until 1 appears in the display. -
Page 9: Before Use
42 OPERATION The Gas Surface Burners Using the Gas Surface Burners Be sure that all of the surface burners and grates Before Use are placed in the correct positions. Read all instructions before using. Place cookware on the grate. Make sure that all burners are properly placed. Burner locations differ depending on the range model. - Page 10 OPERATION Setting the Flame Size Cookware for Gas Burners Watch the flame, not the knob, as you reduce heat. Medium-weight cookware is Match the flame size on a gas burner to the cookware recommended because it heats being used for fastest heating. quickly and evenly.
- Page 11 44 OPERATION Extra Low Simmer (Small Burners Using the Wok Grates Only) The large burner grates can be flipped over to handle a wide variety of round-bottom woks. • Extra Low Simmer is only available on small Turn off all burners and allow the grates and burners.
-
Page 12: Induction Cookware
OPERATION Induction Cooktop Induction Cookware (Available on Some Models) NOTE Before using the induction cooking elements, The induction cooktop uses an electromagnetic field carefully read and follow these cookware to directly heat only the pan, not the cooktop. Any recommendations and the instructions in the pan cookware that can be strongly magnetized will work sensing sections. -
Page 13: Cookware Placement
46 OPERATION Cookware Placement Moving Cookware on the Cooktop Use the proper cookware and place it correctly on Always use heavier gauge, high-quality cookware on the cooktop. One or more of the cooking elements the cooking elements and do not slide it on the glass- will not heat if any of the incorrect conditions shown ceramic cooktop surface. -
Page 14: Setting Surface Controls
OPERATION Setting Surface Controls Hot Surface Indicator • Cooking Element LED Bar The hot surface indicator light glows as long as any There are LED bars located at the front of the surface cooking area is too hot to touch. induction cooktop surface. -
Page 15: Flexible Mode
48 OPERATION The Recommended Surface Cooking Turning On Cooking Elements Setting Push the control knob in. Start most surface cooking on a higher setting and Turn the knob in either direction to select the then adjust to a lower setting to finish cooking. desired setting. -
Page 16: Power Management
OPERATION Sous Vide Noises during Induction Operation The electronic processes involved with induction (Available on Some Models) cooking may create some background noises. You may hear a slight buzzing sound when cooking on Sous vide cooking uses a hot water bath to cook the cooktop. -
Page 17: Using The Rack
50 OPERATION Using Sous Vide Using the Rack Always use the rack when cooking in the sous vide Open the cover of the sous vide module and module. The rack helps prevent food from resting on remove the water bath. the bottom of the water bath, which could cause it to Check the bottom of the water bath and inside cook unevenly. - Page 18 OPERATION Moving the Sous Vide Bath • For longer cooking times, you may need to add water during cooking to keep the water level above Some users may find it more convenient to place the minimum line in the water bath. the empty water bath in the sous vide module before •...
- Page 19 52 OPERATION Setting Sous Vide Temperature Setting Sous Vide Cook Time Set the sous vide temperature before setting the cook Turn the control knob to select one of the default cook time. Turn the control knob to select one of the default times.
- Page 20 OPERATION Assembling the Water Bath Filling the Water Bath • Proper placement of the water bath is important • Use only clean water in the water bath. for the sous vide sensor to detect the water • After use, empty the water bath and clean it before temperature in the bath and heat the water properly.
-
Page 21: Using The Griddle
54 OPERATION The Gas Built-in Griddle Using the Griddle (Available on Some Models) Turn the Griddle knob to set the desired cooking temperature. The available temperature range is 200 °F to 450 °F (93 °C to 232 °C). Use the built-in griddle instead of a saucepan for foods such as eggs, burgers, and pancakes. - Page 22 OPERATION Setting Griddle Cook Time Alarm Most foods benefit from a preheated griddle. Use the chart below as a guide and adjust as Use the control knob and LED ring to set the preferred. Preheat for approximately 10 minutes at temperature and cook time for the griddle.
-
Page 23: Before Using The Oven
56 OPERATION Using the Oven Using Oven Racks The racks have a turned-up back edge that prevents Before Using the Oven them from being pulled completely out of the oven cavity. NOTE • Because the oven temperature cycles, an oven thermometer placed in the oven cavity may not Installing Gliding Racks show the same temperature that is set on the... - Page 24 OPERATION Accessories Steam Trays When using the Steam cooking function, use the Broiler Pan and Grid nested steam trays for best results. Use a broiler pan and grid when preparing meats for Convection Roast, RapidHeat Roast+, and Broil. The broiler pan catches grease spills and the grid helps prevent grease splatters.
- Page 25 58 OPERATION Timer Bake The oven timers don't affect oven operation or Bake is used to prepare foods such as pastries, cooking time. Use them as extra kitchen timers. breads and casseroles. Once the time runs out, the oven chimes and "Timer The oven can be programmed to bake at any Finished"...
-
Page 26: Convection Modes
OPERATION Convection Modes Changing the Cook Settings Touch Edit in the display to bring up the Cook Convection Bake and Convection Roast use a fan to Settings screen. circulate heat evenly within the oven. This improves heat distribution and allows for even cooking and Adjust the settings using the number pad or excellent results whether cooking on one rack or scroll function. - Page 27 60 OPERATION RapidHeat Roast+ Changing the Cook Settings Touch Edit in the display to bring up the Cook The RapidHeat Roast+ feature is designed to quickly Settings screen. roast poultry. The combination of intense heat from the upper and lower heating elements and heated Adjust the settings using the number pad or air from the back heating element and steam results scroll function.
-
Page 28: Recommended Baking And Roasting Guide
OPERATION Recommended Baking and Roasting Baking Rack Guide Guide Food Rack position Baking results will be better if baking pans are • Layer cakes Cakes centered in the oven as much as possible. If cooking • Bundt cakes on multiple racks, place the oven racks in the positions shown. - Page 29 62 OPERATION Broil Smoking Due to the intense heat associated with broiling, it The Broil function uses intense heat from the upper is normal to experience smoke during the cooking heating element to cook food. Broiling works best for process. This smoke is a natural by product of tender cuts of meat, fish, and thinly cut vegetables.
-
Page 30: Recommended Broiling Guide
OPERATION Recommended Broiling Guide The size, weight, thickness, starting temperature, and your preference of doneness will affect broiling times. This guide is based on meats at refrigerator temperature. For best results when broiling, use a pan designed for broiling. Quantity and/or Rack First Side Second Side... - Page 31 64 OPERATION Warm Tips for Broiling Beef The Warm mode maintains an oven temperature of 200°F or less. Use the Warm mode to keep cooked • Steaks and chops should always be allowed to rest food at serving temperature for up to three hours after for five minutes before being cut into and eaten.
- Page 32 OPERATION Proof Probe This feature maintains a warm oven for rising yeast The probe accurately measures the internal leavened products before baking. temperature of meat, poultry and casseroles. It should not be used during broiling, self clean, warming or proofing. Always unplug and remove the probe from Setting the Proof Function the oven when removing food.
- Page 33 66 OPERATION Using the Probe Changing the Cook Settings Insert the probe into the food. Touch Edit in the display to bring up the Cook Settings screen. Connect the probe to the jack in the oven, and Adjust the settings as desired. “Probe is connected”...
- Page 34 OPERATION My Recipe Editing My Recipe • The Edit function cannot add or remove cooking For frequently used cooking menus, you can combine stages to a recipe. Only the oven temperature, up to three different temperatures and cooking modes probe temperature and cook time can be changed. into one hot key.
- Page 35 68 OPERATION Gourmet Chef Guide NOTE • When cooking thin cuts of meat, insert the probe • Preheat oven first for most items. into the thickest part of the meat. If the probe is • Preheat for 5 minutes when broiling. inserted incorrectly, the oven could turn off too soon.
- Page 36 OPERATION Shelf Cooking time in Category Menu Accessories/Cookware Position mins. Directly on rack 10~20 Frozen Thin Crust On pizza pan 10~20 On pizza stone 10~20 Directly on rack 10~20 Pizza Frozen Rising Crust On pizza pan 10~20 On pizza stone 10~20 Directly on rack 10~20...
-
Page 37: Steam Function
70 OPERATION Steam Function Carefully insert the tank into the steam feeder slot, making sure to keep the tank level while Steam cooking uses the moist heat of steam to cook carrying it. If the tank is not kept level, water will food. - Page 38 OPERATION Remote Start Changing the Steam Cook Settings Touch Edit in the display to bring up the Cook If the appliance is registered on a home Wi-Fi Settings screen. network, the preheating function of the oven can be started or stopped using the SIGNATURE KITCHEN Adjust the settings as desired.
-
Page 39: Smart Functions
• The appliance supports 2.4 GHz Wi-Fi networks Application only. To check your network frequency, contact your Internet service provider or refer to your The SIGNATURE KITCHEN SUITE application allows wireless router manual. you to communicate with the appliance using a • SIGNATURE KITCHEN SUITE is not smartphone. -
Page 40: Application Features
Turn on alerts in the app to receive notifications about the issue, providing a fast and effective diagnosis. the current status of the appliance. Push alerts are sent even if the SIGNATURE KITCHEN SUITE app is Call the SIGNATURE KITCHEN SUITE off. -
Page 41: Open Source Software Notice Information
Follow the instructions in the SIGNATURE KITCHEN and copyright notices are available for download. SUITE application to perform a Smart Diagnosis SIGNATURE KITCHEN SUITE will also provide open using your smartphone. source code to you on CD-ROM for a charge covering... -
Page 42: Fcc Notice
SMART FUNCTIONS FCC Notice FCC RF Radiation Exposure Statement The following notice covers the transmitter module contained in this product. This equipment complies with FCC radiation exposure This equipment has been tested and found to comply limits set forth for an uncontrolled environment. This with the limits for a Class B digital device, pursuant transmitter must not be co-located or operating in to Part 15 of the FCC Rules (and also Part 18 of... -
Page 43: Maintenance
76 MAINTENANCE MAINTENANCE Cleaning Burner Heads/Caps For even and unhampered flame, the slits in the NOTE burner heads must be kept clean at all times.The burner heads and caps can be lifted off. • Depending on the model, your range may contain different cooktop modules requiring •... -
Page 44: Cleaning The Burner Grates
MAINTENANCE Burner Grates Gas Cooktop Surface The convertible wok grates should be used in the CAUTION front, and the remaining grates in the back. • To avoid burns, do not clean the cooktop Left Grate Right Grate surface until it has cooled. •... - Page 45 78 MAINTENANCE Sous Vide Module Induction Cooktop (Available on Some Models) (Available on Some Models) CAUTION CAUTION • The sous vide handle may become hot during • Do not use glass-ceramic cooktop cleaners on operation. Use oven mitts when handling during other range surfaces.
-
Page 46: Burned-On Residue
MAINTENANCE Burned-On Residue Metal Marks and Scratches Follow these instructions to remove burned on • Be careful not to slide pots and pans across residue from the glass-ceramic induction cooktop the induction cooktop. Doing so will leave metal surface. markings on the surface. •... - Page 47 80 MAINTENANCE Griddle Cleaning the Griddle Scrape off large food debris with a heatproof (Available on Some Models) silicone or wood spatula immediately after cooking. Do not use metal utensils on the griddle. Clean the griddle plate using hot water and liquid dish soap.
-
Page 48: Stainless Steel Surfaces
MAINTENANCE Exterior Broiler Pan, Grid, and Steam Trays Painted and Decorative Trim For general cleaning, use a cloth with hot soapy Grid Broiler pan water. For more difficult soils and built-up grease, apply a liquid detergent directly onto the soil. Leave it on for 30 to 60 minutes. -
Page 49: Front Manifold Panel And Knobs
82 MAINTENANCE Front Manifold Panel and Oven Door • Use soapy water to thoroughly clean the oven door. Knobs Rinse well. Do not immerse the door in water. It is best to clean the manifold panel after each use of •... - Page 50 The SpeedClean™ feature takes advantage of SIGNATURE KITCHEN SUITE'S • Makes for a better self-clean experience new enamel to help lift soils without harsh chemicals, - Delays the need for a self-clean cycle...
- Page 51 84 MAINTENANCE SpeedClean™ Instruction Guide Once the oven cavity is cleaned, wipe any excess water with a clean dry towel. Replace Remove oven racks and accessories from the racks and any other accessories. oven. If some light soils remain, repeat the above Scrape off and remove any burnt-on debris with steps, making sure to thoroughly soak the a plastic scraper.
-
Page 52: Cleaning Tips
MAINTENANCE Self Clean Cleaning Tips • Allow the oven to cool to room temperature before The Self Clean cycle uses extremely hot temperatures using the SpeedClean™ cycle. to clean the oven cavity. While running the Self Clean • A plastic spatula can be used as a scraper to cycle, you may notice smoking or an odor. -
Page 53: Setting Self Clean
86 MAINTENANCE Setting Self Clean CAUTION The Self Clean function has cycle times of 3, 4 or 5 • Do not leave small children unattended near hours. the appliance. During the Self Clean cycle, the outside of the range can become very hot to •... -
Page 54: Oven Air Vents
MAINTENANCE Oven Air Vents During Self Clean • The Self Clean cycle uses extremely hot Air openings are located at the rear of the cooktop, temperatures to clean the oven cavity. While at the top of the oven door, at the front of oven cavity running the Self Clean cycle, you may notice and at the bottom of the range. -
Page 55: Cleaning Scale On Oven Bottom
88 MAINTENANCE Cleaning Scale on Oven Drying Bottom The Drying function removes residual water inside the steam generator. The function takes a little over To remove mineral deposits that remain on the oven 1 minute and runs automatically after any steam bottom after using the steam mode, use a cloth cooking cycle. -
Page 56: Removing And Replacing The Lift-Off Oven Doors
MAINTENANCE Removing and Replacing the Replacing the Door Lift-Off Oven Doors Firmly grasp both sides of the door at the top. With the door at the same angle as the removal CAUTION position, seat the indentation of the hinge cams into the bottom edge of the hinge slots.
Need help?
Do you have a question about the SKSDR360GS and is the answer not in the manual?
Questions and answers