Table of Contents
Advertisement
Available languages
Available languages
Quick Links
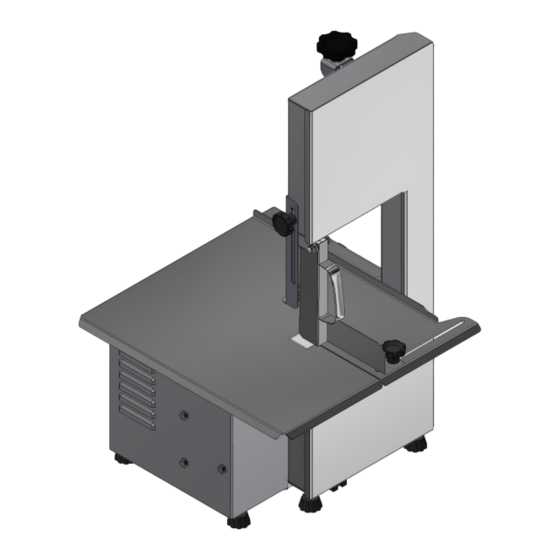
TABLE BAND SAW, STAINLESS STEEL, WITH CUT REGULATOR, BLADE 1.740
SIERRA DE BANCADA PARA HUESOS, INOXIDABLE, CON REGULADOR DE
70016.5 - ENGLISH/ESPAÑOL
Data de Revisão: 14/12/2021
Metalúrgica Skymsen Ltda
Rodovia Ivo Silveira 9525
Volta Grande
88355-202 Brusque/SC/Brasil
CNPJ: 82.983.032/0001-19
www.skymsen.com – Fone: +55 47 3211 6000
DUE TO THE CONSTANT IMPROMEVENTS INTRODUCED TO OUR EQUIPMENTS, THE INFORMATIONS CONTAINED IN THIS
MANUAL MAY BE MODIFIED WITHOUT PREVIOUS NOTICE.
120mm
P
ANTONE Black C
FUNDO BRANCO
PANTONE 485C
linha de corte, não deverá aparecer na etiqueta.
Código: 00047.7
Material: 3M Scotchcal Automotivo APP Branco
Acabamento Superficial: Laminação
Espessura (Filme + Adesivo): 0,10 mm +/- 0,02 mm
Tipo do Adesivo: Acrílico base solvente, sensível a pressão
MM / 68,5"
CORTE, CINTA 1.740 MM / 68,5"
MODEL/MODELOS
SB
SBL
54,87mm
Advertisement
Table of Contents

Related Manuals for Skymsen SB


Summary of Contents for Skymsen SB
- Page 1 Metalúrgica Skymsen Ltda Rodovia Ivo Silveira 9525 Volta Grande 88355-202 Brusque/SC/Brasil CNPJ: 82.983.032/0001-19 www.skymsen.com – Fone: +55 47 3211 6000 DUE TO THE CONSTANT IMPROMEVENTS INTRODUCED TO OUR EQUIPMENTS, THE INFORMATIONS CONTAINED IN THIS MANUAL MAY BE MODIFIED WITHOUT PREVIOUS NOTICE.
-
Page 2: Table Of Contents
SUMMARY 1.1.6 Make sure that the voltage of Equipment and of the local electrical supply match. Also make sure that the equipment is properly grounded. 1. INTRODUCTION ......2 1.1.7 Never adjust the Blade Guide nor the Thickness Guide with the machine running. 1.1 Safety ............. -
Page 3: Installation And Pre-Operation
press the Handle No. 13 (Pic. 01). CHARACTERISTICS UNIT 4.2.5 Lower Wheel Voltage 110 / 220 110 / 220 The Lower Wheel No. 06 (Pic. 01) is assembled in the inferior Frequency bearing and fixed by the Scrap Nº 07, this scrap must always Motor Power 0,75 0,75... -
Page 4: Maintenance
Picture 03 Picture 07 Use a clean cloth or a soft brush to remove residues. Wash, sanitize, rinse and dry all the components. Assemble back all the components following the inverse Fixed Table Block path, and make sure all the components are correctly in Remove the Fixed Table Block #01 (Pic. -
Page 5: Problems Resolution
Use Your QR Code Reader to access more information regarding safety and maintenance. 7. PROBLEMS RESOLUTION PROBLEMS CAUSES SOLUTIONS - Lack of Power; - Check if there is electric power. - The equipment does not switch on. - Problem with the internal or - Call Technical Assistance. -
Page 6: Electrical Diagrams
8. ELECTRICAL DIAGRAMS NOTE: To reverse the motor rotation direction, replace the wire T5 with T8. POWER GRID ON/OFF... - Page 7 NOTE: To reverse the motor rotation direction, replace the wire T5 with T8. POWER GRID ON/OFF...
- Page 8 NOTE: To reverse the motor rotation direction, replace the wire T5 with T8. POWER GRID ON/OFF...
- Page 9 INDICE eléctrica del local sean adecuadas para el uso de este equipo y que el equipo está conectado al cable tierra. 1.1.7 Nunca regule la Guia de la Hoja ni el Regulador de 1. INTRODUCCIÓN ......9 Corte con la maquina en movimiento. Este equipamiento não se destina a la utilización 1.1 Seguridad ..........
- Page 10 CARACTERÍSTICAS UNIDAD 4.2.4 Guía de la Hoja Con el equipo apagado gire la Manija Nº 13 (Fig. 01) en el Tensión 110 / 220 110 / 220 sentido ante horario para libertar la Guía de la Hoja. Ajuste Frecuencia la altura de la Guía de la Hoja para la altura, no mas, de la Potencia del Motor 0,75 0,75...
- Page 11 Volante Superior Después de haber retirado la Hoja agarre firmemente el Para remover las partes arriba proceda como abajo: Volante Superior N° 01 (Fig. 07), empújelo para arriba y en Puerta seguida ơrelo para la frente de la maquina. Abra la Puerta Nº 01 (Fig. 03) y gírelo hacia el lado derecho, Figura 07 dejándolo abierto.
- Page 12 a señales de sobrecalentamiento, aislamiento dañado o avería mecánica. •Verificar posible juego en los cojinetes y rodamientos. •Verificar retenes, o’rings, v’rings y otros sellos. Pase el lector de QR Code para obtener informaciones sobre seguridad mantenimiento. 7. RESOLUCIÓN DE PROBLEMAS PROBLEMAS CAUSAS SOLUCIONES...
- Page 13 8. DIAGRAMAS ELÉCTRICOS NOTA: Para invertir la dirección de rotación del motor, reemplace el cable T5 con T8. RED ELÉCTRICA ENCENDE/APAGA...
- Page 14 NOTA: Para invertir la dirección de rotación del motor, reemplace el cable T5 con T8. RED ELÉCTRICA ENCENDE/APAGA...
- Page 15 NOTA: Para invertir la dirección de rotación del motor, reemplace el cable T5 con T8. RED ELÉCTRICA ENCENDE/APAGA...
- Page 16 ___________________________________________________________ ___________________________________________________________ ___________________________________________________________ ___________________________________________________________ ___________________________________________________________ ___________________________________________________________ ___________________________________________________________ ___________________________________________________________ ___________________________________________________________ ___________________________________________________________ ___________________________________________________________ ___________________________________________________________ ___________________________________________________________ ___________________________________________________________ ___________________________________________________________ ___________________________________________________________ ___________________________________________________________ ___________________________________________________________ ___________________________________________________________ ___________________________________________________________ ___________________________________________________________ ___________________________________________________________ ___________________________________________________________ ___________________________________________________________ ___________________________________________________________ ___________________________________________________________ ___________________________________________________________ ___________________________________________________________ ___________________________________________________________ ___________________________________________________________ ___________________________________________________________ ___________________________________________________________ ___________________________________________________________ ___________________________________________________________ ___________________________________________________________ ___________________________________________________________ ___________________________________________________________...
Need help?
Do you have a question about the SB and is the answer not in the manual?
Questions and answers