
Subscribe to Our Youtube Channel
Related Manuals for GME TX3100VP


Summary of Contents for GME TX3100VP
- Page 1 Super compact 5 watt UHF CB radio 5 YEAR WARRANTY I N S T R U C T I O N M A N U A L...
-
Page 2: Table Of Contents
CONTENTS INTRODUCTION .................3 Using Scan ................14 IMPORTANT INFORMATION ............3 Skipping Over Busy Channels While Scanning ......15 TELEMETRY CHANNELS ..............4 Transmitting While Scanning .............15 FEATURES ..................5 INSTALLATION .................15 GENERAL OPERATION ..............6 Antenna Installation ............16 Unique Flip Feature.............7 Noise Suppression ............16 Power ................7 DC Power Connection ............19 Volume ................7 High Voltage Detection .............20... -
Page 3: Important Information
IMPORTANT INFORMATION CONCERNING UHF CB RADIO Main Radio Unit Screw Pack Mounting Bracket Supplementary GME The use of the Citizen Band radio service is licensed in Australia by the model label ACMA Radio communications (Citizens Band Radio Stations) Class Instruction Manual... -
Page 4: Telemetry Channels
Spectrum Management at: www.rsm.govt.nz In order to ensure driver safety when using the TX3100 The ACMA has allocated channels 5/35 for emergency use only. Plug ‘n’ Play, GME provides the following recommendations Channel 5 is the primary Simplex Emergency Channel. Where and guidelines;... -
Page 5: Features
field of vision or interfere with rear view mirrors and sun Individually Programmable DUPLEX function: User • visors. It may also result in the DC power lead trailing in the selectable for only those individual channels in your area that field of vision. -
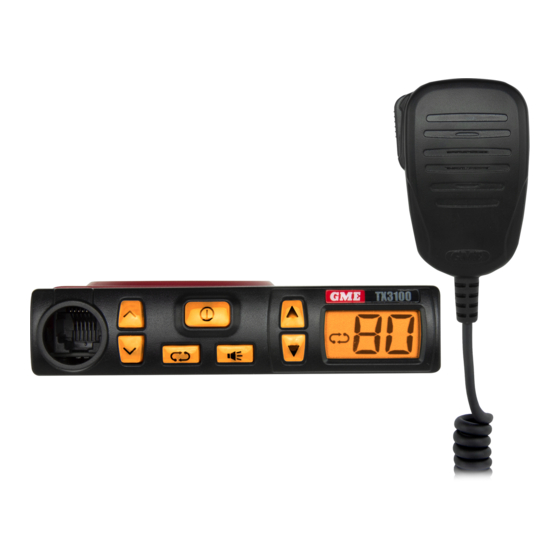
Page 6: General Operation
GENERAL OPERATION BASIC CONTROLS Power Channel Microphone Socket TX3100 Scan Squelch Volume Transmit Squelch Icon Scan Icon Silent (CTCSS) Icon Channel Display DCS Icon PA G E 6 I N S T R U C T I O N M A N U A L T X 3 1 0 0... -
Page 7: Unique Flip Feature
MICROPHONE POWER To turn the TX3100 ON, briefly press the key. Push-To-Talk (PTT) To turn the TX3100 OFF, press and hold the key. VOLUME Press the keys to increase or decrease the volume. The radio will beep with each key press and the display will flash to indicate the volume setting is being displayed. -
Page 8: Squelch Control
SQUELCH CONTROL SQUELCH SENSITIVITY Squelch control is used to eliminate the background noise when The sensitivity of the Squelch to incoming signals can be set to there are no signals present. The TX3100 features a preset suit your operating environment. For example, excessively noisy Squelch system. -
Page 9: Backlight
BACKLIGHT DUPLEX OPERATION When the radio is on, briefly press the key to cycle through the Duplex operation allows the radio to transmit on a different brightness levels for the LCD and keypad lighting. There are 5 levels frequency to that which it receives allowing operation through of lighting from off to full brightness. - Page 10 To select Duplex on individual channels; Channel Selected Receive Channel Transmit Channel 1. Select the required channel (1 – 8 or 41 – 48). 2. Press and hold the key and immediately press the key. The ‘0’ in the channel number will change to ‘r’ if channel 1 –...
-
Page 11: Adjusting The Beep Tone Level
CTCSS & DCS NOTE: You must press the key immediately after pressing the key otherwise the scan memory function will be activated. CTCSS (Continuous Tone Coded Squelch System) and DCS See SCANNING on page 14. (Digitally Coded Squelch) are Squelch quieting systems that allow several groups of users to share the same channel without ADJUSTING THE BEEP TONE LEVEL disturbing each other. -
Page 12: Selecting The Ctcss Or Dcs Tone
SELECTING THE CTCSS OR DCS TONE 3. Press the keys to select the required CTCSS tone. The flashing ‘S’ indicates the Choosing which tone to use will probably be dependent on the tones you are selecting are other radios you talk to. If you talk to others outside your group CTCSS tones. -
Page 13: Enabling Ctss/Dcs On A Channel
ENABLING CTCSS/DCS ON A CHANNEL DISABLING CTCSS/DCS ON A CHANNEL Once a CTCSS/DCS tone has been selected, it can be enabled on Repeat steps 1 and 2 above. A low beep will be heard and ‘S’ individual channels. will disappear from the display. 1. -
Page 14: Scanning
To start scanning SCANNING To begin scanning, briefly press the key. A high beep will The TX3100 has a SCAN function that allows a selection of user be heard, will flash on the display and the radio will programmable channels to be scanned for signals. Channels begin scanning. -
Page 15: Skipping Over Busy Channels While Scanning
SKIPPING OVER BUSY CHANNELS WHILE INSTALLATION SCANNING The TX3100 is supplied with a slim, U-shaped mounting bracket. When scanning, if the radio pauses on a busy channel and you The bracket can be screwed or bolted in any convenient location don’t wish to listen to the conversation briefly press either of the in your vehicle (under or above the dash, on the centre console, keys. -
Page 16: Antenna Installation
GME have a wide range of suitable 477 MHz UHF CB antennas to suit most installations and applications. We recommend contacting your local GME retailer for advice. - Page 17 58 mm Label 31 mm Your TX3100 is fitted with a GME model label adjacent to the LCD. If the final orientation of your radio results in this label being upside down, please fit the supplementary GME The mounting bracket can be oriented with the arms extending label supplied.
- Page 18 Connecting the Microphone Flipping the Display The microphone uses a 6 pin plug and socket. To connect: The TX3100’s small size allows it to be mounted in almost any convenient location. However the most suitable location may 1. Position the microphone plug in the socket so the plastic tab sometimes require the unit to be installed upside-down when faces away from the speaker, and press the plug into the referenced to your driving position.
-
Page 19: Dc Power Connection
DC POWER CONNECTION The TX3100 is designed for 13.8 volts DC, negative earth Radio remains ON when ignition switch is OFF Radio remains ON when ignition switch is OFF installations only (i.e. where the negative terminal of the battery is connected to the chassis or frame of the vehicle). There are two recommended methods of installation. -
Page 20: High Voltage Detection
ANTENNA CONNECTION Emergency use only Repeater output channels (Duplex) GME supply a wide range of mobile and base station antennas Telemetry / SelCall use only. Voice Officially designated call designed specifically for UHF CB communications. transmission is inhibited as required channel by AS/NZS 4365.2011... -
Page 21: Uhf Cb Operating Frequencies
UHF CB OPERATING FREQUENCIES Frequency (MHz) Frequency (MHz) Frequency (MHz) Frequency (MHz) 476.425 476.925 476.4375 476.9375 476.450 476.950 476.4625 476.9625 476.475 476.975 476.4875 476.9875 476.500 477.000 476.5125 477.0125 476.525 477.025 476.5375 477.0375 476.550 477.050 476.5625 477.0625 476.575 477.075 476.5875 477.0875 476.600 477.100 476.6125... -
Page 22: Ctcss Tone Frequency Chart
CTCSS TONE FREQUENCY CHART 50 Tone Frequency 50 Tone Frequency 50 Tone Frequency 50 Tone Frequency 50 Tone Frequency 67.0 94.8 131.8 171.3 203.5 69.4 97.4 136.5 173.8 206.5 71.9 100.0 141.3 177.3 210.7 74.4 103.5 146.2 179.9 218.1 77.0 107.2 151.4 183.5... -
Page 23: Dcs Tone Chart
DCS TONE CHART CODE CODE CODE CODE CODE CODE T X 3 1 0 0 I N S T R U C T I O N M A N U A L PA G E 2 3... -
Page 24: Specifications
SPECIFICATIONS ENVIRONMENTAL Transmitter RF Output: 5.0 watts max. Temperature Range: -10°C to +60°C Modulation: FM ELECTRICAL Maximum Deviation: <± 2.5 kHz at + 20 dB limiting General Spurious Emissions: <-70 dBc Compliant Specification: AS/NZS 4365:2010 Transmit Frequency Response: +6 dB per octave Frequency Range: 476.425 –... - Page 25 Receiver MECHANICAL Circuit Type: Double Conversion Dimensions: 102 (W) x 87 (D) x 23 (H) mm Superheterodyne Weight: 158 grams Intermediate Frequencies: 1st -38.85 MHz Shock and Vibration: MIL STD 810 method 2nd -450 kHz Current Consumption: < 180 mA muted 600 mA @ max.
-
Page 26: Sc Contract Warranty Against Defects
This warranty against defects is given by Standard Communications Pty (i) the replacement of the goods or the supply of equivalent Ltd ACN 000 346 814 (We, us, our or GME). Our contact details are set goods; out in clause 2.7. - Page 27 (f) goods where the serial number has been removed or made illegal. 4. Warranty period 4.1 We provide the following warranty on GME and Kingray products. No repair or replacement during the warranty period will renew or extend the warranty period past the period from original date of purchase.
- Page 28 A division of Standard Communications Pty Ltd. Head Office: PO Box 96, Winston Hills, NSW 2153, Australia. New Zealand: PO Box 58446 Botany, Auckland, 2163, NZ. T: (09) 274 0955. All international enquiries email: export@gme.net.au Part Number: 311028 Drawing Number: 49381-2...
- Page 29 Consider the height of the antenna, and the clearance you will need to allow for when operating the vehicle. MOUNTING GME provides a wide range of mounting hardware to suit various HARDWARE antenna types. Consult with your GME re-seller for selection of the correct mounting hardware.
- Page 30 8. Bring back collar and screw over plug. A division of Standard Communications Pty Ltd. Head Office: PO Box 96, Winston Hills, NSW 2153, Australia. New Zealand: PO Box 58-446 Botany, Auckland, 2163, NZ. T:(09) 274 0955. All other international enquires email: export@gme.net.au PN: 310667 DN: 48196-1...
Need help?
Do you have a question about the TX3100VP and is the answer not in the manual?
Questions and answers