Table of Contents
Advertisement
Quick Links
Advertisement
Table of Contents

Subscribe to Our Youtube Channel
Related Manuals for Excera EP8100 U2


Summary of Contents for Excera EP8100 U2
- Page 1 Digital Portable Radio Digital Portable Radio...
-
Page 2: Table Of Contents
Contents Important Information Programmable Buttons Alert Icon Noise Reduction Disabled Frequencies Transmit Time-Out Checking Items in the Package Bluetooth Getting Started Digital Conventional Functions and Operations Preparing Your Radio for Use Charging the Battery Call Attaching the Battery Private Call Attaching the Antenna Group Call Attaching the Belt Clip... - Page 3 Contents Outbox Emergency Call Drafts Broadcast Call New Msg Priority Call Preset Msg Forced Group Call Status Msg Contact Color Code Private Call Contact Call Log Group Call Contact Man Down New Contact Message Zone Analog Conventional Functions and Operations Inbox DMO and RMO Outbox...
- Page 4 Contents Contents Background Hunt Call Log Team Hunt List Redial or Backdial List Fixed TSCC List Redial List TSCC Hunt Backdial List Channel Information Hunt Subgroup Short Hunt Authentication Comprehensive Hunt Remote Remove Radio Service Team Hunt Remote Change Radio Service Background Hunt Emergency Team Hunt List...
-
Page 5: Important Information
Important Information Before using this product, please read this user manual carefully. Alert Icon ■ Caution: Indicates situations that could cause human injury or damage to your products. Note: Indicates tips that can help you make better use of your products. Caution: This radio is restricted to occupational use only to satisfy FCC RF energy exposure requirements. -
Page 6: Checking Items In The Package
Checking Items in the Package Please unpack carefully and check that all items listed below are received. If any item is missing or damaged, please contact your dealer. Charger Strap Radio Battery Power Adapter Antenna User Manual Belt Clip... -
Page 7: Getting Started
■ Charging the Battery Charger Status LED Indicator For best performance, your radio is powered by an Excera manufactured Lithium-Ion (Li-Ion) battery. To avoid damage LED flashes red slowly. Standby (no load) and comply with warranty terms, charge the battery using the charger contained in the package. -
Page 8: Attaching The Battery
Getting Started Attaching the Battery 1. Align the battery with the rails on the rear of the radio as shown by arrow ①. 2. Slide the battery upward to the top of the rails and snap the latch into place as shown by arrow ②. Note: You need to turn off the radio prior to attaching or removing the antenna. -
Page 9: Radio Controls
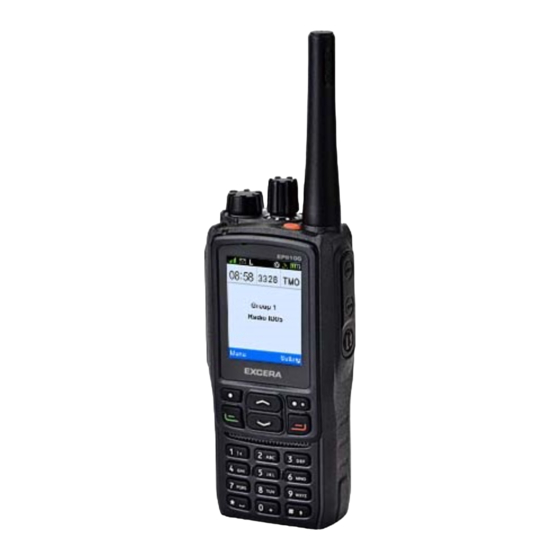
Getting Started Radio Controls ■ Part Name Part Name Part Name SK1 (Side Key 1) LCD Display Accessory Jack PTT Key Menu/OK Key Setting Key SK2 (Side Key 2) P1/Answer/Call Key P2/End/Home Key Channel/Group Call Selector Knob Speaker Up/Down Key Radio On-Off/Volume Control Knob Numeric Keypad Belt Clip... -
Page 10: Led Indicator
Getting Started LED Indicator LCD Icon ■ ■ LED Indicator Icon Icon Name Radio Status LED flashes green slowly. Standby Received Signal Strength Indicator (RSSI) LED flashes green rapidly. Upgrading or powering on New Message Icon/Full Inbox Icon LED glows green. Receiving Scan Icon LED flashes red slowly. -
Page 11: Menu Navigation
Menu Navigation Mode Date and Time ■ ■ You can set date and time for your radio. Your radio can operate in either of these modes: To access this item, press the Setting key in the home Conventional (digital and analog), DMR Trunking, and MPT Trunking. -
Page 12: Vibration
Menu Navigation Vibration Keypad Lock ■ ■ This option allows you to set whether to enable this function. This option allows you to set whether to enable the vibration When Never is unchecked, you can use the Up/Down key to feature. -
Page 13: Transmit Time-Out
Menu Navigation Transmit Time-Out appears on the status bar. You can find a Bluetooth device by ■ using the Search Devices menu and connect it to your radio. The purpose of Transmit Time-Out is to prevent any user When your radio is successfully connected to a Bluetooth from occupying a channel for an extended period. -
Page 14: Gps
Menu Navigation ■ With this option, you can allow your radio to receive its GPS information from the GPS chipset and upload the information to the system after receiving GPS upload request. To enable or disable this feature, press the Setting key in the home screen and then select "Accessories ->... -
Page 15: Digital Conventional Functions And Operations
Digital Conventional Functions and Operations Call Late Entry ■ After a private call is established, it allows other radios to join To ensure that your speech is clear, keep the microphone this private call on this channel. 2.5 to 5 cm from your mouth. Late Entry may occur in any of the following situations: Private Call The radio is powered on. -
Page 16: All Call
Digital Conventional Functions and Operations Scan radio is powered on. ● ■ The Channel Selector knob is rotated to the channel in ● Scan Start Condition operation. You can start scan only when more than one channel radio exits from another group call. ●... -
Page 17: Priority Channel 1
Digital Conventional Functions and Operations Priority Channel 1 Scan Delay This option allows you to select a channel in the scan list as This option enables you to set the time that the radio will Priority Channel 1. If only Priority Channel 1 is set, 50% of a resume scanning after the end of a valid channel activity. -
Page 18: Emergency
Digital Conventional Functions and Operations Emergency Emergency Alarm ■ If the Emergency Alarm option is selected, your radio only Emergency is used to summon help in emergency situations. sends emergency alarm requests upon emergency activation. Your radio supports two types of emergency modes: You may follow the procedure below to initiate an emergency Emergency Alarm and Emergency Call. -
Page 19: Message
Digital Conventional Functions and Operations Message ■ :The message is not sent successfully. In this case, ● you can resend it. To access this item, press the Menu key in the home screen When the Outbox is full, the oldest message will be and then select "Message". -
Page 20: Color Code
Digital Conventional Functions and Operations Color Code To delete all call entries in the Missed/Incoming/Outgoing ■ ● Call list, select "Call Log -> Missed/Incoming/Outgoing Color code is used to identify a system. Users who wish to Call -> Selected Call -> Delete All". communicate with each other are assigned with the same color code. -
Page 21: Analog Conventional Functions And Operations
Analog Conventional Functions and Operations DMO and RMO CTCSS/CDCSS Type ■ ■ This option allows you to configure the current channel with Your radio supports both DMO and RMO modes. a specific Rx CTCSS/CDCSS type. When the radio receives DMO: You can set the Rx frequency of your radio to be ●... -
Page 22: Cdcss Invert
Analog Conventional Functions and Operations CDCSS Squelch Level ■ The radio checks for CDCSS match when receiving a signal This option can reduce background noise by adjusting the on the current channel. squelch level when the radio is receiving signals. You may Follow the procedure below to set CTCSS/CDCSS Type to set the squelch level to Tight, Normal, or Open using the CDCSS. -
Page 23: Dmr Trunking Functions And Operations
DMR Trunking Functions and Operations Note: A license is required for accessing the DMR The radio registers with another base station. The radio registers with another base station. ● ● trunking system. Contact your dealer for details. Call Registering ■ ■... - Page 24 DMR Trunking Functions and Operations Making a Call through Contact or Call Log Receiving a Private Call ● Procedure: When a private call is received, the alert tone is given and 1. Press the Menu key to enter the main menu. the incoming call icon is displayed on the LCD display.
-
Page 25: Group Call
DMR Trunking Functions and Operations Conversation Limit The preset time expires. ● The calling party ends the ongoing call. ● When a private call is established, both the calling party and Signal of base station is missing. ● the called party will display the call duration in real time. Group Call Making a Group Call You can make a group call through any of the following... - Page 26 DMR Trunking Functions and Operations Making a Call through Redial or Backdial List The radio is powered on. ● ● The Group Call Selector knob is rotated to the group in Procedure: ● operation. 1. In the home screen, press the key to access The radio exits from another group call.
- Page 27 DMR Trunking Functions and Operations Conversation Limit Ending a Call When a group call is established, both the calling party and The voice communication will be terminated when one of the the called party will display the call duration in real time. following situations occurs: No operation (PTT key press) is performed within the ●...
-
Page 28: Emergency Call
DMR Trunking Functions and Operations Emergency Call Priority Call In the normal voice calls, priority call has the highest priority. Emergency Call can be either emergency private or group You may follow the procedure below to make a priority call. call. -
Page 29: Contact
DMR Trunking Functions and Operations Contact Group Call Contact ■ To access this item, press the Menu key in the home screen You can save up to 256 entries of group call contact and then select “Contact”. information in the list. To access this list, select “Contact -> Group Call Contact”. -
Page 30: Message
DMR Trunking Functions and Operations Message ■ : The message is not sent successfully. In this case, ● you can resend it. To access this item, press the Menu key in the home screen When the Outbox is full, the oldest message will be and then select “Message”. -
Page 31: Call Log
DMR Trunking Functions and Operations Call Log in the home screen. You can save up to 10 entries in the ■ Redial List and Backdial List respectively. The oldest entry To access this item, press the Menu key in the home screen will be overwritten by the latest one automatically. -
Page 32: Backdial List
DMR Trunking Functions and Operations Hunt To delete all call entries in the list, select "Redial List -> ● ■ Selected Call -> Delete All". In the DMR system, the terminal is required to register with a base station for normal work. Before registering, the terminal Backdial List will hunt through the control channels for available base All incoming calls are saved in the Backdial List. -
Page 33: Team Hunt
DMR Trunking Functions and Operations is achieved after comprehensive hunt, the hunt will go on with channel on which the radio currently registers is lost, it will hunt through the channels available in the saved the Fixed TSCC List. The hunt process will cycle until the radio successfully registers with a base station. -
Page 34: Subgroup
DMR Trunking Functions and Operations Subgroup Remote Remove Radio Service ■ ■ A subgroup is a group of group call contacts. Your radio The authorized dispatcher is able to permanently disable a supports up to 2048 group call contacts and 32 subgroups, radio remotely. -
Page 35: Emergency
DMR Trunking Functions and Operations Emergency ■ Emergency Alarm Emergency Call If the Emergency Alarm option is selected, your radio only If the Emergency Call option is selected, your radio only sends emergency alarm requests upon emergency activation. transmits emergency call upon emergency activation. You may follow the procedure below to initiate an emergency You may follow the procedure below to initiate an emergency alarm. -
Page 36: Mpt Trunking Functions And Operations
MPT Trunking Functions and Operations Call Note: A license is required for accessing the MPT ■ trunking system. Contact your dealer for details. To ensure that your speech is clear, keep the microphone Registering 2.5 to 5 cm from your mouth. ■... - Page 37 MPT Trunking Functions and Operations Voice Communication Making a Call through Redial or Backdial List ● Procedure: After a private call is established, either the calling party or 1. In the home screen, press the key to access the called party can make a voice call only if the PTT key is the Redial or Backdial List.
-
Page 38: Group Call
MPT Trunking Functions and Operations Ending a Call Making a Call ia Manual Dial ● Procedure: The voice communication will be terminated when one of the 1. In the home screen, input a group call number using following situations occurs: the keypad. - Page 39 MPT Trunking Functions and Operations Late Entry Join a Group Call via Manual Dial After a group call is established, it allows other group You can initiate a group call by inputting the group ID that is not covered in Group Call Contact using the keypad. After members to join this call.
-
Page 40: All Call
MPT Trunking Functions and Operations All Call At the Calling Party ● A countdown timer is displayed to the calling party to All Call in System is available in the MPT system. show the remaining time for a call. The time period is programmed by your dealer. -
Page 41: Broadcast Call
MPT Trunking Functions and Operations Broadcast Call Call Log ■ Broadcast call can only be broadcast group call. In a To access this item, press the Menu key in the home screen broadcast call, the calling party can only transmit voice and then select “Call Log”. -
Page 42: Redial Or Backdial List
MPT Trunking Functions and Operations Redial or Backdial List To delete all call entries in the list, select "Redial List -> ■ ● Selected Call -> Delete All". To access the Redial or Backdial List, press the in the home screen. Either of the two lists can save up to 10 Backdial List entries. -
Page 43: Hunt
MPT Trunking Functions and Operations Hunt with the Fixed TSCC List. The hunt process will cycle until ■ the radio successfully registers with a base station. In the MPT system, the terminal is required to register with a base station for normal work. Before registering, the terminal will hunt through the control channels for available base Team Hunt stations. -
Page 44: Team Hunt List
MPT Trunking Functions and Operations Team Hunt List TSCC Hunt With this option, you can enable your radio to register with a This option is used to determine whether a selected channel base station by inputting the ID of an available control team to be searched repeatedly during radio registration. -
Page 45: Subgroup
MPT Trunking Functions and Operations Subgroup Emergency ■ ■ A subgroup is a group of group call contacts. Your radio Your radio supports one emergency mode: Emergency Call. supports up to 2048 group call contacts and 32 subgroups, You may follow the procedure below to initiate an emergency with a maximum of 64 group call contacts per subgroup. -
Page 46: Optional Accessories
Optional Accessories The following items are the main optional accessories for the product. Consult your local dealer for more other accessories. Remote Speaker 3400 mAh Battery Programming Cable Wireless PTT Bluetooth Headset C-Shell Earset Microphone EB342L EPC01 EPTTB01 EEWB03E EEHN011 EMRN011 Police Full Bone Fireman Full Bone... -
Page 47: Troubleshooting
Troubleshooting Phenomena Solution Analysis The battery may be improperly installed. Remove the battey and attach it again. The radio cannot be The battery may run out. Recharge or replace the battery. powered on. The battery may suffer from poor contact Clean the battery contacts. -
Page 48: Limited Warranty
What This Warranty Covers and for How Long Shenzhen Excera Technology Co., Ltd. warrants the Excera manufactured products listed below against defects in material and workmanship under normal use and service for a period of time from the date of purchase as scheduled below:... -
Page 49: Warranty Card
Warranty Card Purchase Information Customer Name: Customer Phone: Customer Address: Purchase Date: Radio Information Model Number: Serial Number: Note: This warranty card applies to after-sale and maintenance services for the product and accessories described above. ● You must provide this warranty card and purchase invoice in order to get warranty services. ●... - Page 50 Compliance with RF Exposure Standards Excera 2-way radio complies with the following RF energy exposure standards and guidelines: • United States Federal Communications Commission, Code of Federal Regulations; 47 CFR §§...
- Page 51 Antenna should be kept away from eyes. • When worn on the body, always place the radio in a Excera’s approved clip, holder, holster, case, or body harness for this product. Using approved body-worn accessories is important because the use of Excera’s or other manufacturer’s non-approved accessories...
Need help?
Do you have a question about the EP8100 U2 and is the answer not in the manual?
Questions and answers