
Related Manuals for Echo LAYLA 24


Summary of Contents for Echo LAYLA 24
- Page 1 LapTop LapTop LapTop LapTop LAYLA LAYLA LapTop LapTop LapTop LapTop MONA MONA ™ ™ GINA ™ Owner’s Manual Version 3.0 for Macintosh Designed and Manufactured in the U.S. by Echo Corporation...
- Page 2 Echo hardware. Do not install or operate your Echo hardware near sources of water or moisture such as sinks, damp basements, leaky roofs, etc. 6. Heat – Your Echo hardware should be situated away from sources of heat such as heaters or radiators.
- Page 3 Products returned without an RA number will be refused. Echo may, at its option, require proof of the original date of purchase in the form of a dated copy of the original authorized dealer’s invoice or sales receipt.
-
Page 4: Table Of Contents
INTRODUCTION....................5 ..........5 HOULD ECEIVED IN THE CHECKING OUT YOUR MAC................7 SOFTWARE INSTALLATION ................8 HARDWARE INSTALLATION................10 PCI C .......10 NSTALLING THE ARD FOR ESKTOP OMPUTERS ......12 NSTALLING THE DAPTER FOR APTOP OMPUTERS 24’ ......13 ONNECTING TO AYLA MOUNT UDIO NTERFACE ’ .......17 ONNECTING TO MOUNT... -
Page 5: Introduction
Checking out your Mac – all products Introduction Thank you for choosing Echo Digital Audio. We think you’ll find your Echo product to be an extremely flexible, high-performance tool for your computer- based hard disk recording system. What You Should Have Received in the Box When you opened the box, you should have found the following: •... - Page 6 • Peripheral audio equipment, such as a mixer, microphones, studio monitors, musical instruments, etc. Note: Echo will not be able to supply technical support for any non-Apple brand Macintosh clone computers. In addition, your Echo hardware may not work properly if you have a processor upgrade card installed.
-
Page 7: Checking Out Your Mac
1. Do you have enough memory? With your mouse select “About This Computer” from the “Apple” menu. Look at the amount of “Built-in Memory.” You will need at least 128MB to use your Echo hardware properly. We strongly recommend having at least 256 MB. -
Page 8: Software Installation
Software Installation – all products Software Installation The first step is to install the software needed to support your Echo hardware. 1. Power up. Power up your Macintosh. 2. Start the Installer. Insert the Installation CD into your CD-ROM drive. - Page 9 3. Install the software. Now you will be able to choose where the Echo24 Console software is installed. The default setting will create a folder called “Echo” on your main hard drive. When you are ready, click the Install button. The installer will now create the folder where you told it to and place the Console, the ASIO driver, and this manual inside it.
-
Page 10: Hardware Installation
Once you have checked your system requirements, verified that there are no problems with your system, and installed your ASIO-based software, it is time to install the Echo hardware into your computer. Please refer to the section in your Macintosh manual for installing a PCI card. - Page 11 Then be sure to locate the rack-mount box in a secure location. Plug one end of the cable into the connector on the Echo PCI card that now protrudes through the back panel of your computer, and secure the cable using the built-in screws located on both sides of the connector.
-
Page 12: Installing The Cardbus Adapter For Laptop Computers
Hardware installation – all products Installing the CardBus Adapter for Laptop Computers 1. Locate the rack-mount interface, the 9-pin interface cable, and the power cable. Securely mount the interface into your equipment rack. If you will not be mounting the box in a rack, remove the backing from the four rubber feet and place one in each bottom corner of the interface unit. -
Page 13: Connecting To Layla24'S Rack-Mount Audio Interface
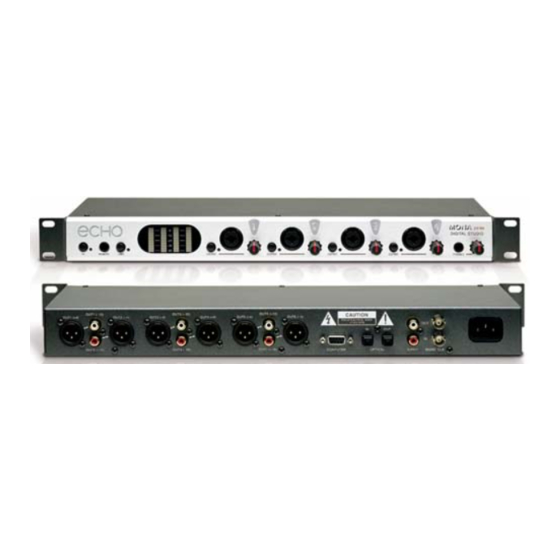
Audio connections – Layla24 Connecting to Layla24’s Rack-mount Audio Interface The back panel of Layla24’s rack-mount audio interface contains a wide variety of connections that allow great flexibility in the operation of Layla24. For optimal performance with Layla24, it is critical to use the appropriate cabling and connectors. - Page 14 A cable was supplied with your Layla24 for this purpose. This custom made cable is manufactured to certain specifications; if you need to replace it, you should only use a replacement cable from Echo. ADAT / S/PDIF Optical I/O Next to the COMPUTER connector is a pair of connectors labeled OPTICAL, IN and OUT.
- Page 15 Audio connections – Layla24 S/PDIF Next to the ADAT connectors is a pair of connectors labeled S/PDIF, IN and OUT. These S/PDIF connectors are used to transmit digital data among digital audio devices via an electrical signal. S/PDIF data can use the full 24-bit sample width used internally on Layla24.
- Page 16 Audio connections – Layla24 MIDI The last set of connections to the Layla24 interface is for MIDI. The MIDI ports can be used for receiving MIDI time code (MTC), or sending MIDI signals from your digital audio/MIDI sequencing software to external sound modules, etc. MIDI cabling is highly standardized and widely available.
-
Page 17: Connecting To Mona's Rack-Mount Audio Interface
Audio connections - Mona Connecting to Mona’s Rack-mount Audio Interface The back panel of Mona’s rack-mount audio interface contains a wide variety of connections that allow great flexibility in the operation of Mona. To achieve the optimal performance with Mona, it is critical that the appropriate cabling and connectors are used. - Page 18 Audio connections - Mona Mona provides 48 volts of phantom power for microphones that require it. To enable phantom power press the button labeled +48V (the LED next to it will light up) and phantom power will be provided to all microphone inputs. Note: Phantom power will not be applied to any line level equipment or guitars plugged in using ¼”...
- Page 19 Audio connections - Mona Mona’s Guitar Input (1/4” Plug, Impedance: 107K, Trim: 10 – 50dB) An input impedance of 10K is too low to record non-active guitar pickups, so each input also has its own GUITAR switch. When the GUITAR switch is pushed in (green indicator lit), the input impedance is increased to 107K and the trim knob has a range of 10 to 50dB.
- Page 20 Mona PCI card inside your computer. A cable was supplied with your Mona for this purpose. This custom made cable is manufactured to certain specifications; if you need to replace it, you should only use a replacement cable from Echo. Audio connections - Mona...
- Page 21 Audio connections - Mona ADAT/S/PDIF optical I/O Next to the COMPUTER connector is a pair of connectors labeled OPTICAL, IN and OUT. These connectors are used to transmit digital data among digital audio devices via an optical signal. You can use this port for ADAT (8 channels) or for optical S/PDIF (stereo) I/O. Note: Mona is only capable of transmitting or receiving one type of digital signal at a time.
- Page 22 Audio connections - Mona S/PDIF Next to the ADAT connectors is a pair of connectors labeled S/PDIF, IN and OUT. These S/PDIF connectors are used to transmit digital data among digital audio devices via an electrical signal. S/PDIF data can use the full 24-bit sample width used internally on Mona.
- Page 23 Audio Connections – Gina24 Connecting to Gina24’s Audio Interface The back panel of Gina24’s audio interface contains a wide variety of connections that allow great flexibility in the operation of Gina24. To achieve the optimal performance with Gina24, it is critical that the appropriate cabling and connectors are used.
- Page 24 A cable was supplied with your Gina24 for this purpose. This custom made cable is manufactured to certain specifications; if you need to replace it, you should only use a replacement cable from Echo. Please Note: The Gina24 cable is NOT interchangeable with Darla24 or Gina (20-bit) cables.
- Page 25 Audio Connections – Gina24 S/PDIF Next to the ADAT connectors is a pair of connectors labeled S/PDIF, IN and OUT. These S/PDIF connectors are used to transmit digital data among digital audio devices via an electrical signal. S/PDIF data can use the full 24-bit sample width used internally on Gina24.
-
Page 26: Connecting To Mia
Audio Connections – Mia Connecting to Mia Analog Inputs and Outputs Mia has two analog outputs (OUT1 and OUT2) and two analog inputs (IN1 and IN2) on the back. The input and output connections can accept balanced or unbalanced jacks via ¼” connectors. Both the inputs and outputs are set to receive or send a +4 dBu (balanced) signal. -
Page 27: Asio Driver Installation & Configuration
ASIO; Sound Manager is not supported. 1. Find it. Find the ASIO Echo24 file in the newly created Echo folder. 2. Copy it. Create a copy of this file. You will need one copy for every ASIO based software program you have installed. -
Page 28: Oms Setup (Layla24 Only)
If you want to use MIDI input and output on your Layla24, you will need to use Opcode’s OMS. 1. Install OMS. OMS is included on the CD that came with your Echo product; just open the OMS folder and double-click the installer. - Page 29 OMS setup – Layla24 3. Create a New Studio Setup. Go to the File menu and click New Studio Setup. Click OK. A new window will come up. Click Search. OMS will search for any new equipment, and then you should see Layla24 recognized in a window like this: OMS setup –...
- Page 30 OMS setup – Layla24 4. Verify that the Echo OMS driver is recognized. The OMS Driver Setup window recognizes MIDI hardware drivers in your system. If there is something missing, then refer to your OMS manual and follow the instructions. If everything is OK, then click OK. Now you will see the OMS MIDI Device Setup window.
- Page 31 OMS setup – Layla24 6. Save the new studio setup. Now you will be asked to save the new studio setup. You can overwrite your old setup with the same name or create a new one. Click Save when you’re done and you’ll see a window displaying your new setup.
-
Page 32: Install Cubasis
Your Echo hardware comes with Steinberg’s Cubasis VST. This is a great way to get started with digital recording. To install Cubasis VST: 1. Insert the CD. Insert the Echo CD-ROM into your Mac and open the “Cubasis VST” folder. 2. Run the installer. Double-click on the “Cubasis OEM Installer”... -
Page 33: The Console - Gina24, Layla24, And Mona
A “virtual control surface” application called the Console is included with the Mac driver. The Console allows you to control the audio I/O and clocking functions of your Echo hardware, and it brings these controls to a single easy-to-use location. From the console you can control the output levels, select synchronization clocks, select the digital mode, and adjust input monitoring. - Page 34 Console – Mia Here’s a picture of the console for Layla24 (Gina24 and Mona are similar) Bus select: The bus select panel is the area outlined in green. Eight different output busses are shown here: four analog busses in the top row and four digital busses on the bottom row.
- Page 35 Console – Mia currently controlling everything mixed to analog outputs 1 and 2. These channels correspond to the currently selected button on the bus select panel. The two buttons labeled “+4” are the nominal level select buttons. Since they both read “+4,” this indicates these outputs are sending a +4dBu (professional level) signal.
- Page 36 Console – Mia buttons here either; this is because Mona’s input level is controlled on its audio interface box. Below the “nominal level” button is the peak meter for this channel, labeled in decibels. The red segment of the peak meter starts at –3 dB and the yellow starts at –12 dB.
-
Page 37: Menus
S/PDIF device to the digital output of your Echo card, try changing this setting. The “Active Card” menu is used when you have more than one Echo card; use this menu to switch between the different cards. -
Page 38: The Console - Mia
A “virtual control surface” application called the Console is included with the Mac driver. The Console allows you to control the audio I/O and clocking functions of your Echo hardware, and it brings these controls to a single easy-to-use location. From the console you can control the output levels, select synchronization clocks, select the digital mode, and adjust input monitoring. - Page 39 Console - Mia or digital outputs in any combination. You therefore have eight virtual outputs that are mixed down to the four physical outputs. Here’s a picture of the console for Mia: Bus select: Let’s start with the area within the green outline on the right.
- Page 40 Console - Mia At the top of this area you will see the label “Analog out 1-2”. This indicates that you are currently controlling everything that will be mixed out to analog outputs 1 and 2, which corresponds to the green “A 1-2” on the bus select panel.
- Page 41 Console - Mia Next is the monitor mute. This controls whether or not you want this input channel to be mixed directly back out to the currently selected output bus. Again, this does not affect recording. This is followed by the monitor fader. This controls the input monitor level. Once again, this does not affect your record level.
-
Page 42: Menus
Some S/PDIF devices need to see one format or another. If you are having trouble connecting a S/PDIF device to the digital output of your Echo card, try changing this setting. The “Active Card” menu is used when you have more than one Mia; use this menu to switch between the different cards. -
Page 43: Synchronizing Multiple Devices
The Mac drivers included in this package support multiple Echo cards within the same system. In addition, your new Echo hardware will operate alongside other Echo products. Echo hardware can also peacefully coexist with audio equipment from other manufacturers, but be aware that operating alongside another product is not the same as operating with it. - Page 44 Esync – Esync is a proprietary form of super clock that is used to synchronize two or more Echo 24-bit products like Layla24, Mona, Gina24, and Darla24. While Gina24 and Darla24 have both input and output connectors on their PCI cards, Layla24 and Mona only have the Esync output connectors, and Mia has no Esync connectors.
- Page 45 Synchronization – all products Now let’s take a look at some sample configurations and how you might set them up from a synchronization standpoint. Let’s start simple. Suppose that Layla24 is the only audio device used in your system. Since you have no other devices to synchronize with, simply select Internal for Layla24’s input clock.
-
Page 46: Asio Direct Monitoring
Typically, this adds latency, meaning that the audio you hear on the outputs is delayed from the inputs. Your Echo hardware has an on-board DSP chip which can also handle mixing inputs to outputs. Since this is done on the DSP, it lightens the load on the PowerPC chip and has virtually no latency. - Page 47 Using hardware and software monitoring simultaneously won’t hurt anything, but you’ll get a noticeable delay effect in your outputs (kind of like a slapback echo) since the hardware and software monitors have different latencies. The best method, therefore, is to mute the monitors in the console and to control your software monitoring from within your audio application.
-
Page 48: Asio Control Panel
The topmost setting, “Use 96 kHz capable cards only,” doesn’t apply to just using one Echo card by itself. This setting only applies in the following scenario: •... - Page 49 ASIO control panel – all products Say, for example, you have a Layla24 and a Mona. Congratulations on your superb taste in purchasing not one but two Echo products. However, say you set Layla24 to ADAT mode and Mona to S/PDIF mode.
-
Page 50: Contacting Customer Service
Customer service – all products Contacting Customer Service If you experience any trouble with your Echo hardware please go to the support area of our website at www.echoaudio.com and check out the tutorials & troubleshooting FAQ’s we have there. If you can’t find a solution to your problem there, please fill out the provided technical support email form. -
Page 51: Appendix A: General Troubleshooting Guide
Solution: Your Echo hardware is not compatible with processor upgrade cards. It only supports genuine Apple processors without upgrades. You will have to uninstall the processor upgrade card to get your Echo card to work again with your computer. Problem: You can’t get your Echo card to work under OS X. - Page 52 If you have a DAT deck that is not able to read the S/PDIF output from your Echo card, chances are the card is transmitting in the mode that the deck is not equipped to handle.
- Page 53 Problem: (Layla24, Mona, and Gina24) You keep hearing a high-pitched squealing sound or your S/PDIF or ADAT signal has gone crazy. Solution: Reset the sample rate of your Echo card. You may have set the sample rate to 11kHz or 22kHz. Because neither S/PDIF nor ADAT support these rates, you will have problems syncing until you reset the sample rate to one within spec (like 44.1 or 48kHz).
- Page 54 Solution: Not all ¼” plugs are made to the exact same dimensions. Try a plug/cable from a different manufacturer.
-
Page 55: Appendix B: Asio Audio Software Faq
Metro 5.0 Echo24 ASIO Driver and ASIO 2.0 Q: Can I use all Echo cards together at the same time in my ASIO program? No. There are two different Echo ASIO drivers. One is for the older Echo hardware (Layla, Gina, Darla & Darla24). The other is for the new hardware (Gina24, Layla24, Mia &... -
Page 56: Appendix C: Introduction To Digital Recording
Appendix C: Introduction to Digital Recording Converting Sound into Numbers In a digital recording system, sound is represented as a series of numbers, with each number representing the voltage, or amplitude, of a sound wave at a particular moment in time. The numbers are generated by an analog-to- digital converter, or ADC, which converts the signal from an analog audio source (such as a guitar or a microphone) connected to its input into numbers. - Page 57 Figure B. The more bits there are available, the more accurate the representation of the signal and the greater the dynamic range. Your Echo hardware’s analog inputs use 24-bit ADCs, which means that the incoming signal can be represented by any of over 16 million possible values.
- Page 58 Nyquist Theorem. When dealing with full-bandwidth sound (20Hz−20kHz), you should sample at greater than 40,000 times per second (twice 20kHz). Your Echo hardware allows you to sample at rates up to 96,000 times per second. If the sampling rate is lower than the frequency you are trying to record, entire cycles of the waveform will be missed, and the result will not resemble the proper waveform.
- Page 59 Storing Digital Data Once the waveform has been transformed into digital bits, it must be stored. When sampling in stereo at 48kHz using a 20-bit word size, the system has to accommodate 1,920,000 bits per second. Though this is a lot of data, it is well within the capabilities of personal computers.
- Page 60 The difference between the nominal level and the loudest signal that can be recorded without clipping is called “headroom”. Your Echo hardware provides approximately 14dB of headroom allowing an 18dBu signal (9.8 volts or 28...
- Page 61 The three sections of a TRS connector are used to transmit the three components of a balanced signal (T = plus, R = minus, S = ground). Your Echo hardware can also accommodate the two conductor unbalanced style connector.
- Page 62 96dB. Two questions immediately come to mind: Why does my Echo hardware only have a dynamic range of 106 dB? For mastering 16-bit CDs with a dynamic range of 96dB, isn’t anything more than 96dB just overkill? First, today’s analog to digital converters typically produce a full-scale input...
-
Page 63: Appendix D: Specifications
Appendix D: Specifications Gina24 - Audio Performance Analog Inputs (x2 balanced TRS): Frequency Response: 10Hz – 22kHz, 0.25dB ± Dynamic Range: 108dB A-weighted THD+n: <0.001%, 20Hz–22kHz A-weighted Nominal Input Level: +4dBu Maximum Input Level: +18dBu Input Impedence: 10K Analog Outputs (x8 balanced TRS): Frequency Response: 10Hz –... - Page 64 Gina24 - Hardware Host Interface: PCI bus mastering card Two balanced ¼” analog inputs with precision 24-bit 128x oversampling analog-to-digital converters Eight balanced ¼” analog outputs with high performance 24-bit 128x oversampling digital-to-analog converters S/PDIF digital I/O with up to 24-bit resolution ADAT optical digital I/O Headphone output with volume control On-board 24-bit Motorola DSP...
- Page 65 Layla24 - Audio Performance Analog Inputs (x8 balanced TRS): Frequency Response: 10Hz – 22kHz, 0.25dB ± Dynamic Range: 110dB A-weighted THD+n: <0.001%, 20Hz–22kHz A-weighted Nominal Input Level: +4dBu Maximum Input Level: +22dBu Input Impedence: 10K Analog Outputs (x8 balanced TRS): Frequency Response: 10Hz –...
- Page 66 Layla24 - Hardware Host Interface: PCI bus mastering card Eight balanced ¼” analog inputs with precision 24-bit 128x oversampling analog-to-digital converters Eight balanced ¼” analog outputs with high performance 24-bit 128x oversampling digital-to-analog converters S/PDIF digital I/O with up to 24-bit resolution ADAT optical digital I/O Headphone output with volume control On-board 24-bit Motorola DSP...
- Page 67 Mona -Audio Performance Analog Inputs (x4): Frequency Response: 10Hz – 22kHz, 0.25dB ± Dynamic Range: 110dB A-weighted THD+n: <0.001%, 20Hz–22kHz Nominal Input Level: +4dBu Maximum Input Level: +22dBu Microphone Input Level (balanced XLR): EIN: -129dBV Input Impedance: 1.5K Gain Adjustment: 20 – 60dB Line Input Level (balanced TRS): Input Impedance: 10K Gain Adjustment: 0 –...
- Page 68 Nominal Output Level: -10dBV Maximum Output Level: +8dBV Mona - Hardware Host Interface: PCI bus mastering card Four high quality mic preamps with phantom power (+48v) Four universal analog inputs with precision 24-bit 128x oversampling analog-to-digital converters Six analog outputs (both XLR & RCA) with high performance 24-bit 128x oversampling digital-to-analog converters S/PDIF digital I/O with up to 24-bit resolution ADAT optical digital I/O...
- Page 69 Mia - Audio Performance Analog Inputs (x2 balanced TRS): Frequency Response: 10Hz – 22kHz, 0.5dB ± Dynamic Range: 106dB A-weighted THD+n: <0.001%, 20Hz–22kHz Nominal Input Level: +4dBu Maximum Input Level: +18dBu Input Impedence: 10K Analog Outputs (x2 balanced TRS): Frequency Response: 10Hz – 22kHz, 0.5dB ±...
- Page 70 Mia - Hardware Host Interface: PCI bus card PCI bus master interface Two balanced ¼” analog inputs with precision 24-bit 64x oversampling analog-to-digital converters Two balanced ¼” analog outputs with high performance 24-bit 128x oversampling digital-to-analog converters S/PDIF digital I/O with up to 24-bit resolution On-board 24-bit Motorola DSP 24-bit data resolution maintained throughout entire signal path Multiple sample rates from 8kHz to 96kHz...
- Page 71 ....18 contacting customer service..51 MIDI......... 17 contents ........6 MIDI time code......17 MTC ......... 17 multiple Echo cards ....56 decibels ........60 digital data........ 60 digital recording ....... 57 nominal levels ......61 digital-to-analog converter..57 Direct Monitoring ..
- Page 72 processor ........8 specifications ......64 processor upgrade card ..8, 52 static electricity, discharging 11 professional mode ....52 synchronization....44, 54 professional output setting..53 synchronizing multiple devices44 system requirements ..7 rack-mount box, installing . 12, 13 recording, pops or skips ...
Need help?
Do you have a question about the LAYLA 24 and is the answer not in the manual?
Questions and answers