
Subscribe to Our Youtube Channel
Related Manuals for Broyhill LEGACY CASTLE PINES RVS9431


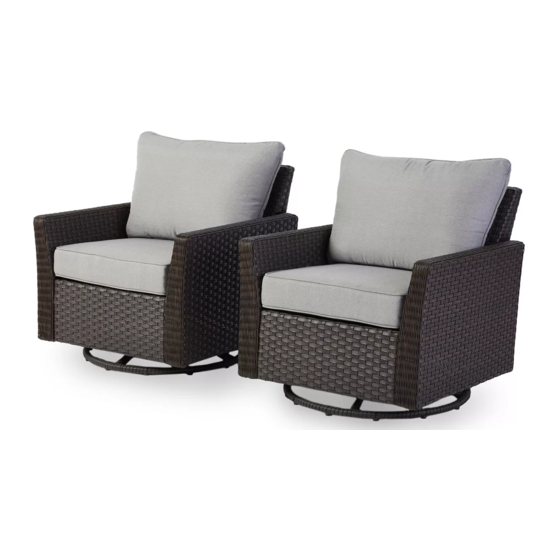
Summary of Contents for Broyhill LEGACY CASTLE PINES RVS9431
- Page 1 ASSEMBLY INSTRUCTION ITEM#: RVS9431 SKU#: 810487338 C A S T L E P I N E S 2 P C S W I V E L G L I D E R S 1 (877) 539 – 7436 Need help? We are here for you! •...
- Page 2 GENERAL BEST PRACTICES FOR ASSEMBLY: Read all instructions before starting Clear a at covered space to begin assembly Always best to do it with a friend Note that hardware required is provided for every step Pay attention to orientation Letter of the part corresponds to a sticker on the product Number of the hardware corresponds to its letter in the package Helpful hints provided along the way Retain these assembly instructions for future reference.
- Page 3 PARTS LIST PART MATERIAL CODE PART Q’TY 17C01A0810001YX BOLT M8*30 RVS9431-CS03-1 17C01A0814001YX BACK ASSEMBLY BOLT M8*40 RVS9431-CS02-1 17FA05040301-YX SEAT ASSEMBLY WASHER d6.5*D13*1.0 RVS9431-CS01-2 17FA05100701-YX WASHER d6.5*D30*2.0 RVS9431-CS14-1 17FA08060601-YX SUPPORT FRAME WASHER d8.5*D17*1.6 RVS966Z-CS19-1 17FD08300501-YX WASHER d8.5*D12.5*1.5 SEAT POST 18000744004 17FC08030801-YX DECORATIVE WASHER d8.5*D12*2.1 PLASTIC COVER...
- Page 4 STEP 1 PARTS REQUIRED: 3, 8, 11, & 16 Keep the bolts loose. STEP 2 PARTS REQUIRED: 1, 3, 9, & 13 Keep the bolts loose. PAGE 3 OF 7 E-320...
- Page 5 STEP 3 PARTS REQUIRED: 2, 3, 9, & 13 Keep the bolts loose. STEP 4 PARTS REQUIRED: 1, 2, 10, 13, & 18 Keep the bolts loose. PAGE 4 OF 7 E-320...
- Page 6 STEP 5 PARTS REQUIRED: 4, 8, 11, & 16 Keep the bolts loose. STEP 6 PARTS REQUIRED: 4, 5, 12, 15, 17, & 19 Tighten all bolts by using the supplied Hex key. PAGE 5 OF 7 E-320...
- Page 7 STEP 7 PARTS REQUIRED: 6 & 7 STEP 8 PARTS REQUIRED: 5, 7, 9, & 14 Note: For ease with installation, we recommend that the seat post (#5) be slightly olied or waxed before fastening it to the base assembly (#7). PAGE 6 OF 7 E-320...
- Page 8 STEP 9 PARTS REQUIRED: 20 & 21 Caution: To ensure one’s safety during use of this swivel glider, make sure that all of the bolts are completely tightened. This chair has the ability to swivel; therefore use by young children should be adult supervised. Warranty •...
Need help?
Do you have a question about the LEGACY CASTLE PINES RVS9431 and is the answer not in the manual?
Questions and answers