Advertisement
Quick Links
Advertisement

Subscribe to Our Youtube Channel
Related Manuals for CHIEF WP2 S Series


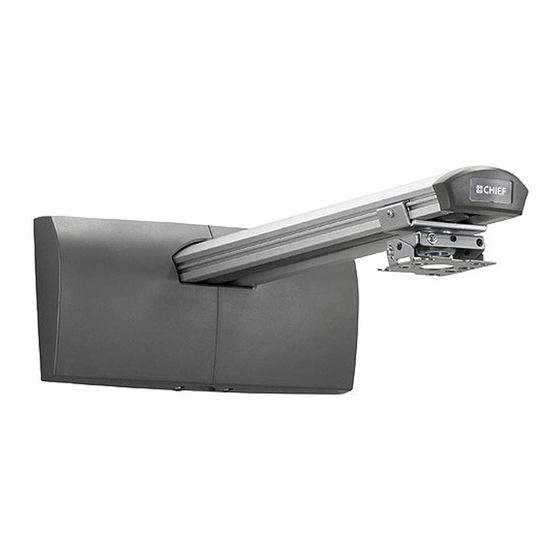
Summary of Contents for CHIEF WP2 S Series
- Page 1 I N S T A L L A T I O N I N S T R U C T I O N S WP2XS WP2XUS Short Throw Projector Wall Mounts Spanish Product Description German Product Description Portuguese Product Description Italian Product Description Dutch Product Description French Product Description...
-
Page 2: Installation Instructions
IMPORTANT ! : The WP2XS and WP2XUS mounts are designed to be mounted to: Chief® is a registered trademark of Milestone AV Technologies. All rights reserved. • a bare 8" concrete wall; •... - Page 3 Installation Instructions WP2XS, WP2XUS DIMENSIONS WP21S/US 8.62 219.0 1.00 25.4 1-1/2" PIPE THREAD ATTACH PROJECTOR MOUNT HERE DIMENSIONS: INCHES [MILLIMETERS]...
- Page 4 WP2XS, WP2XUS Installation Instructions LEGEND Tighten Fastener Pencil Mark Apretar elemento de fijación Marcar con lápiz Befestigungsteil festziehen Stiftmarkierung Apertar fixador Marcar com lápis Serrare il fissaggio Segno a matita Bevestiging vastdraaien Potloodmerkteken Serrez les fixations Marquage au crayon Loosen Fastener Drill Hole Aflojar elemento de fijación Perforar...
-
Page 5: Tools Required For Installation
Installation Instructions WP2XS, WP2XUS TOOLS REQUIRED FOR INSTALLATION 5/32" Hardware required, not included: 5/32" (security) Steel Stud Install (included) 4 - Toggler® 1/4-20 (BB) Snap-Toggle 4 - Grade 2 or better 1/4-20 x 1-3/4" Phillips 1/4" (included) pan head screws 4 - Grade 2 or better 1/4"... - Page 6 WP2XS, WP2XUS Installation Instructions INSTALLATION Wood Studs Installation Determine mounting location on wall. Use a stud finder to The WP2XS/WP2XUS short throw projector mounts are locate studs. designed to be mounted to an 8" concrete, 8"x8"x16" concrete Using wall plate (E) as a template, mark four holes through block, 2"...
- Page 7 Installation Instructions WP2XS, WP2XUS Steel Studs Installation Site Requirements WARNING: IMPROPER INSTALLATION CAN LEAD TO EQUIPMENT FALLING CAUSING SERIOUS PERSONAL INJURY OR DAMAGE TO EQUIPMENT! The following figure identifies the minimum requirements for installation of mount onto a steel stud structure.
- Page 8 WP2XS, WP2XUS Installation Instructions IMPORTANT ! : See Site Requirements section before proceeding with Steel Studs installation to ensure Steel Stud installation site meets requirements! The drywall must Drywall have a minimum thickness of 1/2"! Determine mounting location on wall. Use stud finder to locate steel studs.
- Page 9 Installation Instructions WP2XS, WP2XUS 10. Place wall plate (E) over anchors and align mounting holes in wall plate with holes in anchors. (See Figure 8) 11. Insert Grade 2 or better 1/4-20 x 1-3/4" Phillips pan head screws (not included) through Grade 2 or better 1/4" washer (not included), corresponding mounting hole on wall bracket and into Snap-Toggle (not included) and tighten until flush against mount.
- Page 10 WP2XS, WP2XUS Installation Instructions Projector Installation (WP2XUS Models Only) NOTE: Proceed to Adjustments section to continue installation. WARNING: Exceeding the weight capacity can result in serious personal injury or damage to equipment! It is the installer’s responsibility to make sure the weight of the projector does not exceed 25 lbs (11.3 kg).
- Page 11 Installation Instructions WP2XS, WP2XUS Projector Installation (WP2XS Models Only) Tighten the M5x35mm button head cap screw (H) on the wall plate (E). (See Figure 14) WARNING: Exceeding the weight capacity can result in serious personal injury or damage to equipment! It is the installer’s responsibility to make sure the weight of the projector does not exceed 25 lbs (11.3 kg).
-
Page 12: Cable Management (Optional)
WP2XS, WP2XUS Installation Instructions Adjustments Projector Arm Height Adjustment Distance from Wall / Screen Size (See Figure 15) 13. Loosen two Phillips screws (one on left, one on right) on sides of projector arm plate. (See Figure 16) Loosen two Phillips screws (one on left, one on right). 14. - Page 13 Installation Instructions WP2XS, WP2XUS Add Covers Add left and right wall plate covers (B and C) over wall plate (E). (See Figure 18) Fasten covers using four M5 x 12mm Phillips cap head screws (J). (See Figure 18) (J) x 2 (J) x 2 Figure 18 Add end cap (D) to end of short throw projector arm (A).
- Page 14 WP2XS, WP2XUS Installation Instructions...
- Page 15 Installation Instructions WP2XS, WP2XUS...
- Page 16 Europe A Franklinstraat 14, 6003 DK Weert, Netherlands P +31 (0) 495 580 852 F +31 (0) 495 580 845 Chief, a products division of Asia Pacific A Office No. 918 on 9/F, Shatin Galleria Milestone AV Technologies 18-24 Shan Mei Street...
Need help?
Do you have a question about the WP2 S Series and is the answer not in the manual?
Questions and answers