Advertisement
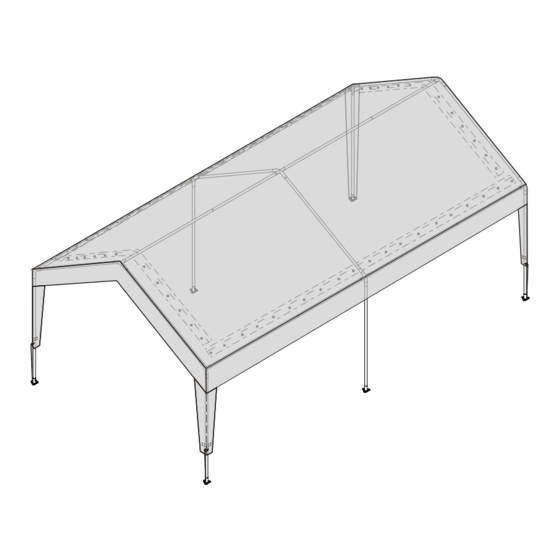
10ft X 20ft Garden Canopy
10ft8in Wide x 20ft Deep x 6ft8in Side Height x
9ft9in Center Height
King Canopy Item #: GC1020BK-CB
With 6 Legs, Black Mesh Cover, Elastic Ball Straps, Foot Pads & Storage Bag
WARNING:
Keep all flame and heat sources
away from this tent fabric. It
is not fire proof. The fabric
will burn if left in continuous
contact with any flame source.
www.northlineexpress.com
1-877-734-2458
Advertisement
Table of Contents

Related Manuals for KING CANOPY GC1020BK-CB


Summary of Contents for KING CANOPY GC1020BK-CB
- Page 1 10ft X 20ft Garden Canopy 10ft8in Wide x 20ft Deep x 6ft8in Side Height x 9ft9in Center Height King Canopy Item #: GC1020BK-CB With 6 Legs, Black Mesh Cover, Elastic Ball Straps, Foot Pads & Storage Bag WARNING: Keep all flame and heat sources away from this tent fabric.
- Page 2 PARTS LIST 6X6PC 6 pc 1 3/8” Diameter 78” Pipe 5X8PC 12 pc 1 3/8” Diameter 68” Pipe 4X6PC 6 pc 1 3/8” Diameter 52” Swaged Pipe 3WPC 6 pc 3-Way Donnectors 4WPC 3 pc 4-Way Connectors FOOTPC 6 pc Steel Foot Pads TGC1020BK 1 pc...
- Page 3 FRAME ASSEMBLY Step 1: Place all corners and pipe on the ground as shown. The swaged pipes are used to form the length of the canopy. Step 2: Start with the center and complete the center frame first. Then assemble each side. (See Dotted Circled Section Above) NOTE: Attach the cover before inserting the legs.
- Page 4 COVER ASSEMBLY Step 1 Unfold the cover with the grommets toward the cover’s bottom and place over the frame. Step 2 Begin attaching the cover with the elastic ball straps by inserting the elastic cord of the ball strap underneath the cover and through the grommet. Then pull cord taut until ball stops. Wrap the cord around the pole and under the ball.
- Page 5 LEG ASSEMBLY NOW, CONNECT THE LEG POLES TO THE ROOF ASSEMBLY WITH THE COVER ALREADY POSITIONED ON TOP OF THE UNIT. Step A: First attach the foot pads to the 6 leg pipes. Step B: Insert the pipe for the middle leg on one side into the 4-way connector, and then insert the cor- ner legs into the 3-way connectors the same way.
- Page 6 ANCHORING YOUR UNIT This canopy is designed for use as a temporary structure. After assembly, the canopy MUST BE securely anchored to the ground to prevent damage from winds. Your canopy will act like a kite in the wind if not properly and securely anchored to the ground.
- Page 7 King Canopy/PIC America, LTD. has no control over wind, snow, ice, rain or any other weather condition and we are in no way responsible for any damage caused by the canopy or to the canopy.
- Page 8 Improper Anchoring, Strong Winds, Rain Snow, or Ice King Canopy/PIC America, LTD. does not guarantee these canopies under strong weather conditions. These canopies are designed to protect against damages caused by sun, rain, tree sap, birds, etc. They are not designed to hold roof loads that accompany snow, ice or heavy rains.
Need help?
Do you have a question about the GC1020BK-CB and is the answer not in the manual?
Questions and answers