Yamaha RS7000 Owner's Manual
Music production studio
Hide thumbs
Also See for RS7000:
- Software manual (17 pages) ,
- Addendum (4 pages) ,
- Service manual (97 pages)
Table of Contents
Advertisement
Quick Links
Download this manual
See also:
Service Manual
Advertisement
Table of Contents

Related Manuals for Yamaha RS7000


Summary of Contents for Yamaha RS7000
-
Page 2: Special Message Section
SPECIFICATIONS SUBJECT TO CHANGE: The information contained in this manual is believed to be cor- rect at the time of printing. However, Yamaha reserves the right to change or modify any of the specifications without notice or obligation to update existing units. - Page 3 Yamaha service personnel. Location • Do not expose the instrument to excessive dust or vibrations, or extreme cold or heat (such as in direct sunlight, near a heater, or in a car during the day) to prevent the possibility of panel disfiguration or damage to the internal...
-
Page 4: Backup Battery
Yamaha cannot be held responsible for damage caused by improper use or modifications to the instrument, or data that is lost or destroyed. Always turn the power off when the instrument is not in use. - Page 5 • Take care to avoid dropping screws into the RS7000 unit. If a screw does fall in, be sure to remove it before you reassemble and power up the unit. Starting the unit with a loose screw inside may lead to improper operation or equipment failure.
-
Page 6: Supplied Accessories
In order to take maximum advantage of the many advanced features and capabilities offered by the RS7000, we urge you to read the manual carefully, and keep it in a safe, readily-accessi- ble location for future reference. * The company names and product names in this Owner’s Manual are the trademarks or registered trademarks of their respective com- panies. -
Page 7: Rs7000 Features
… and more. G AWM2 Tone Generator Even electronic sounds change with the times, and the RS7000 is right up to date. The internal AWM2 tone generator system offers more than 1054 pitched voices, and sound effects, as well as 63 top-quality drum kits —... -
Page 8: Using The Owner's Manual
Then there are jobs to automatically create glides, rolls, crescendos, and other subtleties that can make a huge difference to the musical mood. If you can image it, the RS7000 can probably do it. And when you want to really make detailed refinements, the EDIT mode gives you direct access to individual note and even parameters. -
Page 9: Finding Specific Information
G The Function Tree ...(Page 55) The Function Tree lists all RS7000 functions with page references in a tree-type diagram which is organized by mode. G The Page Footers, Margins, and Headers The area at the bottom of each page shows the page number. The chapter numbers and titles are also listed in the right- most margin of each spread. -
Page 10: Table Of Contents
4. Recording Original Phrases ... 39 5. Add Samples... 43 6. Finalizing Your Sound ... 46 Reference Chapter 1. Basic 1. RS7000 System Overview ... 52 Mode Structure ... 52 Function Tree... 55 2. RS7000 Internal Structure ... 58 The 6 Functional Blocks ... 58 Sequencer ... - Page 11 2. MIDI Setup... 260 3. MIDI Filter ... 262 Chapter 7. Other Information 1. MIDI Basics ... 264 2. MIDI Events Handled by the RS7000 ... 266 Appendix 1. Installing Optional Equipment ... 272 2. Specifications ... 282 3. Troubleshooting ... 286 4.
-
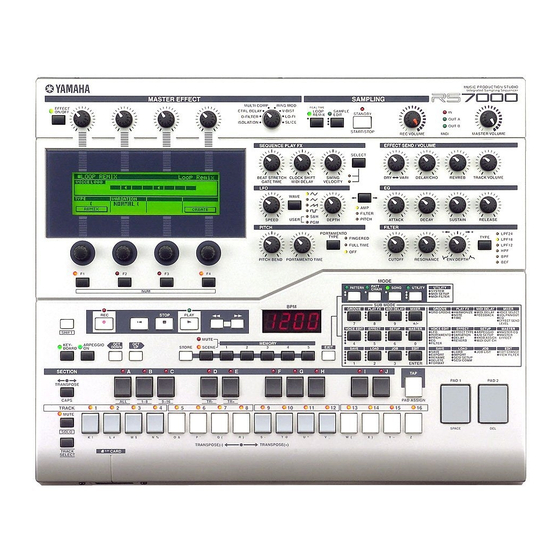
Page 12: The Controls & Connectors
Selects the master effect type. Effect Type Selector SAMPLING MULTI COMP RING MOD CTRL DELAY V-DIST The controls in this group control sampling via the RS7000 D-FILTER LO-FI ISOLATION SLICE INPUT L and R connectors, and allow editing of recorded samples. - Page 13 MIDI IN/OUT Indicator The appropriate lamp will flash when MIDI data is received or transmitted by the RS7000. Use this indicator to confirm MIDI data reception or transmission. [MASTER VOLUME] Control Adjusts the level of the signal appearing at the RS7000 OUTPUT L/MONO and R connectors as well as the PHONES jack.
- Page 14 [TRACK VOLUME] Knob (Page 94) With the initial default settings, this knob provides real- time control of the volume of the currently selected track. 14 RS7000 LFO Knobs In addition to the functions described here, these knobs are fully assignable and can be set up to control a wide range of functions and parameters.
- Page 15 [TYPE] Button (Page 103) Selects the filter type. The settings are selected in sequence each time the button is pressed. FINGERED FULL TIME The Controls & Connectors [ENV. DEPTH] Knob LPF24 TYPE LPF18 LPF12 RESONANCE ENV.DEPTH [TYPE] Button RS7000 15...
- Page 16 Switches to the phrase or song recording display. The indi- cator will light when the button is press to engage the record standby mode. ](Top) Button Goes directly to the top measure of the current pattern or song. 16 RS7000 STOP PLAY MUTE MEMORY STORE...
- Page 17 MODE Buttons Select the main RS7000 operating mode. The indicator above the selected MODE button will light. [PATTERN] Button [SONG] Button MODE PATT PATTERN SONG CHAIN [PATT CHAIN] Button [PATTERN] Button (Page 70) Selects the PATTERN mode. The PATTERN Play and PATTERN Patch modes are selected alternately each time the button is pressed.
- Page 18 [KEYBOARD] Button Determines whether the RS7000 keyboard is to be used as a music keyboard (i.e., to play notes). When you press the [KEYBOARD] button so that its indicator lights, the key- board will function as a music keyboard to play notes.
- Page 19 MODEL SER. NO. MADE IN JAPAN POWER Switch Press in to turn the RS7000 on, and press again to turn it off. AC INLET The AC power cable supplied with the RS7000 is plugged in here. Use only the supplied cable.
- Page 20 OPTICAL OUT B MADE IN JAPAN A range of options are available to give the RS7000 even greater music production capabilities. Recorded samples and samples loaded from memory card must be stored in the internal memory in order to be played.
-
Page 21: Notes On Musical Copyright
Data that was digitally sampled from a CD or other source cannot be saved to a memory card or SCSI disk in WAV format, or transferred via the TWE wave editor as sample data. If you wish to save this data, you must save it in the RS7000’s own format. -
Page 22: Preparation And Setup
Making connections with the power on may damage your amp or speakers. The RS7000 has no internal amplifier or speakers of its own. To monitor the sound of the RS7000, connect headphones, powered speakers, or other playback equipment as required. -
Page 23: Connecting A Footswitch
MTC device such as the Yamaha AW4416. Use MIDI cables to connect the MIDI OUT connector of the RS7000 to the MIDI IN connector of the MTR, and the MIDI IN connector of the RS7000 to the MIDI OUT connector of the MTR. -
Page 24: Turning Power On And Off
O & TRANSPOSE(-) TRANSPOSE(+) TRACK 3.3V CARD SELECT * In this case MTC must be sent to the RS7000 from an external MIDI device. RS7000 Controlling External Device via MMC MUSIC PRODUCTION STUDIO Integrated Sampling Sequencer MASTER EFFECT SAMPLING MULTI COMP... -
Page 25: Restoring The Initial Factory Settings
Restoring the Initial Factory Settings The original RS7000 factory settings can be restored as follows. When the factory settings are restored, all the voice and sequence data you created as well as the system setup data will be erased. Be sure to save all important data to memory card (Smart Media) or SCSI disk (Page 114, 166, 204) before performing this procedure. - Page 26 Restoring the Initial Factory Settings 26 RS7000...
-
Page 27: Tutorial
Tutorial Although all the information you need to operate the RS7000 is available in the reference section of this manual, you might want to take the time to go through the tutorial in order to familiarize yourself with some of its most important features in a step-by-step “linear”... -
Page 28: Rs7000 System Overview
Advanced Sampling and Editing Features In addition to directly loading sample data in a variety of popular formats, the RS7000 allows you to record your own sam- ples from CDs or any line-level or microphone source. Once your samples are recorded they can be trimmed, sliced, looped, and otherwise prepared for playback with the power and flexibility you’d expect from a stand-alone sampler. - Page 29 Then there are jobs to automatically create glides, rolls, crescendos, and other subtleties that can make a huge difference to the musical mood. If you can image it, the RS7000 can probably do it. And when you want to really make detailed refinements, the EDIT mode gives you direct access to individual note and event parameters.
-
Page 30: Assemble A Pattern Using Preset Phrases
All you have to do is select a pattern track, select the phrase you want to assign to that track, then repeat for as many tracks as you need. Of course, you can record your own phrases for use in patterns, too. Phrases can use voices from the RS7000’s internal tone generator, or samples in the RS7000’s sample memory. - Page 31 An Alternative Track Selection Method When the [KEYBOARD] button indicator is out (press the [KEYBOARD] button if it is lit), the black keys on the RS7000 key- board can be used to directly select sections “A” through “J” — note the labels above the black keys.
- Page 32 Select a Track Select the track you want to assign a phrase to via the RS7000 keyboard: Press the lower key (white or gray) corresponding to the desired track number (1 through 16) while holding the [TRACK SELECT] button. The keyboard LED corresponding to the currently active track will flash while the [TRACK SELECT] button is held.
- Page 33 As in the PATTERN Play display, the number of the currently active track is highlighted. You can change tracks while the PATTERN Patch display is showing in the same way that you change tracks in the main PATTERN display: press the appropriate white or gray key on the RS7000 keyboard while holding the [TRACK SELECT] button. Press the [PLAY] Button Press the [PLAY] button.
- Page 34 Select a Phrase for the First Track The preset RS7000 phrases are organized into categories. Take a look at the Phrase Category List on page 313 for a complete list of the phrase categories. To select a phrase you will need to specify both its category and number.
- Page 35 SELECT Try Out the MUTE and SOLO Functions While we’re at it, let’s try out a couple of the RS7000’s convenient monitoring features: MUTE and SOLO. MUTE Tracks can be individually muted (turned off) for monitoring purposes … or for creative real-time playback control. To mute tracks press the [MUTE] button so that its indicator lights, then the lower (white and gray) keys on the keyboard will alternately mute and un-mute the corresponding tracks.
- Page 36 Save the Pattern Since the RS7000 saves all pattern (and other) data in volatile RAM memory, the data will be lost as soon as the power is turned off. In order to keep patterns, phrases, songs, or samples you’ve created, you’ll need to save them to either a memory card or external SCSI disk before turning the power off.
- Page 37 JOB LIST EDIT CHANGE EXPORT IMPORT VIEW FILTER RENAME DELETE SCSI SETUP SCSI COMM ENTER FORMAT SECTION PAD 1 PAD 2 TRANSPOSE CAPS 9~16 PAD ASSIGN TRACK MUTE SPACE SOLO O & TRANSPOSE(-) TRANSPOSE(+) TRACK 3.3V CARD SELECT UTORIAL RS7000 37...
-
Page 38: Real-Time Sound Control
EFFECT SEND/VOLUME These knobs are directly linked to the corresponding controls for the selected track in the RS7000’s mixer (we’ll look at the mixer in section 6 of the tutorial). Simply, the first three knobs — [DRY ↔ VARI.], [DELAY/CHO] and [REVERB] — control the effect send levels to the corresponding RS7000 effect stages. -
Page 39: Recording Original Phrases
Still in the PATTERN Patch mode, use [Knob 1] to select the “User” phrase category, and [Knob 2] to select the number of the user phrase you want to record. The RS7000 has memory for up to 256 user phrases per style. Select “001” for our example. - Page 40 Record When you’ve set up all the parameters as required, press the [PLAY] button to begin recording. The RS7000 will give you a one-mea- sure count-in, then recording will begin. Make sure the [KEYBOARD] button indicator is lit (press the [KEYBOARD] button if it isn’t), and play your original part on the RS7000 keyboard.
- Page 41 EXPORT IMPORT SCSI SETUP VIEW FILTER DELETE SCSI COMM ENTER FORMAT SECTION PAD 1 PAD 2 TRANSPOSE CAPS PAD ASSIGN 9~16 TRACK MUTE SPACE SOLO O & TRANSPOSE(-) TRANSPOSE(+) TRACK 3.3V CARD SELECT 4. Recording Original Phrases UTORIAL RS7000 41...
- Page 42 Press [STOP] to stop playback and continue entering notes in the step mode. Stop recording and return to the PATTERN Play (or PATTERN Patch) mode by pressing the [STOP] button. 42 RS7000 MUSIC PRODUCTION STUDIO Integrated Sampling Sequencer...
-
Page 43: Add Samples
Plug the left and right outputs from a stereo source in the INPUT L and R jacks, respectively. What to Record Obviously, you can sample any sound or instrument you like for your own music. The RS7000 has a number of features that make creating even complex samples quite easy. The SLICE+SEQ sampling mode, for example, automatically “slices”... -
Page 44: Basic Sampling Procedure
“44.1 K” setting will give you the best sound quality. SOURCE Select “A/D INPUT” if you’re recording via the RS7000’s built-in analog inputs. If you have the AIEB2 I/O Expansion Board installed then you might want to select “DIGITAL” or “OPTICAL”, as required. - Page 45 KIT+NOTE sample type was selected. You might also want to loop, slice, or modify the way your sample plays back in other ways. Refer to “Chapter 5: The Sampling Mode” beginning on page 227 for complete information on all of the sam- ple editing functions provided by the RS7000. MUSIC PRODUCTION STUDIO...
-
Page 46: Finalizing Your Sound
Grid Groove With the RS7000 there are a surprising number of ways to modify your sound even after the tracks are recorded. The Grid Groove func- tion is one of these. Grid Groove lets you change the notes, timing, length, and velocity of individual beats in your pattern or song to fine-tune the “groove”. - Page 47 The Mixer As the name implies, the RS7000 mixer is much like a mixer you’d use for mixing regular sources. You’ll use it to select voices for individual tracks, adjust levels and pan, adjust equalization, and adjust effect send levels.
-
Page 48: Master Effects
Master Effects As if the effects accessed via the mixer weren’t enough, Yamaha has added a versatile Master Effect stage which allows even further pro- cessing of the overall sound. Spend some time playing with the various effects provided to hear how they affect the pattern we’ve cre- ated. - Page 49 The four knobs above the display adjust the parameters listed directly below them. Other parameters are available in the MASTER sub mode (Page 111). Experiment with the various effects and their parameters while playing back the pattern to get a feel for what the RS7000 master effects can do for your sound. EFFECT...
- Page 50 6. Finalizing Your Sound 50 RS7000...
-
Page 51: Chapter 1. Basic
Chapter 1. Basic 1. RS7000 System Overview ... 52 2. RS7000 Internal Structure ... 58 3. Basic Operation... 64 RS7000 51... -
Page 52: Rs7000 System Overview
Allows editing or insertion of new data in recorded phrases. [PATT CHAIN]...(Page 158) Allows sequential playback of patterns. Patterns can be “chained” to create songs, and the results can be converted to actual RS7000 songs. Press the [PATT CHAIN] button to enter the PATTERN CHAIN mode. - Page 53 Allows editing or insertion of new data in recorded songs. UTILITY mode [UTILITY]...(Page 256) Accesses the basic RS7000 settings and MIDI settings. Press [UTILITY] to go to the UTILITY mode. The UTILITY mode is made up of the following 3 sub modes.
- Page 54 1. RS7000 System Overview SAMPLING mode ...(Page 228) This mode is used to record and edit samples. The SAMPLING mode is made up of the following 3 sub modes. • Sampling [STANDBY/START/STOP]...(Page 229) Records samples. NOTE A “sample” is digitally recorded wave data that includes sample parameter data which defines the way it is to be triggered and played back.
-
Page 55: Function Tree
Setup [SETUP] Arpeggio Setting ... P.108 A/D Setup... P.108 Knob Assign... P.109 MIDI Out Channel ... P.110 Master [MASTER] Master EQ ... P.111 Master Effect... P.112 1. RS7000 System Overview Save [SAVE] Save ...P.118 Export ...P.120 Rename...P.122 Delete...P.123 Format...P.124 Load [LOAD] Load...P.126... -
Page 56: Song Mode
1. RS7000 System Overview G SONG Mode Song [SONG] ... P.182 Song Recording [REC] Recording Standby... P.184 Real Time Recording ... P.186 Step Recording... P.187 Grid Step Recording ... P.189 Groove [GROOVE] Grid Groove ... P.191 Play Effects [PLAY FX] Harmonize... -
Page 57: Sampling Mode
Pattern Chain Edit [EDIT] Edit List... P.175 G UTILITY Mode Utility [UTILITY] ... P.256 System... P.257 MIDI Setup ... P.260 MIDI Filter... P.262 1. RS7000 System Overview G SAMPLING Mode SAMPLING ...P.228 Sampling [STANDBY/START/STOP] Sampling Setup...P.231 Sampling Standby...P.232 Trim ...P.234 Slice ...P.235... -
Page 58: Rs7000 Internal Structure
2. RS7000 Internal Structure 2. RS7000 Internal Structure The 6 Functional Blocks The RS7000 system consists of 6 main functional blocks: the sequencer, the tone generator, controllers, the arpeggiator, effects, and master EQ & effects. INPUT RECORD MIDI IN MIDI OUT... -
Page 59: Sequencer
Pattern chains can be con- verted to songs, so creating a pattern chain is a convenient way to begin producing a song. The RS7000 has memory for 20 pattern chains (01 ~ 20). Pattern Chain Track Structure... -
Page 60: Tone Generator
2. RS7000 Internal Structure G Songs Songs on the RS7000 are much like the songs you would create with a conventional sequencer. Songs are different from patterns in the following ways: • Performance data can be directly recorded to the tracks. - Page 61 Common sample voices are available for use by all songs and styles. 2. RS7000 Internal Structure Up to 128 common sample voices can be stored in the RS7000 memory at a time. The sample contents and program number/ voice relationship remains the same even when songs or styles are switched.
-
Page 62: Controllers
GM data, but do not fully conform to the GM standard. G Maximum Polyphony The RS7000 can play up to 62 notes simultaneously. If perfor- mance data which plays a greater number of notes is received some notes will be cut off. Be careful that the maximum polyph- ony is not exceeded, especially when using many notes with a slow decay or release time. -
Page 63: Arpeggiator
See the “Effect List” on Page 313 for details. Master EQ & Effects This block applies equalization and effects to the final stereo out- put signal. This block is ideal for “mastering” the overall RS7000 sound. 8 Effect types are provided. -
Page 64: Basic Operation
NOTE Modes cannot be selected during playback or recording. 64 RS7000 Most modes have a number of sub modes that can be accessed by using the appropriate SUB MODE buttons, or the [REC] button. The [EXIT] button can be used to exit from the sub modes. -
Page 65: When One Button Accesses Several Pages
Further, some mode and sub mode displays will have arrows at the bottom left or right indicating that other pages can be accessed. In this case use the [F1] or [F4] button to scroll to the next page. 3. Basic Operation EXIT EXIT RS7000 65... -
Page 66: Editing Parameter Values
([F1] ~ [F4]) is held. After entering the desired value press the [EDIT] (ENTER) button to actually enter the value (it will stop flashing on the display). (This entry method is not available for all parameters.) 66 RS7000 Command Selection and Execution [Knob 3] [Knob 4] Command selection and execution is carried out using the [F1] ~ [F4] buttons. -
Page 67: Job Selection
Lit... The corresponding track contains data. Flashing... The corresponding track is selected. Off... The corresponding track does not contain data. TRACK MUTE SOLO O & 3. Basic Operation TRANSPOSE(+) TRACK SELECT TRANSPOSE(-) TRANSPOSE(+) RS7000 67... -
Page 68: Free Tempo Entry
• Undo/Redo does not work with sample voice operations. 68 RS7000 The sequencer [ repeat function. Hold either button to continuously scroll through the measures in the corresponding direction. If the power is turned on while holding one of the white keys on the keyboard as listed below, the Auto Load function will be acti- vated and the corresponding file will be loaded automatically. -
Page 69: Chapter 2. The Pattern Mode
11. Master EQ and Effects ... 111 12. Saving to Memory Card or Disk... 114 13. Loading From Memory Card or Disk ... 126 14. Pattern & Phrase Editing — The Pattern Jobs ... 133 15. Phrase Editing ... 154 RS7000 69... -
Page 70: About The Pattern Mode
Original phrases can be created by recording to “user” phrases. G Groove...(Page 85) Allows groove and feel variations to be applied to individual tracks. 70 RS7000 NOTE For more information on patterns and phrases see “Chapter 1: Basics”, page 59. - Page 71 G Load...(Page 126) Loads data from memory card or disk. About the Pattern Mode G Job...(Page 133) Accesses the pattern and phrase editing jobs. G Phrase Edit...(Page 154) Allows editing or insertion of new data in recorded phrases. RS7000 71...
-
Page 72: Pattern Playback
NOTE For more information about styles and sections see “Chapter 1: Basics”, page 59. 72 RS7000 [Section Selection Procedure] Sections A through J can also be selected via the keyboard. Press the [KEYBOARD] button so that its indicator goes out, then use the black keys to select the corresponding section. - Page 73 Tracks can also be selected by using the black [TR-] and [TR+] keys while holding the [TRACK SELECT] button. Hold 9~16 O & 1. Pattern Playback TRACK SELECT TRANSPOSE(-) TRANSPOSE(+) TRACK SELECT TRANSPOSE(-) TRANSPOSE(+) RS7000 73...
- Page 74 Press a white key on the keyboard to mute or solo the cor- responding track. • Mute When a white key is pressed to mute a track the corre- sponding key indicator will flash. Additional white keys can be pressed to mute multiple tracks. 74 RS7000 MUTE SOLO Flashing O & TRANSPOSE(-) TRANSPOSE(+) •...
-
Page 75: Combining Phrases To Create Patterns (Patch)
(also during playback). length of the pattern. length of the pattern. length of the pattern. A, B, C, D, E, F, G, H, I, J, K, L, M, N, O, P ], and [ ] buttons can be used RS7000 75... - Page 76 [PLAY] to hear the phrases during selection. If necessary use [Knob 3](NOTE SHIFT) to set a note-shift value for the current phrase. 76 RS7000 To adjust the BPM, press [PATTERN] to return to the PAT- TERN Play mode and use [Knob 4](BPM) to adjust as required.
-
Page 77: Phrase Recording
Voice selection and transposition can be carried out via this page. G Real-time Record...(Page 80) This recording mode allows notes played via the RS7000 and variations applied via the assignable knobs, as well as perfor- mance data from external MIDI devices, to be recorded in real time. -
Page 78: Record Standby
[Knob 2] [Knob 3] [F3] [SHIFT]+[F3] REC TYPE = STEP 78 RS7000 REC LOOP (Record Loop) [Settings] ON, OFF Turns loop recording ON or OFF. When ON, the phrase will play repeatedly during real-time recording. This can be handy when recording drums parts, for example, in which you want to add different instruments on each pass. - Page 79 It is a good idea to turn this parameter OFF when recording drum phrases or other phrases you do not want to be trans- posed. → [Knob 1], → Numeric Keypad → Numeric Keypad ... [Knob 3] RS7000 79...
-
Page 80: Real-Time Recording
3. Phrase Recording Real-Time Recording Real-time recording allows anything played on the RS7000 key- board, operation of the assignable knobs, and data received from an external MIDI controller to be recorded in real time. In this section we’ll look at the real-time REPLACE or OVER- DUB recording procedure. - Page 81 [Settings] 001:01:000 ~ Pattern Length Sets the data-entry position. The triangular pointer above the beat graph indicates the data-entry position. Rotating the [knob 1] causes the pointer to move left or right, accordingly. [F4] rhythmic pattern → Numeric Keypad RS7000 81...
- Page 82 When the EVENT TYPE is PITCH BEND When the EVENT TYPE is CC Sets the value of the data to be entered. When KEYBOARD is selected the value can directly entered via the RS7000 keyboard. [Procedure] When the EVENT TYPE is PITCH BEND ... [F2] note and [F2] is pressed, note 2 is entered.
-
Page 83: Grid Step Recording
A note is entered on the grid each time a white key is pressed and its indicator lights. Press the same white key a second time so that its indicator goes out to erase the note at that position. 3. Phrase Recording PAD ASSIGN note divisions, and the RS7000 83... - Page 84 Specifies the pitch of the notes to be entered. In addition to using [Knob 1], the pitch can be specified by pressing a key on the keyboard while holding the [SHIFT] button. 84 RS7000 GATE TIME beat onward can be [Settings] 001% ~ 999% Sets the gate time as a percentage of the grid’s 16...
-
Page 85: Adding Groove To A Pattern
The selected segment is indicated both by the keyboard indicators and on the display. In the example below the 3 for editing. 4. Adding Groove to a Pattern note segments which are selected 1/4 note beat, and so on. 1/4 note beat is selected RS7000 85... - Page 86 VELO OFFSET (Velocity Offset)... [Settings] -127 ~ +127 Increases or decreases the velocity of notes on the selected grid segment(s). 86 RS7000 TR (Track) [Settings] TR01 ~ 16 Specifies the track to which the groove settings are to be applied.
-
Page 87: Play Effects
For example, if the unison effect is set to “8” the effect will use up 8 (or 16) simultaneous notes. Be sure that whatever effect you use, the maximum 62 note polyphony of the RS7000 is not exceeded. For more informa- tion on maximum polyphony refer to “Chapter 1: Basics”, page 62. - Page 88 Two harmonize effects can be used simultaneously to create an even thicker sound. [2] Note Page [Knob 1] [Knob 2] 88 RS7000 NOTE OFFSET ... [Settings] -99 ~ +99 Shifts the notes in the phrase or down in semitone incre- ments.
- Page 89 [REC] button and the Rec Standby mode will not be engaged. If this happens go to the UTILITY mode and turn MEMORY PROTECT OFF (Page 257) and then continue from step 2 of the above procedure. 2:1:000 5. Play Effects RS7000 89...
-
Page 90: Midi Delay
Since MIDI delay uses the tone generator stage to produce the delay sound, it uses 1 note (2 if a 2-element voice is used) of the RS7000’s maximum polyphony. Be sure that whatever effect you use, the maximum 62 note polyphony of the RS7000 is not exceeded. - Page 91 NOTE value is set to +1, the pitch of the first repeat will be C#3, the second repeat will be D3, the third D#3, and so on. 6. MIDI Delay [PATTERN] → [MIDI DELAY] × 2 [Knob 3] [Knob 4] [Knob 1] Feedback velocity Time ... [Knob 2] RS7000 91...
- Page 92 The delay time of the 2nd and subsequent repeats = the delay time of the preceding repeat × the FB CLOCK setting. 92 RS7000 For example, if the delay time of an original note is 240 clocks and the FB CLOCK parameters is set to –50%, the delay time of the 1st repeat will be 120 clocks, the second repeat will be 60 clocks, the third 30 clocks, and so on.
-
Page 93: Adjusting Level And Effects For Each Track (Mixer)
• Using the four panel EFFECT SEND/VOL- UME knobs you can directly edit the corre- sponding mixer parameters without having to access the mixer displays. Display Parameters [1] Voice Select Page [PATTERN] → [MIXER] [Knob 1] [Knob 3] BANK ... [Knob 1] [Knob 4] RS7000 93... - Page 94 ... [Knob 2] ... [Knob 3] ... [Knob 4] AS1&2, AS3&4, AS5&6 L&R ...Output is sent to the RS7000 OUTPUT jacks. AS1, AS2, AS3, AS4, AS5, AS6, AS1&2, AS3&4, AS5&6 ...These settings send output to the cor- responding individual outputs on the optional AIEB2 I/O Expansion Board (Page 20).
- Page 95 [Settings] -32 ~ +32 Boosts or cuts the high frequency band, above the cutoff fre- quency set by the HIGH FREQ parameter, above. Large Q Gain Equalizer – Frequency ... [Knob 4] ... [Knob 3] ... [Knob 2] RS7000 95...
- Page 96 If the dry line level is reduced the depth of the system effects is increased, but with some effects the sound may appear at stereo center. 96 RS7000 [PATTERN] → [MIXER] × 4 [Knob 3] [Knob 4]...
-
Page 97: Changing The Sound Of Voices (Voice Edit)
Display Parameters [1] LFO Page [PATTERN] → [VOICE EDIT] [Knob 1] [Knob 2] [Knob 3] [F1] [Knob 1] [Knob 2] [Knob 3] [F4] [Knob 4] [F4] [Knob 4] RS7000 97... - Page 98 When BPM SYNC is OFF the LFO speed is specified as a number. When BPM SYNC is ON the LFO speed is specified as the type or number of beats per cycle. 98 RS7000 LFO PHASE Absolute [Settings] 0, 90, 120, 180, 240, 270 Specifies the phase from which the LFO will begin oscilla- tion when it is reset.
- Page 99 TOTAL specifies the total number of steps per one cycle of the user waveform. More steps allow more complex wave- forms. Press [F2] to move the cursor to the TOTAL parameter and set the total number of steps using [Knob 2]. [F4] Absolute → [Knob 2] Absolute RS7000 99...
- Page 100 ...[Knob 1] [Settings] MONO, POLY Selects the MONO (only one note can be played at a time) or POLY (multiple notes can be played at a time) mode. 100 RS7000 PORTAMENTO SW (Portamento Switch) Absolute [Settings] OFF, FINGERED, FULL TIME OFF ...Portamento is OFF...
- Page 101 Determines how fast the filter envelope falls from maximum attack level to the sustain level. The smaller the value the faster the decay. Relative Relative [F4] [Knob 2] [Knob 3] [Knob 4] FEG sustain level Release value Time FEG decay time FEG release time Relative Relative RS7000 101...
- Page 102 [Settings] -64 ~ +63 Determines the speed of attack from the initial pitch to the normal pitch of the voice. The smaller the value the faster the attack. 102 RS7000 PEG DCY (Pitch Envelope Generator Decay) ...[F2] Relative [Settings] -64 ~ +63 Determines how fast the envelope falls from the normal pitch of the voice to the sustain-level pitch.
- Page 103 Sets the depth of the filter envelope set via the FEG display (Page 101). Negative settings invert the filter envelope. Frequency Frequency Passed Blocked frequencies frequencies Frequency Center frequency Passed Blocked frequencies frequencies Frequency Center frequency ... [Knob 4] Relative RS7000 103...
-
Page 104: Adding Effects
Use the [EXIT] to move back through the Delay/Chorus Parameter, Variation Parameter, and Effect Type pages, and finally to return to the PATTERN Play (or Patch) mode. 104 RS7000 NOTE When you need to make large value changes rotate a knob while holding the [SHIFT] button to change val- ues in increments of 10 rather than 1. - Page 105 RETURN LEVEL ...[Knob 3] [Settings] 000 ~ 127 Adjusts the signal level sent from the VARIATION effect stage (the effect or “wet” sound) sent to the RS7000 stereo outputs. PAN (Variation Pan) ...[Knob 4] [Settings] L63 ~ CENTER ~ R63 Adjusts the stereo pan position of the signal output from the VARIATION effect stage.
- Page 106 RETURN LEVEL ...[Knob 3] [Settings] 000 ~ 127 Adjusts the signal level sent from the REVERB effect stage (the effect or “wet” sound) sent to the RS7000 stereo outputs. PAN (Reverb Pan) ...[Knob 4] [Settings] L63 ~ CENTER ~ R63 Adjusts the stereo pan position of the signal output from the REVERB effect stage.
-
Page 107: Arpeggio & Assignable Knob Settings (Setup)
10. Arpeggio & Assignable Knob Settings (Setup) This sub-mode is used to set up arpeggios, the assignable knobs, and other RS7000 functions. 4 pages are available: Arpeggio Setting, A/D Setup, Knob Assign, and MIDI Out Channel. The A/D Setup parameters are available on 3 sub pages accessible via the [F1] and [F4] buttons. - Page 108 [Settings] 1 ~ 4 Specifies the maximum arpeggio range in octaves. The RS7000 INPUT L and R jacks allow an external audio signal to be input and mixed with the sound from the internal tone gen- erator. The external audio signal can even be processed via the RS7000’s REVERB, DELAY, and VARIATION effect stages.
- Page 109 When set to 01 ~ 16, the specified track is assigned to the knob regardless of the currently selected track..[Knob 3] [PATTERN] → [SETUP] × 3 [Knob 2] [Knob 4] ... [Knob 2] RS7000 109...
- Page 110 B connectors. OUT SELECT ...[Knob 3] [Settings] TG, MIDI A, MIDI B TG... Output is sent to the RS7000 tone generator. MIDI A... Output is sent to the MIDI OUT A connector. MIDI B... Output is sent to the MIDI OUT B connector.
-
Page 111: Master Eq And Effects
Master EQ The Master EQ is a 4-band equalizer which can be used to adjust the sound at the final output stage of the RS7000. The Master EQ allows the type of response control shown in the graph below via 3 parameter pages: GAIN, FRE- QUENCY, and Q. - Page 112 Sets the Q (bandwidth) of the low EQ band. Lower values produce a broader bandwidth — i.e. a wider range of fre- quencies will be boosted or cut. 112 RS7000 MID 1 Q [Settings] 0.01 ~ 12.0 Sets the Q (bandwidth) of the low-mid EQ band. Lower val- ues produce a broader bandwidth —...
- Page 113 The number and type of available parameters depend on the selected effect type. Refer to page 315 of the Appendix for information on the parameters for each effect type. 11. Master EQ and Effects ... [Knob 4] [Knob 4] RS7000 113...
-
Page 114: Saving To Memory Card Or Disk
Memory Card is not in use (see the following note), or it is not being accessed by the instrument. Then pull the Memory Card out slowly by hand. 114 RS7000 NOTE *"During access" includes save, load, format, delete, and directory creation operations. Also,... - Page 115 Do not reuse the seal that is peeled off. Write-protect seal Data Backup For maximum data security Yamaha recommends that you keep two copies of important data on separate Memory Cards. This gives you a backup if one Memory Card is lost or damaged.
- Page 116 230 MB, and 540 MB types. MO disks with a capacity of 640 MB and above cannot be used. • The RS7000 can use up to 2 GB removable disks. Even if a larger disk is connected the RS7000 will use a maximum of 2 GB.
- Page 117 12. Saving to Memory Card or Disk NOTE ALL (R2A) files include all data in the RS7000 internal memory, as follows: All style data ... Style 01 ~ 64 (includ- ing 16 patterns and phrases style).
- Page 118 [F1] button (step 5, above). Press [EXIT] to return to the PATTERN Play or Patch mode. NOTE When the file save destination is SCSI only DOS-formatted disks can be used (disks for- matted by the RS7000 are formatted using DOS format).
- Page 119 Refer to “Chapter 1: Basics”, page 67, for character-entry details. 12. Saving to Memory Card or Disk SCSI disk connected to the SCSI connector. card slot. [PATTERN] → [SAVE] → [F1] RS7000 119...
- Page 120 • When the export destination is SCSI it is nec- [2] Export Page Export Procedure )/[F4](OPEN) to move between DOS-formatted disks can be used (disks for- matted by the RS7000 are formatted using DOS format). essary to select the appropriate SCSI ID and partition in the SCSI Setup page.
- Page 121 (not including the extension). Further, the file extension cannot be changed. Characters which cannot be used in file names are automatically converted to “_”. 12. Saving to Memory Card or Disk [PATTERN] → [SAVE] × 2 → [F1] [Knob 3] RS7000 121...
- Page 122 When the target rename media is a SCSI disk, files and folders on DOS-formatted disks can be renamed. 122 RS7000 Press the [SAVE] button 3 times from the PATTERN Play or Patch mode to go to the Rename page. Press [F1] (CARD/SCSI) to specify whether you want to rename a file on a memory card or disk.
- Page 123 OPEN ... [F2] Opens the selected folder, moving down one level in the folder hierarchy. DELETE! ... [F4] Deletes the selected file or folder. 12. Saving to Memory Card or Disk [PATTERN] → [SAVE] × 4 [F2] [F4] RS7000 123...
- Page 124 1. Press [LOAD] 3 times from the PATTERN Play or Patch mode to display the SCSI Setup page. 2. Use [Knob 1] (MOUNT ID) to set the RS7000 SCSI ID number. 124 RS7000 Display Parameters [PATTERN] → [SAVE] × 5...
- Page 125 NOTE • Disks formatted to DOS format by a personal computer can be used with the RS7000, but some partitions may not mount. • Only 2 GB of space on removable disks larger than 2 GB can be used.
-
Page 126: Loading From Memory Card Or Disk
• Refer to “Chapter 12: Saving to Memory Card or Disk” for information about the types of memory cards and disks that can be used with the RS7000. (Page 114) • If the memory protect function is ON, “Memory Protected” will appear on the display when the [F1] button is pressed and it will not be possible to load data. - Page 127 Press [F3] if it is OK to overwrite the corresponding memory contents. Press [F2] to abort the load operation and return to the status of the RS7000 prior to pressing the [F1] button. Press [EXIT] to return to the PATTERN Play or Patch mode. NOTE...
- Page 128 01 ~ 64 contents. Press [F2] to abort the load operation and return to the status of the RS7000 prior to pressing the [F1] button. play. existing data in the selected style number or sample voice number will be overwritten.
- Page 129 Press [F2] to abort the import operation and return to the sta- tus of the RS7000 prior to pressing the [F1] button. 13. Loading from Memory Card or Disk Press [EXIT] twice to return to the PATTERN Play or Patch mode.
- Page 130 [Knob 1] [F2] FILE TYPE = SMF, RM1x PATT [Knob 1] [F2] 130 RS7000 File Select Selects the file to be imported. Only files matching the selected file type are shown in the list. If the file to be loaded is inside a folder, Use [F1] ( [F2] (OPEN) to move to the folder containing the file.
- Page 131 Press [LOAD] 3 times from the PATTERN Play or Patch mode to go to the SCSI Setup page. Use [Knob 4] (SELF ID) to set the RS7000 SCSI ID number. NOTE The new SCSI ID number will take effect the next time the RS7000 power is turned on (i.e.
- Page 132 13. Loading from Memory Card or Disk [4] SCSI Communication Page About the YAMAHA TWE Wave Editor The Yamaha TWE Wave Editor can be used to edit RS7000 wave data on a personal computer. TWE Communication Page Procedure Connect the RS7000 to a personal computer via the SCSI connector.
-
Page 133: Pattern & Phrase Editing - The Pattern Jobs
14. Pattern & Phrase Editing — The Pattern Jobs The RS7000’s 37 pattern “jobs” can be used to edit and modify pattern and phrase data in a number of ways. G Job List [Undo/Redo Category] 00 Undo/Redo Undo job cancels the changes made by the most recent operation, restoring the data to its previous state. - Page 134 In this case go to the UTILITY mode System page (Page 257) and turn MEMORY PROTECT “OFF”. 134 RS7000 • If there is no data in the specified range “No Data” will appear on the display and the job can not be executed.
- Page 135 Quantize value (Swing Rate = 50%) Quantize value (Swing Rate = 60%) , 16th-note , 8th-note , Quarter-note , or ...50% ~ 75% , or ...66% ~ 83% ...50% ~ 66% , even-numbered Quarter-note length Back beat Back beat RS7000 135...
-
Page 136: Modify Velocity
A setting of 50% produces exact timing and therefore no swing feel. Settings above 51% increase the amount of swing, with 66% being equivalent to a triplet delay. [Settings] 50% ~ 66% (50% is the initial value) 136 RS7000 , or Swing Gate Time [Settings] 000% ~ 200%... -
Page 137: Modify Gate Time
0 lengthen the gate time. When the Set All parameter is not “OFF” this parameter appears as “****” and cannot be changed. Original gate time Offset = -20 Offset = +20 [F4] (Gate) (Gate) (Gate) (Gate) (Gate) (Gate) RS7000 137... - Page 138 (application range = (Vel) 001:1 ~ 003:1) Velocity range = -40 (application range = (Vel) 001:1 ~ 003:1) 138 RS7000 Transposes notes in the specified range in semitone increments. [Knob 3] [F4] Phrase [Settings] 001 ~ 256 Range [Settings] Measure:Beat:Clock Sets the range of measures/beats/clocks and note pitches over which the job is applied.
-
Page 139: Chord Sort
Note [Settings] C-2 ~ G8 Sets the note (the instrument in drum kit voices) to be rolled. The note can also be entered via the RS7000 keyboard. 14. Pattern & Phrase Editing — The Pattern Jobs Step Clock [Settings] Start Specifies the size of the step (i.e. -
Page 140: Shift Clock
[Settings] 001 ~ 256 Range [Settings] Measure:Beat:Clock 001:1:000 ~ 257:1:000 Sets the range of measures/beats/clocks over which the job is applied. 140 RS7000 Clock [Settings] 000 ~ 999 Sets the number of clock cycles inserted between adjacent chord notes. (low-... -
Page 141: Erase Event
EXC (System exclusive) ALL (All events) Sets the event type to be cleared erased. All events are cleared when ALL is selected. Individual control change numbers can be specified when erasing control change events. [Knob 2] [Knob 3] [F4] RS7000 141... -
Page 142: Extract Event
EXC (System exclusive) ...— Selects the event type to be extracted. Specific note and control change numbers can also be speci- fied as required. 142 RS7000 Destination Phrase [Settings] 001 ~ 256 Selects the destination phrase. Creates continuous pitch bend or control change data over the specified range. -
Page 143: Thin Out
Sets the range of measures/beats/clocks over which the job will be applied. Event Type [Settings] PB (Pitch bend) CC (Control change):000 ~ 127, ALL [F4] CAT (Channel aftertouch) PAT (Polyphonic aftertouch) Selects the event type to be modified. [Knob 3] [F4] RS7000 143... -
Page 144: Copy Phrase
The sample voice itself is not affected. [Knob 2] 144 RS7000 Phrase [Settings] 001 ~ 256 Range [Settings] Measure:Beat:Clock Sets the range of measures/beats/clocks over which the job will be applied. -
Page 145: Mix Phrase
Phrase a... 001 ~ 256 Specify phrase “a”. Style b, Phrase b [Settings] Style b... 01 ~ 64 Phrase b ... 001 ~ 256 [F4] Specify phrase “b”. Phrase “b” Mix Phrase Phrase “a” Phrase “b” [Knob 3] [F4] RS7000 145... -
Page 146: Append Phrase
Phrase b [Settings] Style b ... 01 ~ 64 Phrase b... 001 ~ 256 Specify phrase “b”, to which Phrase “a” will be appended. 146 RS7000 This job splits a selected phrase into two separate phrases. Append Phrase [Knob 3]... -
Page 147: Get Phrase
Phrase category Phrase Number Specifies the source phrase. [Knob 3] [F4] US (User), Preset Phrase, see the Appendix (Page 313) for information on the phrase categories. 001 ~ 256 (The available range may change depending or the category.) RS7000 147... -
Page 148: Phrase Name
This job deletes all data from the selected phrase. [Knob 2] Phrase [Settings] 001 ~ 256 148 RS7000 Delete Sample When the checkbox is checked, sample data assigned to the selected phrase will be deleted. This parameter has no effect when no sample voice is used by the selected phrase. - Page 149 The track’s PLAY FX. GROOVE, and MIDI DELAY set- tings. MIXER/VOICE EDIT The track’s mixer and voice edit settings. Determine the type(s) of data to be exchanged. When a checkbox is checked the corresponding data type will be exchanged. [Knob 3] [F4] RS7000 149...
-
Page 150: Clear Track
[F4] (DO!) button is pressed, the “Are You Sure? Cancel [F2]/OK [F3]” confirmation prompt will appear. [F3] will execute the Clear Track job. 150 RS7000 This job rewrites the data in the selected track so that it incorpo- rates the current Play FX/Groove/MIDI Delay settings. [Knob 3]... -
Page 151: Copy Pattern
• If the pattern length becomes greater than 256 measures as a result of the Append Pat- tern job, an error message will be displayed and the job will be aborted. Original pattern “a” Append Pattern RS7000 151... -
Page 152: Split Pattern
Splits a selected pattern into two patterns. Original pattern Split measure Split pattern Original pattern 152 RS7000 [Knob 3] [F4] Source Style and Section [Settings] Style a ... 01 ~ 64 Specify the source style and section. After the Split Pattern... -
Page 153: Style Name
Styles cannot be selected from this display. Select the style you want to name or rename while in the PATTERN Play mode. [Knob 2] Style Name Refer to “Chapter 1: Basics”, page 67, for details on name entry. [F4] [F4] RS7000 153... -
Page 154: Phrase Editing
• While an event is flashing (being edited), you can use the SUB MODE buttons as a numeric keypad to directly enter parameter values. 154 RS7000 When the parameter has been edited as required, press [ENTER] to confirm and enter the edit (the event will stop flashing). - Page 155 000 ~ 479 (depends on meter) Specifies the location at which the new event will be inserted. Parameter The value for selected event. The available parameter(s) depends on the type of event selected. 15. Phrase Editing [Knob 4] RS7000 155...
- Page 156 Use [Knob 1] ~ [Knob 4] to make the required settings. Press [EXIT] twice to return to the PATTERN Play or Patch mode. 156 RS7000 ...[Knob 2] Event Checkboxes [Settings] Only events with checked boxes (i.e. “ON”) will appear in the event edit list.
-
Page 157: Chapter 3. The Pattern Chain Mode
(Pattern Chain Recording)... 161 3. Master EQ and Effects ... 164 4. Saving to Memory Card or Disk... 166 5. Loading from Memory Card or Disk ... 169 6. The Pattern Chain Jobs ... 171 7. Pattern Chain Editing... 175 RS7000 157... -
Page 158: About The Pattern Chain Mode
This mode is used for sequential pattern playback. Patterns can be chained to create complete songs, and the results can be converted into an RS7000 song. Press [PATT CHAIN] to go to the Pattern Chain Play screen of PATTERN CHAIN mode. The Pattern Chain Play page will appear. -
Page 159: Sequential Pattern Playback (Pattern Chain Play)
[Settings] Pattern Chain Number 01 ~ 20 Chain Name Display only. Specifies the number of the pattern chain to be played..[Knob 2], [SHIFT]+[F2] → Numeric Keypad STYLE ... [F2] → [Knob 2] SECTION [Knob 4] [SHIFT]+[F4] RS7000 159... - Page 160 [Knob 4] to adjust in steps of 0.1. NOTE BPM can also be set by using the [TAP] button (Page 68). 160 RS7000 OCT (Octave) [Settings] -5 octaves ~ +5 octaves Shows the current octave setting of the keyboard. Each “...
-
Page 161: Creating Pattern Chains (Pattern Chain Recording)
Selects the track to be recorded and allows other preparations for recording. G Real Time Recording ...(Page 162) Operations performed via the RS7000 keyboard and scene/mute memory buttons as well as pattern and tempo changes can be recorded in real time. -
Page 162: Real Time Recording
[Knob 4] to adjust in steps of 0.1. Real Time Recording Operations performed via the RS7000 keyboard, scene/mute memory buttons, and knobs as well as pattern and tempo changes can be recorded in real time. -
Page 163: Step Recording
NOTE Mistakenly entered events can be erased by pressing [F4] immediately after they are entered [F4] (before changing the step time value). note , 16 note triplet note , 1/4 note , half note RS7000 163... -
Page 164: Master Eq And Effects
Display Parameters [1] Master EQ Page [Knob 2] [Knob 1] [F1] [Knob 1] [Knob 2] [F1] [Knob 1] [Knob 2] 164 RS7000 LOW GAIN MID1 GAIN MID2 GAIN [PATT CHAIN] → [MASTER] HIGH GAIN LOW FREQUENCY MID1 FREQUENCY MID2 FREQUENCY [F4]... - Page 165 ... [Knob 4] ... [Knob 1] ... [Knob 2] ... [Knob 3] ... [Knob 4] ... [Knob 1] ... [Knob 2] ... [Knob 3] ... [Knob 4] ... [Knob 1] ... [Knob 2] ... [Knob 3] ... [Knob 4] RS7000 165...
-
Page 166: Saving To Memory Card Or Disk
Export functions are not available from the Pattern Chain mode. G Rename...(Page 167) Changes the file name of a file stored on memory card or disk. 166 RS7000 G Delete...(Page 168) Deletes a specified file from memory card or disk. - Page 167 Details are the same as for the PATTERN mode SAVE page. [F4] (Page 114) Display Parameters [F1] [Knob 2] 4. Saving to Memory Card or Disk [PATT CHAIN] → [SAVE] × 2 [PATT CHAIN] → [SAVE] × 3 [F4] [F2] [F3] RS7000 167...
- Page 168 [F2] FILE ...[Knob 1] (UP) ...[F1] OPEN ...[F2] DELETE ...[F4] 168 RS7000 Formats memory cards and disks. CARD or DISK = SCSI Partition Name Disk Type [PATT CHAIN] → [SAVE] × 4 CARD or DISK = CARD [F4] SCSI/CARD FORMAT TYPE...
-
Page 169: Loading From Memory Card Or Disk
(Page 126). Only parameters that are different from the PAT- TERN mode will be introduced here. Display Parameters [PATT CHAIN] → [LOAD] CARD or DISK = CARD [F1] [Knob 2] CARD or DISK = SCSI Partition Name Disk Type SCSI ID Icon [F1] [Knob 2] [F4] [F4] RS7000 169... - Page 170 The import functions are not available from the PATTERN chain mode. [3] SCSI Setup Page Provides access to a number of SCSI settings. Details are the same as for the PATTERN mode LOAD page (Page 126). 170 RS7000 Display Parameters [Knob 1] [Knob 2] [F1] MOUNT ID ...[Knob 1], [F1]...
-
Page 171: The Pattern Chain Jobs
6. The Pattern Chain Jobs The RS7000’s 9 pattern chain “jobs” can be used to edit and modify pattern chain data in a number of ways. G Job List [Undo/Redo Category] 00 Undo/Redo [Event Category] 01 Copy Event 02 Erase Event... - Page 172 CAUTION When Copy Event is executed any data already existing at the Destination location will be over- written. 172 RS7000 [Knob 2] Source Range [Settings] Measures 001 ~ 999 Specify the source range from which the data will be copied.
-
Page 173: Create Measure
6. The Pattern Chain Jobs 005~012 013~024 Measures M005 ~ M012 deleted 005~016 [Knob 2] [Knob 3] [F4] RS7000 173... - Page 174 Source Pattern Chain Destination Pattern Chain [Settings] 01 ~ 20 Specify the copy source and destination pattern chain num- bers. 174 RS7000 This job deletes all data from the selected pattern chain. [Knob 3] [F4] Chain [Settings] 01 ~ 20 Selects the pattern chain to be deleted.
-
Page 175: Pattern Chain Editing
Use [Knob 2] to move the cursor to the meter, style, or sec- tion to be edited, and use [Knob 4] (VALUE) to change as required. • When a style is turned OFF, a corresponding blank section is pro- duced during pattern playback (playback does not stop). RS7000 175... - Page 176 Clock 000 ~ 479 (depends on meter) Indicates the location of the corresponding event. Changing any of these values changes the location of the event accord- ingly. 176 RS7000 Event and Parameters [Settings] BPM Track SCENE/MUTE Track Displays the type of each event.
- Page 177 7. Pattern Chain Editing 16 are displayed in order from left to right. indicates that mute is off; indicates that mute is on. 001 ~ 999 1 ~ 16 (depends on meter) 000 ~ 479 (depends on meter) ... [Knob 2] RS7000 177...
- Page 178 7. Pattern Chain Editing 178 RS7000...
-
Page 179: Chapter 4. The Song Mode
9. Arpeggio & Assignable Knob Settings (Setup)... 200 10. Master EQ and Effects ... 202 11. Saving to Memory Card or Disk... 204 12. Loading from Memory Card or Disk ... 208 13. The Song Jobs ... 212 14. Song Editing ... 225 RS7000 179... -
Page 180: About The Song Mode
Allows groove and feel variations to be applied to individual tracks. G Play Effects...(Page 192) Add depth and harmony to individual tracks. 180 RS7000 NOTE For more information on songs see “Chapter 1: Basics”, page 60. G MIDI Delay...(Page 193) Adds a special MIDI-based delay effect to individual tracks. - Page 181 Saves data to memory card or disk. G Load...(Page 208) Loads data from memory card or disk. About the Song Mode G Job...(Page 212) Accesses the song editing jobs. G Song Edit...(Page 225) Allows editing or insertion of new data in recorded songs. RS7000 181...
-
Page 182: Song Playback
[SHIFT]+[F2] [SHIFT]+[F1] [Knob 1] SONG (Song Number) ... [Knob 1], [SHIFT]+[F1] → Numeric Keypad 182 RS7000 Song Name [Settings] Song Number The song to be played back is selected by specifying the song number. Refer to “13. The Song Jobs”, page 212 for information on entering song names. - Page 183 : Sample data is assigned to this track. [Mute & Solo Setting Procedure] The mute and solo setting procedure is the same as in the PAT- TEN mode (Page 74). 1. Song Playback RS7000 183...
-
Page 184: Song Recording
This page is used to prepare for recording performance data to the currently selected song. G Real-time Record (Page 186) This recording mode allows notes played via the RS7000 key- board and velocity pads, variations applied via the assignable knobs, and performance data from external MIDI devices, to be recorded in real time. - Page 185 MIDI device can be recorded at once. MIDI channels 1 through 16 are assigned to the corre- spondingly numbered tracks. data. changes or keyboard track mute oper- ations..[Knob 2] (16th note triplet), (8th note triplet), (1/4 note triplet), RS7000 185...
-
Page 186: Real-Time Recording
Numeric key input is valid only when inputting control change numbers. Real-time recording allows anything played on the RS7000 key- board, operation of the assignable knobs, and data received from an external MIDI controller to be recorded in real time. -
Page 187: Step Recording
NOTE In the step record mode notes are actually entered when the keys are released. So when entering chords be sure to press all notes you want to enter before releasing the keys. 2. Song Recording RS7000 187... - Page 188 [SHIFT]+[F3] When EVENT TYPE is not NOTE [Knob 3] [SHIFT]+[F3] 188 RS7000 1 Beat Graph This is the display in which notes are “placed” during step recording. When the meter is 4/4, the display is divided into 4 beats (one measure).
-
Page 189: Grid Step Recording
000 ~ 127, KEYBOARD 001.0 ~ 300.0 Sets the value of the data to be entered. When KEYBOARD is selected the value can directly entered via the RS7000 keyboard. [Procedure] VALUE entry procedure is the same as in the PATTERN mode (Page 82). - Page 190 188 in the “Step Recording” section for details. BPM (Tempo) ... [Knob 4], [F4], [SHIFT]+[F4] → Numeric Keypad Has the same effect as the pattern play parameter. Refer to page 183 in the “Song Playback” section for details. 190 RS7000 PAD ASSIGN [Knob 3] [Knob 4] [F4]...
-
Page 191: Adding Groove To A Pattern
[SONG] → [GROOVE] [Knob 1] [Knob 2] [Knob 3] NOTE OFFSET ... CLOCK SHIFT ...[Knob 2] GATE OFFSET ... VELO OFFSET (Velocity Offset)... TR (Track) [Knob 4] [Knob 1] [Knob 3] [Knob 4] 3. Adding Groove to a Pattern RS7000 191... -
Page 192: Play Effects
OCTAVER ...[Knob 2] HARMONIZE 1 ... HARMONIZE 2 ...[Knob 4] [2] Note Page [Knob 1] [Knob 2] 192 RS7000 NOTE OFFSET ... GATE TIME ... VELO OFFSET (Velocity Offset) ... [SONG] → [PLAY FX] [Knob 3] [Knob 4] [Knob 3] BEAT STRETCH ... -
Page 193: Midi Delay
FB VELOCITY (Feedback Velocity) FB NOTE (Feedback Note) ... FB GATE TIME (Feedback Gate Time) FB CLOCK (Feedback Clock) [Knob 3] 5. MIDI Delay [Knob 3] [Knob 4] ... [Knob 1] [Knob 2] ... [Knob 3] ... [Knob 4] RS7000 193... -
Page 194: Adjusting Level And Effects For Each Track (Mixer)
The Mixer features are the same as in the PATTERN mode (Page 93). Display Parameters [1] Voice Select Page [Knob 1] [Knob 3] BANK MSB (Voice Bank MSB) PROGRAM (Program Number) HOLD (Voice Parameter Hold) 194 RS7000 [SONG] → [MIXER] [Knob 1] VOLUME [Knob 4] ... [Knob 2] ...[Knob 1] RANDOM PAN ...[Knob 3]... - Page 195 VARIATION ... [Knob 1] DELAY ... [Knob 2] [F4] [Knob 4] REVERB ... [Knob 3] DRY LEVEL ... [Knob 4] ... [Knob 4] ... [Knob 3] ... [Knob 2] [SONG] → [MIXER] × 4 [Knob 3] [Knob 4] RS7000 195...
-
Page 196: Changing The Sound Of Voices (Voice Edit)
[F2] KEY ON RESET ...[Knob 1] BPM SYNC (BPM Synchronization) LFO SPEED ...[Knob 3] LFO PHASE ...[Knob 4] PITCH DEPTH ...[Knob 1] 196 RS7000 FILTER DEPTH AMP DEPTH LFO WAVE [SONG] → [VOICE EDIT] SLOPE STEP/TOTAL STEP VALUE TEMPLATE [F4]... - Page 197 ... [Knob 3] ... [F3] → [Knob 3] ... [Knob 4] [5] Filter Page [SONG] → [VOICE EDIT] × 5 [Knob 2] [Knob 3] [Knob 4] ... [Knob 1] ... [Knob 2] ... [Knob 3] ... [Knob 4] RS7000 197...
-
Page 198: Adding Effects
DELAY TYPE ...[Knob 2] REVERB TYPE ...[Knob 3] [2] Variation Parameter Page [Knob 1] [Knob 2] 198 RS7000 [SONG] → [EFFECT] [F1] ...[Knob 1] ~ [Knob 4] SEND VAR. TO DELAY ... [Knob 3] SEND VAR. TO REVERB RETURN LEVEL PAN (Variation Pan) [SONG] →... - Page 199 [F1] [Knob 4] EFFECT PARAMETERS ...[Knob 1] ~ [Knob 4] RETURN LEVEL PAN (Reverb Pan) 8. Adding Effects [SONG] → [EFFECT] × 4 [F4] [Knob 3] [Knob 4] [Knob 3] [Knob 4] ... [Knob 3] ... [Knob 4] RS7000 199...
-
Page 200: Arpeggio & Assignable Knob Settings (Setup)
9. Arpeggio & Assignable Knob Settings (Setup) This sub mode is used to set up arpeggios, the assignable knobs, and other RS7000 functions. 4 pages are available: Arpeggio Setting, A/D Setup, Knob Assign, and MIDI Out Channel. The A/D Setup param- eters are available on 3 sub pages accessible via the [F1] and [F4] buttons. - Page 201 PARAMETER (MIDI OUT) ...[Knob 2] TRACK ...[Knob 4] [4] Out Channel Page [SONG] → [SETUP] × 4 [Knob 3] OUT SELECT ...[Knob 3] OUT CHANNEL ...[Knob 4] TR (Track) 9. Arpeggio & Assignable Knob Settings (Setup) [Knob 4] [Knob 4] RS7000 201...
-
Page 202: Master Eq And Effects
Display Parameters [1] Master EQ Page [Knob 1] [Knob 2] [F1] [Knob 2] [Knob 1] [F1] [Knob 1] [Knob 2] 202 RS7000 LOW GAIN MID1 GAIN MID2 GAIN [SONG] → [MASTER] HIGH GAIN LOW FREQUENCY MID1 FREQUENCY MID2 FREQUENCY [F4]... - Page 203 ... [Knob 4] ... [Knob 1] ... [Knob 2] ... [Knob 3] ... [Knob 4] ... [Knob 1] ... [Knob 2] ... [Knob 3] ... [Knob 4] ... [Knob 1] ... [Knob 2] ... [Knob 3] ... [Knob 4] RS7000 203...
-
Page 204: Saving To Memory Card Or Disk
Saves the selected sample or song to memory card or disk in a standard format — SMF or WAV — that can be handled by a per- sonal computer. 204 RS7000 G Rename Changes the file name of a file stored on memory card or disk. - Page 205 ... [Knob 1] Folder Select ... [F2] Icon [F4] (UP) ... [F3] OPEN ... [F4] Icon SAVE! ... [F1] [F4] 11. Saving to Memory Card or Disk [SONG] → [SAVE] → [F1] [F2] [Knob 3] [F3] [F4] ... [Knob 3] RS7000 205...
- Page 206 Sample Name Available Space Icon [F1] [Knob 1] [Knob 2] FILE TYPE = SMF Song Number Song Name Available Space Icon [Knob 1] [F1] 206 RS7000 FILE TYPE TRACK NOTE SCSI/CARD I Export Execution Page [SONG] → [SAVE] × 2 [Knob 1] FILE NAME...
- Page 207 CARD or SCSI = CARD [F1] SCSI/CARD ... [F1] FORMAT TYPE ... [Knob 3] PARTITION ... [Knob 4] FORMAT! ... [F4] [F4] 11. Saving to Memory Card or Disk [SONG] → [SAVE] × 5 [Knob 4] [F4] [Knob 3] [F4] RS7000 207...
-
Page 208: Loading From Memory Card Or Disk
Provides access to a number of SCSI settings. 208 RS7000 G SCSI Communication Allows communication with the YAMAHA TWE Wave Editor application running on a personal computer. [1] Load Page Loads data to internal memory from a memory card or disk. - Page 209 “EMPTY” will appear to indicate that the sample will be loaded to empty memory. [Knob 4] [F4] Sample Voice Number [Knob 4] [F4] RS7000 209...
- Page 210 SMF (Standard MIDI File, format-0 or 1) type file. mat can be loaded into the currently selected RS7000 song..[F1] [SONG] → [LOAD] × 2 → [F4] Sample Voice Number [F1]...
- Page 211 SCSI SELF ID ... [Knob 4] NEXT/PREV ... [F3] [4] SCSI Communication Page Allows communication with the YAMAHA TWE Wave Editor application running on a personal computer. Features and details are the same as in the PATTERN mode (Page 132). Display Parameters...
-
Page 212: The Song Jobs
13. The Song Jobs 13. The Song Jobs The RS7000’s 30 song “jobs” can be used to edit and modify song data in a number of ways. G Job List [Undo/Redo Category] 00 Undo/Redo Undo job cancels the changes made by the most recent operation, restoring the data to its previ- ous state. - Page 213 Undo/Redo does not work with sample voice opera- tions. I The following parameters are the same as in the PATTERN mode (Page 135). Undo/Redo Indication Undo/Redo target 13. The Song Jobs P.223 P.223 P.224 P.224 beat of the 1 measure up to measure. [F4] RS7000 213...
- Page 214 If the result is 0 or less, the value is set to 1. If the result is higher than 127, the value is set to 127. Details are the same as the PATTERN mode (Page136). 214 RS7000 Track [Settings] 01 ~ 16, ALL...
- Page 215 [Knob 2] Track [Settings] 01 ~ 16, ALL Range [Settings] Measure:Beat:Clock 001:1:000 ~ 999:16:479 I The following parameters are the same as in the PATTERN mode (Page 138). 13. The Song Jobs [Knob 3] [F4] [Knob 3] [F4] RS7000 215...
- Page 216 Velocity 08 Chord Sort This job sorts chord events (simultaneous note events) by order of pitch. Details are the same as the PATTERN mode (Page 139). [Knob 2] 216 RS7000 Track [Settings] 01 ~ 16, ALL Range [Settings] Measure:Beat:Clock I The following parameters are the same as in the PATTERN mode (Page 139).
- Page 217 PC (Program change) ... — PB (Pitch bend) CC (Control change) ... 000 ~ 127, ALL CAT (Channel aftertouch) PAT (Polyphonic aftertouch) 13. The Song Jobs [Knob 3] [F4] Range ... — ... — ... — ... — RS7000 217...
- Page 218 Selects the track from which events are to be extracted. Source Range [Settings] Measure:Beat:Clock 001:1:000 ~ 999:16:479 Destination Track [Settings] 01 ~ 16 218 RS7000 I The following parameters are the same as in the ... — PATTERN mode (Page 142). Event Range Range Creates continuous pitch bend or control change data over the specified range.
- Page 219 Offset [Settings] -127 ~ +127 *** (-8192 ~ +8191 for pitch bend, ***), (-275.0 ~ +275.0 for BPM, ***) 13. The Song Jobs [Knob 2] [Knob 3] [F4] Range ... — ... — ... — Range ... — RS7000 219...
- Page 220 001~004 005~016 8 measures inserted at measure 5 001~004 005~012 The inserted 8 measures 220 RS7000 recorded using Insert Point [Settings] 001 ~ 999 Specifies the insert point (measure number) at which the newly created blank measures will be inserted.
-
Page 221: Copy Track
[F3] will execute the Copy Track job. 21 Exchange Track Exchanges the specified type of data between two specified tracks in the current style and section. [F4] [Knob 2] 13. The Song Jobs [Knob 3] [F4] RS7000 221... -
Page 222: Mix Track
Track “a” [Knob 2] Track a [Settings] 01 ~ 16 Specifies track “a”. 222 RS7000 Track b [Settings] 01 ~ 16 Specifies track “b”. This job deletes all data of the selected type from the selected track, or from all tracks. -
Page 223: Copy Song
Splits a selected song into two the specified sections of a speci- fied style. SMF data can be easily used as a basis for patterns. CAUTION The job overwrites any data already existing in the destination pattern. 13. The Song Jobs [Knob 3] [F4] RS7000 223... -
Page 224: Clear Song
[F4] (DO!) button is pressed, the “Are You Sure? Cancel [F2]/OK [F3]” confirmation prompt will appear. [F3] will execute the Split Song to Pattern job. 224 RS7000 This job deletes all data from the selected song or all songs. Scene/mute memory data is also cleared. [Knob 3]... -
Page 225: Song Editing
Set the measure, beat, clock, and parameter, and then press [F3] (DO!) insert the event. Press [EXIT] to go back to the SONG Play mode. NOTE The Solo function cannot be used while editing the BPM track or Scene/Mute track. 14. Song Editing RS7000 225... - Page 226 ...[F2] INSERT ...[F3] VALUE ...[Knob 4] Insert Page Press [F3] (Insert) from the song EDIT page to access this page. [Knob 2] 226 RS7000 Event Measure, Beat, and Clock Parameter ← → (Cursor ← and →) VALUE [F3] [Knob 4] ...[Knob 2]...
-
Page 227: Chapter 5. The Sampling Mode
Chapter 5. The Sampling Mode About the Sampling Mode ... 228 1. Recording Samples (Sampling) ... 229 2. The Real Time Loop Remix Function ... 239 3. Sample Editing... 241 4. The Sample Jobs ... 244 RS7000 227... -
Page 228: About The Sampling Mode
Slice Sampling function. • The Real Time Loop Remix function can only be used in the PATTERN mode. G Sample Edit [SAMPLE EDIT]...(Page 241) Allows recorded samples to be edited. 228 RS7000... -
Page 229: Recording Samples (Sampling)
Common sample voices are available for use by all songs and styles. Up to 128 common sample voices can be stored in the RS7000 memory at a time. The sample contents and program number/voice relationship remains the same even when songs or styles are switched. -
Page 230: Sampling Procedure
Press [MIXER] to go to the MIXER page and select the sam- ple voice number to which you want to record the new sam- ple. 230 RS7000 From the PATTERN or SONG mode press the [SETUP] but- Samples up to 8 measures long ton twice to go to the A/D Setup page, and use [Knob 1] to set can be sliced. - Page 231 32 kHz are supported. However in any case, the data will be converted to the [Knob 4] RS7000's own sampling frequency of 44.1 kHz for recording. • Digital output is possible when the optional AIEB2 I/O Expansion Board is installed, but the output sampling frequency is fixed at 44.1...
- Page 232 • When DIGITAL or OPTICAL is selected the digital input signal will simultaneously be out- put via the OUTPUT connector, while the sound produced by the RS7000 will be output via the DIGITAL OUT and OPTICAL OUT connectors. • Resampling allows samples to be re-recorded after application of filtering, effects, and other processing.
- Page 233 This display appears while waiting for the sampling trigger. This page is selected by pressing the [STANDBY/START/STOP] button when the TRIGGER MODE is set to LEVEL or MEA- SURE. Sequencer playback will begin automatically if the sam- ple type is set to KIT+NOTE. RS7000 233...
- Page 234 The Trim page will appear when sampling ends and the SLICE + SEQ sampling type is selected. 234 RS7000 The trim function makes it possible to specify the beginning and end points of a measure within a sample to allow appropriate slic- ing.
- Page 235 When the slice operation is executed, sequence data corre- sponding to the specified number of measures is created. The sequence data is created from the beginning of the nearest measure at the point at which sampling is started. [F4] [Knob 4] [F4] [Knob 4] RS7000 235...
- Page 236 This parameter is not available when the slice type is BEAT 1~2, and the sample will be sliced on the transients, as shown below. 1 measure 236 RS7000 SLICE TYPE [Settings] BEAT 1~3, PHRASE 1~4, QUICK ...[Knob 2] note (1/2),...
- Page 237 : Original wave size × N + (0.4 × number of slices) PHRASE3 kilobytes. : Original wave size × N + (1.4 × number of slices) PHRASE4 kilobytes. : Original wave size × 3 + (0.7 × number of slices) QUICK kilobytes. RS7000 237...
- Page 238 44.1 kHz sample is sliced to 32 slices, the longest possible sampling time will be approximately: BEAT1~3, PHRASE1~4: approx. 138 seconds (mono), 47 sec- onds (stereo). QUICK: approx. 253 seconds (mono), 126 seconds (stereo). 238 RS7000...
-
Page 239: The Real Time Loop Remix Function
ROLL 1 ~ 16 ...In addition to division and rear- rangement, some portions of the data may be played with a roll effect. 16 variations are pro- vided. Determines how the original performance data will be modi- fied. [LOOP REMIX] [F4] RS7000 239... - Page 240 Press [F2] to abort. • “Memory Protected” will appear when the memory protect function is ON. Go to the util- ity mode system page (Page 257) and turn memory protection OFF, then try again. 240 RS7000...
-
Page 241: Sample Editing
Press [EXIT] to go back to the Trim page, and then again to return to the original display. Display Parameters [F1] [Knob 2] [Knob 1] 3. Sample Editing [1] Trim Page [SAMPLE EDIT] [F4] [F2] [Knob 3] [Knob 4] RS7000 241... - Page 242 START ATCK / LOOP ...[F2] [Settings] START(ATCK), START(LOOP) START(ATCK)... Sets the sample start point. 242 RS7000 START(LOOP)... Sets the loop start point. When the PLAY MODE is set to ATK+LOOP this button switches the parameter to be adjusted by [Knob 2]. The but- ton alternately selects the START(ATCK) and START (LOOP) parameters.
- Page 243 VOICE (Sample Voice Number) This is the same parameter as in the Trim page (Page 241). Sample Information These are the same as in the Trim page (Page 241). 3. Sample Editing LOOP START(LOOP) RS7000 243...
-
Page 244: The Sample Jobs
Select the track to which the sample to be edited is assigned in the PATTERN or SONG play mode (Page 73, 183) Press [SAMPLE EDIT] 3 times to display the sample job list. 244 RS7000 Copies the specified sample voice to another sample voice. Deletes the selected sample or sample voice. - Page 245 NOTE The PITCHED option is not available when a Sample Kit Voice is stored in the destination sample voice number. AUDITION ... [F2] Plays the specified copy source sample..[F4] Executes the job. [F4] ... [Knob 1] RS7000 245...
- Page 246 241). • When the play mode is ATK + LOOP data outside the start (attack) point and end point region will be deleted. 246 RS7000 [Knob 1] SAMPLE (Sample Number) [Settings] 001 ~ 128, C001 ~ C128...
- Page 247 CREATE TO [F4] (Destination Key Number) [Settings] C-2 ~ G8 Specifies the key number to which the processed sample will be saved. 4. The Sample Jobs ... [Knob 2] Lower than 100% Higher than 100% [F3] ... [Knob 2] RS7000 247...
-
Page 248: Time Stretch
Specifies whether the sound quality or rhythmic feel of the time-stretched sample will be emphasized. 248 RS7000 AUDITION Plays the specified sample. Plays the time-stretched sample if pressed after [F4] (DO!) is pressed to stretch the sample. - Page 249 Selects a fade-in (IN) or fade-out (OUT). START, START (ATCK) Fade In LENGTH Fade Out LENGTH NOTE The portions of the sample prior to the specified START or START(ATCK) point and after the specified END point will not be affected. [F4] [Knob 4] RS7000 249...
- Page 250 ...[F3] Saves the processed sample to the specified destination key number. 250 RS7000 09 FREQUENCY CONVERT Halves the sampling frequency of the specified sample. This can be used to convert hi-fi samples to a lo-fi sound, and reduce the sample size by half.
-
Page 251: Loop Remix
[Knob 2] [Knob 1] SAMPLE (Sample Number) [Settings] 001 ~ 128, C001 ~ C128 Specifies the sample voice to be remixed. 4. The Sample Jobs [F3] ... [Knob 2] [F3] [F4] [Knob 3] [Knob 4] ... [Knob 1] RS7000 251... - Page 252 If the original sample is a Pitched Sample it will be overwrit- ten at this point. If the original sample is part of a Sample Kit Voice a key-number selection page will appear. [Knob 2] 252 RS7000 CREATE TO (Destination Key Number) [Settings] C-2 ~ G8 Specifies the key number to which the processed sample will be saved.
- Page 253 Refer to “Chapter 1: Basics”, page 67, for more information on name entry..[F4] Enters the sample voice name. 4. The Sample Jobs [F3] [Knob 3] [F4] ... [Knob 1] RS7000 253...
- Page 254 4. The Sample Jobs 254 RS7000...
-
Page 255: Chapter 6. The Utility Mode
Chapter 6. The Utility Mode About the Utility Mode ... 256 1. System... 257 2. MIDI Setup ... 260 3. MIDI Filter ... 262 RS7000 255... -
Page 256: About The Utility Mode
About the Utility Mode About the Utility Mode The UTILITY mode provide access to overall RS7000 system settings and MIDI setup parameters. Press the [UTILITY] button to go to the UTILITY mode. About the Utility Mode The UTILITY mode includes the following 3 pages. -
Page 257: System
[Knob 3] [Knob 1] [Knob 2] MASTER TUNE ...[Knob 1] [Settings] -102.4 ~ +102.3 Tunes the RS7000 tone generator in 0.1-cent increments. (one “cent” = 1/100 of a semitone). FOOT SWITCH ...[Knob 2] [Settings] SEQ START, SECTION, SUSTAIN, TAP, SAMPLING SEQ START... - Page 258 000 and 900 milliseconds in 100-millisecond increments. If MIDI errors occur when transmitting data to external MIDI devices, try setting a longer SYS.EX INTER- VAL TIME. 258 RS7000 PATTERN BPM HOLD [Settings] OFF, ON Determines whether the BPM setting will switch to the BPM value stored with each style when a new style is selected dur- ing playback.
- Page 259 Before Optimize Memory Sample A Sample B Sample C 5 second blank 10 second blank 5 second blank After Optimize Memory Sample A Sample B Sample C 20 second blank 20 seconds free for recording 1. System RS7000 259...
-
Page 260: Midi Setup
...[Knob 1] [Settings] INTERNAL, MIDI, MTC INTERNAL ... Synchronization to internal clock. Use this setting when the RS7000 is to be used alone or as the master clock source for other equipment. MIDI... The RS7000 is synchronized to a MIDI... - Page 261 Specifies the time-code time from which sequence playback will start MTC is received. This feature can be used to accu- rately align playback of the RS7000 with an external MTC- compatible device. Use [F4] to select Hour, Minute, Second, or Frame, then use [Knob 4] to set as required.
-
Page 262: Midi Filter
When an IN box is disabled, the corresponding MIDI event will not be sent to the sequencer and will not be recorded. All events are sent to the tone generator section regardless of the MIDI Filter settings. 262 RS7000 [F4]... -
Page 263: Chapter 7. Other Information
Chapter 7. Other Information 1. MIDI Basics ... 264 2. MIDI Events Handled by the RS7000 ... 266 RS7000 263... -
Page 264: Midi Basics
The RS7000 tone generator is a multi-timbre type which is always capable of simultaneously playing up to 16 different parts. -
Page 265: Parts And Tracks
These type of parameters are commonly known as “part parameters”. 5. Parts and Tracks In the RS7000, the performance data recorded on each of its 16 tracks plays the corresponding tone generator parts. Although the default track-to-part relationship is that track 1 plays part 1, track 2, plays part 2, etc., these assignments can be changed via the... -
Page 266: Midi Events Handled By The Rs7000
• The bank select MSB and LSB parameters are actually included in the Control Change category, below, but since in the RS7000 these 3 events are used to select voices they are grouped and described here. • Bank select MSB and LSB select the voice bank. - Page 267 • Sets the volume for each individual part. No sound is produced when the value is “0”, and “127” produces maximum volume. 2. MIDI Events Handled by the RS7000 G Panpot (Control Number 010) • Sets the pan position for each individual part. The sound is panned fully left when the value is “0”...
- Page 268 2. MIDI Events Handled by the RS7000 G Effect Send Level 1 (Reverb Effect) (Control Number 091) • Specifies the reverb effect send level. G Effect Send Level 3 (Chorus Effect) (Control Number 093) • Specifies the delay/chorus effect send level.
- Page 269 • Normally three types of control change data are sent: RPN MSB (101), RPN LSB (100), and Data Entry MSB (6). In the RS7000, Data Entry LSB (38) is added to this and the resulting group of control change events is handled as one.
- Page 270 • Normally three types of control change data are sent: NRPN MSB (99), NRPN LSB (98), and Data Entry MSB (6). In the RS7000 this group of control change events is handled as one. • Once an NRPN is specified, the following data entry message received on the same channel is processed as the value of that NRPN.
-
Page 271: Appendix
6. Drum Voice List... 295 7. Phrase Category List ... 313 8. Effect Type List ... 313 9. Effect Parameter List ... 315 10. Effect Data/Value Table ... 323 11. MIDI Data Format... 325 12. Glossary... 334 13. Index... 343 RS7000 271... -
Page 272: Installing Optional Equipment
Switch off the RS7000 power, and unplug the power cord from the wall outlet. Remove the screws holding the bottom cover in place. Set the RS7000 upside down on the workbench and use a Phillips screwdriver to unscrew the 12 screws from the bottom (see illus- •... - Page 273 Do not use screws other than those removed in step 3 (Page 272). Other screws can damage the unit. Holes B in the diagram below are not screw holes. Be careful not to insert screws into these holes. Carefully turn the unit right side up. 1. Installing Optional Equipment RS7000 273...
-
Page 274: Installing Simms
• SIMMs must be installed as a pair of the identical capacity. It is not possible to add just a single SIMM. • The RS7000 ships with 4 MB of memory installed. This means that if, for example, you install a pair of 16 MB SIMMs, the sampling memory will be 4 + (16 ×... - Page 275 • NOTE When inserting SIMMs, always begin with the outer socket (i.e., the socket closest to the side of the RS7000 cover). SIMMs will not fit into the socket if you reverse this order. Hold the SIMM with its cutout part facing the rear panel, and set the SIMM into the socket at an angle as shown in the figure •...
- Page 276 IMPORTANT Before performing the installation, please read precautions “Handling and Installation of Options”, found at the beginning of this manual. Please note that the AIEB1 cannot be used in the RS7000. Procedure Be sure that you have the following at hand before starting the installation.
- Page 277 The connector has a cut-out that prevents it from being connected in an incorrect orientation. Connect the flat cable. Connect the flat cable from the I/O expansion board (the thin, flat cable) to the corresponding connector on the RS7000’s circuit •...
- Page 278 Connect the other red/white cable (4-wire) in the same way. Connect the cable to the connector shown below (CN2: 4-pin). • Secure the cables to the bundle tie. Run the 3-wire and 4-wire cables through the bundle tie (see illustration below), and secure them. • 278 RS7000 Bundle tie...
- Page 279 Make sure that the cables are bundled below the circuit board. If any cables are pinched between the cover and I/O expansion circuit board when the bottom cover is replaced, broken connections or malfunctions may occur. Correct Replace the bottom cover (Page 273). Plug in the power cord. 1. Installing Optional Equipment Bundle tie Incorrect RS7000 279...
-
Page 280: Connecting External Scsi Devices
The last device in the chain must be “terminated”, either with a terminator unit plugged into the open SCSI connector, or by turning the device’s internal terminator on (if available). The first device in the chain must also be terminated, but in the case of the RS7000 this is accomplished by the terminator inside the RS7000. - Page 281 Make sure that there is no conflict between the SCSI ID of each SCSI device including the RS7000. When shipped from the factory, the RS7000’s SCSI ID is set to 6. Be sure to turn off the power before changing the SCSI ID setting of the external SCSI device.
-
Page 282: Specifications
Timing (Beat Stretch, Clock Shift, Swing) MIDI Delay Edit, Feedback Edit Type (Up, Down, Alternate 1 & 2, Random), Sort, Hold, Octave Range RS7000 original sequence format SMF format 0, 1 (Format 1 load only) RM1x format (PATT, SONG) (load only) - Page 283 Max. Sample Length : 32 megabytes mono : 64 megabytes stereo Max. Sample Time (Mono or Stereo) : Approx. 6 min. 20 sec. (44.1 kHz) Original format AIFF (load only), WAV (save and load) A3000/4000/5000, SU700, (load only) 2. Specifications RS7000 283...
- Page 284 Keyboard Pads (× 26) Tap Button Velocity Pads (× 2) Display (LCD) LEDs 284 RS7000 [PATTERN], [PATT CHAIN], [SONG], [UTILITY] [GROOVE], [PLAY FX], [MIDI DELAY], [MIXER], [VOICE EDIT], [EFFECT], [SETUP], [MASTER], [SAVE], [LOAD], [JOB], [EDIT] [F1] - [F4] [EFFECT ON/OFF]...
- Page 285 Options * Specifications and descriptions in this owner’s manual are for information purposes only. YAMAHA Corp. reserves the right to change or modify products or specifications at any time without prior notice. Since specifications, equipment or options may not be the same in every locale, please check with your YAMAHA dealer.
-
Page 286: Troubleshooting
No sound? Wrong sound? When a problem like this occurs please check the following points before assuming that the product is faulty. In many cases you’ll find the solution to your problem here. If the problem persists, then contact your YAMAHA dealer. Problem... - Page 287 • Is the source input set properly? • Is the A/D level set properly? Memory is Full Even • The total RS7000 memory capacity determines the number of patterns, Though There Are Avail- phrases, and songs that can be recorded. For example, if the memory con-...
-
Page 288: Error Message List
In some cases, the amount of remaining memory will be increased when you execute the Wave Memory Optimize operation. This message appears when the RS7000 is restored to the initial factory set- tings (Page 25). The data in internal memory can be corrupted when the backup battery voltage runs too low, for example, and all data will automatically be restored to the factory settings, causing this message to appear. - Page 289 Card/Disk Not Ready A card or disk is not properly inserted in or connected to the RS7000. Unformatted Card/Disk The card or disk is not formatted, or the format is unusable by the RS7000. Check the card/disk contents. Write Protected The card or disk is write protected, or you have attempted to write to a read- only medium such as CD-ROM.
- Page 290 [F3] Sequence or Sample Voice Exists. Cancel [F2]/ Replace [F3] 290 RS7000 Confirms that you want to execute a specified operation. Press [F2] or [F3] as required. When some jobs are executed the internal memory becomes full and undo cannot be used.
-
Page 291: Voice List (Normal Voice)
Spin WoahBass AnTambrn Takeoff BuzzoidB Cowbell GiantStp SykoBass AnCowbl1 CyberStp DkCorBa2 AnCowbl2 Typhoon Techstep Vibraslp Rocker Abstract AnVbrslp Amphibia SubSlide SyVbrslp Escape UK Oam Bongo Shower Jazzstep Conga Thunder BL Lead1 AnaConga Wind BL Lead2 Timbale Seashore SqrSolo1 RS7000 291... - Page 292 A : Long Decay, LFO Wave - Triangle B : Short Decay, LFO Wave - Triangle C : Long Decay, LFO Wave - Saw up D : Long Decay, LFO Wave - S&H 292 RS7000 Drum Kit GM Drum Kit Kit Type...
- Page 293 RvMtlNz2 AnGuiro2 RvIndsTm TambrnRX RvCarEIg CowbelRX RvCarCrs Bongo RX RevPunch Agogo RX RvGunsht ShakerRX RevBomb Feet2 RevHiQ1 Clap Aco RevHiQ2 AnaClap2 RevSyTm1 Clap RX5 RevSyTm2 SynClap2 RvSFXGn1 SynSdStk RvSFXGn2 FM SdStk RvBrstNz SynTom1 RvRipper SynTom2 RvSyVibr AnaClick RvBelTre RS7000 293...
- Page 294 A : Long Decay, LFO Wave - Triangle B : Short Decay, LFO Wave - Triangle C : Long Decay, LFO Wave - Saw up D : Long Decay, LFO Wave - S&H 294 RS7000 Drum Kit GM Drum Kit Kit Type...
-
Page 295: Drum Voice List
Tom Analog 80 5 Tom Analog 80 6 Tom Analog 80 Soft 1 Tom Analog 80 Soft 2 Tom Analog 80 Soft 3 Tom Analog 80 Soft 4 Tom Analog 80 Soft 5 Tom Analog 80 Soft 6 RS7000 295... - Page 296 C# 3 Shaker 2 3 Shaker 1 D# 3 Shaker Analog The overall kit sound can be varied by using the Voice Edit parameters. All instruments are compatible with Key Off messages. 296 RS7000 Bank MSB Bank LSB Program Kit Type...
- Page 297 Reverse Synth Cymbal Reverse Low Noise Feet 2 Reverse Metal Noise 2 Reverse Cowbell Reverse Agogo Reverse Cowbell Analog 80 Reverse Tambourine Reverse Bell Tree Reverse Jingle Bell Reverse Finger Cymbal Reverse Vibraslap Synth 6. Drum Voice List RS7000 297...
- Page 298 G# 4 Triangle Mute 4 Triangle Open A# 4 Shaker Analog 4 Jingle Bell 5 Bell Tree : No sound. Some Voice Edit parameters will have no effect on the sound. 298 RS7000 Trigger Alternate Alternate assign Anlg Kit2 assign...
- Page 299 SFX Gun 1 Guiro Analog DM H Guiro Analog DM L Hi Q 1 H Hi Q 1 L Hi Q 2 Scratch 1 H Scratch 1 L Triangle Mute Triangle Open Shaker Analog Jingle Bell Bell Tree RS7000 299...
- Page 300 G# 4 Triangle Mute 4 Triangle Open A# 4 Shaker Analog 4 Jingle Bell 5 Wind Chime : No sound. Some Voice Edit parameters will have no effect on the sound. 300 RS7000 Trigger Alternate Alternate assign assign Hard Kit...
- Page 301 BD & Hi-Hat Open L Agogo H Agogo L Cabasa Maracas Stab Giant H Stab Giant L Scratch 2 Scratch Stop 1 Claves Noiseburst Car Crash Scratch 1 H Scratch 1 L Triangle Mute Triangle Open Shaker 1 Jingle Bell Turntable Noise RS7000 301...
- Page 302 G# 4 Triangle Mute 4 Triangle Open A# 4 Shaker 1 4 Jingle Bell 5 Bell Tree : No sound. Some Voice Edit parameters will have no effect on the sound. 302 RS7000 Trigger Alternate Alternate assign Jazz Kit assign...
- Page 303 Cabasa Maracas Analog 80 Hit EP L Hit EP H Scratch Spin Scratch Stop 2 Claves Analog Door Squeak Hit Brass 3 Scratch BD F Scratch BD B Triangle Mute Triangle Open Shaker Analog Tambourine Low Wind Chime RS7000 303...
- Page 304 G# 4 Triangle Mute 4 Triangle Open A# 4 Shaker 1 4 Tambourine 5 Wind Chime FX : No sound. Some Voice Edit parameters will have no effect on the sound. 304 RS7000 Trigger Alternate Alternate assign Smoth Kit assign...
- Page 305 SFX Gun 1 Guiro Analog DM H Guiro Analog DM L Hi Q 1 H Hi Q 1 L Hi Q 2 Scratch 1 H Scratch 1 L Triangle Mute Triangle Open Shaker Analog Jingle Bell Bell Tree RS7000 305...
- Page 306 4 Hi-Hat Open SE A# 4 Shaker Analog 4 Vibraslap Synth 5 Tape Rewind Some Voice Edit parameters will have no effect on the sound. All instruments are compatible with Key Off messages. 306 RS7000 Note on/off Alternate PsychKtN assign AcidKitN...
- Page 307 Agogo L Cabasa Maracas Hit Brass 1 Kick & Hit Scratch 2 Scratch Stop 1 Claves Wood Block H Wood Block L Scratch 1 H Scratch 1 L Triangle Mute Triangle Open Shaker 1 Jingle Bell Turntable Noise RS7000 307...
- Page 308 4 Triangle Open A# 4 Shaker 1 4 Jingle Bell 5 Bell Tree Some Voice Edit parameters will have no effect on the sound. All instruments are compatible with Key Off messages. 308 RS7000 Note on/off Alternate Alternate assign D&BKitN...
- Page 309 Timbale L Agogo H Agogo L Cabasa Maracas Samba Whistle H Samba Whistle L Guiro Short Guiro Long Claves Wood Block H Wood Block L Cuica Mute Cuica Open Triangle Mute Triangle Open Shaker 1 Jingle Bell Bell Tree RS7000 309...
- Page 310 A# 4 Reverse Shaker Analog 4 Reverse Jingle Bell 5 Reverse Bell Tree Some Voice Edit parameters will have no effect on the sound. All instruments are compatible with Key Off messages. 310 RS7000 Note on/off Alternate Alternate assign RX Kit N...
- Page 311 Reverse Vox Whoa! Reverse Vox Muh! Scratch 2 Scratch Stop 1 Reverse Scratch Stop 1 Scratch 4 B Reverse Scratch Stop 2 Scratch 1 H Scratch 1 L Triangle Mute Triangle Open Shaker 1 Jingle Bell Turntable Noise RS7000 311...
- Page 312 A# 5 LFO SFX7 5 LFO SFX5 6 LFO SFX6 : No sound. Some Voice Edit parameters will have no effect on the sound. All instruments are compatible with Key Off messages. 312 RS7000 Alternate assign SFX Kit2 RevBomb RvThundr...
-
Page 313: Phrase Category List
CHORUS 2 CHORUS 3 CHORUS 4 CHORUS 5 CELESTE 1 CELESTE 2 CELESTE 3 CELESTE 4 SYMPHONIC ENSEMBLE FLANGER 1 FLANGER 2 FLANGER 3 V-FLANGER TMP-FLNG D-FLANGER PHASER 1 PHASER 2 TMP-PHASE D-PHASER 7. Phrase Category List DLY/ Master RS7000 313... - Page 314 ISOLATION SLICE MISC 3-BAND EQ 2-BAND EQ HARMONIC ENHANCER VOICE CANCEL AMBIENCE TALKING MODULATOR RING MODULATOR DYNAMIC RING MODULATOR DYNAMIC FILTER 314 RS7000 Effect Name TREMOLO AUTO PAN ROTARY SP DIST+RTRY ODRV+RTRY AMP+RTRY 2WAY RTRY DST+2RTRY ODRV+2RTY AMP+2RTRY DUAL RTR1...
-
Page 315: Effect Parameter List
(52 ~ 76) Range Value MIDI Parameter Table Number (0 ~ 127) (1 ~ 48) (0 ~ 127) (0 ~ 1) (1 ~ 127) (1 ~ 10) (4 ~ 40) (52 ~ 76) (28 ~ 58) (52 ~ 76) RS7000 315... - Page 316 7 Diffusion 0 ~ 10 8 Density 0 ~ 4 9 Feedback Level -63 ~ +63 10 Feedback High Damp 0.1 ~ 1.0 316 RS7000 009 DELAY L, C, R Value MIDI Parameter Table Parameter Number (0 ~ 127) 1 Lch Delay Time...
- Page 317 (5 ~ 21) (0 ~ 127) (1 ~ 127) (0 ~ 127) (4 ~ 124) (0 ~ 2) (4 ~ 40) (52 ~ 76) (28 ~ 58) (52 ~ 76) (14 ~ 54) (52 ~ 76) (1 ~ 120) RS7000 317...
- Page 318 10 EQ Low Frequency 32Hz ~ 2.0kHz 11 EQ Low Gain -12dB ~ +12dB 12 EQ High Frequency 500Hz ~ 16.0kHz 13 EQ High Gain -12dB ~ +12dB 318 RS7000 046 TREMOLO Value MIDI Parameter Table Parameter Number (0 ~ 127)
- Page 319 (0 ~ 127) (52 ~ 76) (52 ~ 76) (1 ~ 14860) (1 ~ 127) (0 ~ 127) Range Value MIDI Parameter Table Number (0 ~11) (1 ~ 127) (1 ~ 127) (1 ~ 127) (32 ~ 96) RS7000 319...
- Page 320 1.0kHz ~ 20.0kHz 10 Drive Low Gain -12dB ~ +12dB 11 Drive Mid Gain -12dB ~ +12dB 12 Drive Output Level 0 ~ 127 320 RS7000 079 WAH+DIST+DELAY ~ 080 WAH+OVERDRIVE+DELAY Value MIDI Parameter Table Parameter Number (0 ~ 55)
- Page 321 Value MIDI Parameter Table Number (0 ~ 127) (0 ~ 127) (0 ~ 52) (34 ~ 60) (0 ~ 1) (0 ~ 127) (0 ~ 127) (4 ~ 40) (52 ~ 76) (28 ~ 58) (52 ~ 76) RS7000 321...
- Page 322 8 EQ Low Frequency 32Hz ~ 2.0kHz 9 EQ Low Gain -12dB ~ +12dB 10 EQ High Frequency 500Hz ~ 16.0kHz 11 EQ High Gain -12dB ~ +12dB 322 RS7000 4 MULTI COMPRESSOR1 Value MIDI Parameter Table Parameter Number (0 ~ 127)
-
Page 323: Effect Data/Value Table
20.2 20.5 20.8 21.1 21.4 21.7 22.0 10.2 22.4 10.4 22.7 10.7 23.0 11.0 23.3 11.2 23.6 11.5 23.9 RS7000 323 135.5 137.0 138.6 140.2 141.8 143.3 144.9 146.5 148.1 149.6 151.2 152.8 154.4 155.9 157.5 159.1 160.6 162.2 163.8 165.4... - Page 324 1.03k 512.8 Table#17 Table#18 Dynamic Attack Time Dynamic Release Time Data Value Data Value Data Value Data Value 324 RS7000 Table#15 Divide Frequency Data Value Data Value1 Value2 Data Value1 Value2 Data Value1 Value2 -∞ 1.2k 1.6k 2.0k 2.5k 3.2k 4.0k...
-
Page 325: Midi Data Format
11. MIDI Data Format he RS7000 tone generator and sequencer blocks handle different MIDI events. These are listed separately in the MIDI Data Format as well as in the MIDI Implementation Chart. G Tone generator block (Voice part) (1) TRANSMIT FLOW... - Page 326 FINE TUNING COARSE TUNING (3-5-1-2)IDENTITY REQUEST (only transmitted) F0H 7EH 0nH 06H 01H F7H (n is the Device Number, but the RS7000 receives all numbers.) (3-5-1-3)IDENTITY REPLY (only transmitted) F0H 7EH 7FH 06H 02H 43H 00H 41H ddH ddH 00H 00H 00H 01H F7H dd;...
- Page 327 MIDI Control In The UTILITY parameter MIDI Control allows reception to be turned on/off. [SW3] MIDI Sync Timing Clock is received when the UTILITY parameter MIDI Sync = MIDI, and MTC is received when MIDI Sync = MTC. RS7000 327...
- Page 328 00 - 7F REVERB PARAMETER 9 LSB 00 - 7F REVERB PARAMETER 10 MSB ˝ 00 - 7F REVERB PARAMETER 10 LSB 00 - 7F REVERB RETURN LEVEL 01 - 7F REVERB PAN 328 RS7000 DELAY/CHORUS Description Address 01 01 00...
- Page 329 ˝ depends on type ˝ depends on type ˝ depends on type ˝ depends on type ˝ depends on type ˝ depends on type ˝ depends on type ˝ depends on type ˝ depends on type RS7000 329...
- Page 330 NOT USED NOT USED NOT USED NOT USED 00 - 02 LFO KEY ON RESET NOT USED NOT USED NOT USED NOT USED 330 RS7000 MULTI PART GROUP2 Address Size Description Default 11 pp 30 Value (H) 0 - 127...
- Page 331 NOT USED NOT USED NOT USED NOT USED NOT USED NOT USED NOT USED 00 - 01 INPUT GAIN MIC, LINE MONO × 2, STEREO 00 - 01 MONO/STEREO (n=0 only) Description Default Value (H) 11. MIDI Data Format RS7000 331...
- Page 332 YAMAHA [ Music Priduction Studio --- sequencer part ] Model RS7000 MIDI Implementation Chart Function... Basic Default Channel Changed Default Mode Messages Altered Note Number : True voice ************** Velocity Note ON Note OFF After Key's Touch Ch's Pitch Bend...
- Page 333 YAMAHA [ Music Production Studio --- voice part ] Model RS7000 MIDI Implementation Chart Function... Basic Default 1-16 Channel Changed Default Mode Messages Altered ************** Note 0-127 Number : True voice ************** Velocity Note ON o 9nH,v=1-127 Note OFF...
-
Page 334: Glossary
filtering is also built-in, allowing precise control over the tone. AWM2 is an acronym for Advanced Wave Memory 2. Bank Number In the RS7000 use of the bank select MSB and LSB is facilitated by categorizing voices according to bank number. Bank Select MIDI data used to select extended voices. - Page 335 A value used to verify the integrity of multiple blocks of received MIDI data (system exclusive data). The check- sum is transmitted at the end of the data. Clock A unit of note resolution. On the RS7000 one clock equals 1/480 of a quarter note. Common Sample Voice Sample voices which are available for use by all songs and styles.
- Page 336 Element A block within the AWM2 tone generator that generates a single sound. The voices of the RS7000 consist of 1 to 2 elements. End Point The point at which playback of a sample is set to stop.
- Page 337 MIDI tone generators, sequencers, etc. An example of a high-per- formance MIDI Wind Controller is the YAMAHA WX5. An acronym for Most Significant Byte, referring to the upper byte of data when MIDI control change data is divided into two bytes (the MSB and LSB) for transmis- sion.
- Page 338 Refer to the MIDI Data Format section for details. Part A single voice played via one of the 16 available MIDI channels is known as a “part”. The RS7000 has 16 parts. Partition A software division on a disk storage medium (hard disk or MO, for example) used to store data.
- Page 339 Portamento Switch MIDI control change number 65 turns the portamento effect on or off. Preset An item provided in the internal memory. In the RS7000 a substantial number of phrases are provided as pre- sets. Punch-in Record A method of realtime recording in which the user speci- fies the punch-in and punch-out points, so that record-...
- Page 340 Save The process of saving data or songs from internal mem- ory to floppy disk. Scene Memory The RS7000 has 5 scene memories which can store complete “snapshots” of all current settings for instant recall when needed. SCSI Stands for “Small Computer Serial Interface”. The SCSI interface is used to connect hard disks and other stor- age media to the RS7000.
- Page 341 System Exclusive Message A type of MIDI message used to exchange data unique to a specific model or type of device. The RS7000 [TAP] button can be used to tap-enter BPM values. Track A location where musical performance data is recorded.
- Page 342 MIDI bank select MSB and LSB data. Wah Effect An effect that cyclically modulates the tone. The RS7000 produces this effect by using an LFO signal to modulate the cutoff frequency of a filter. Wah effects are included in the Variation effect stage.
-
Page 343: Index
Data Increment ...268 DECAY ...15 DELAY ...96, 195 Delay ...91 DELAY LEVEL ...91, 193 DELAY SEND ...109 DELAY SEND LEVEL ...200 DELAY TIME ...91, 193 DELAY TYPE ...104, 198 DELAY/CHO ...14 Delay/Chorus ...105 Delay/Chorus Effect ...63 13. Index RS7000 343... - Page 344 FB NOTE (Feedback Note) ... 91 FB VELOCITY (Feedback Velocity) ... 91, 193 Feedback ... 91, 193 344 RS7000 FEG ATTACK (Filter Envelope GeneratorAttack) ...101, 197 FEG DECAY (Filter Envelope Generator Decay) ...101, 197 FEG RELEASE (Filter Envelope Generator Release) ...102, 197 FEG SUSTAIN (Filter Envelope Generator Sustain) ...102, 197...
- Page 345 Note ...88, 141, 142, 155, 192, 266 Note (Note events) ...217 NOTE OFFSET ...86, 88, 191, 192 NOTE SHIFT ...75 NRPN ...155 NRPN LSB (Non-Registered Parameter Number LSB) ...268 NRPN MSB (Non-Registered Parameter Number MSB) ...268 Null ...269 13. Index RS7000 345...
- Page 346 PEG INIT LEVEL (Pitch Envelope Generator Initial Level) ... 102, 197 PEG RLS (Pitch Envelope Generator Release) ... 102, 197 PEG RLS LEVEL (Pitch Envelope Generator Release Level) ... 102, 197 346 RS7000 PEG SUS (Pitch Envelope Generator Sustain) ...102, 197 PGM (Program Number) ...79 PHONE ...19, 22...
- Page 347 SUB DIVID (Sub Divide) ...236, 253 205, 206, 207, 209, 210 SUB MODE ...17 Sub Mode ...64 sub mode ...52 SUSTAIN ...15 Sustain ...267 SWING ...14, 78, 89, 192 Swing Gate Time ...136, 214 Swing Rate ...135, 214 13. Index RS7000 347...
- Page 348 VOICE (Sample Voice Number) ... 235, 237, 242, 243 Voice Bank ... 61 VOICE EDIT ... 17 Voice Edit ... 97, 196 348 RS7000 Voice Select ...93, 194 VOICE SETUP TO TG ...261 VOLUME ...94, 109, 200, 243 Volume ...267 WAV (Wave) ...116...
- Page 349 Compliance with FCC regulations does not * This applies only to products distributed by YAMAHA CORPORATION OF AMERICA. IMPORTANT NOTICE FOR THE UNITED KINGDOM Connecting the Plug and Cord WARNING: THIS APPARATUS MUST BE EARTHED IMPORTANT.
-
Page 350: Important Safety Instructions
Some of these items are designed to be dealer assembled or installed. Please make sure that benches are stable and any optional fixtures (where applicable) are well secured BEFORE using. Benches supplied by Yamaha are designed for seating only. No other uses are recommended. - Page 351 For details of products, please contact your nearest Yamaha or the authorized distributor listed below. Pour plus de détails sur les produits, veuillez-vous adresser à Yamaha ou au distributeur le plus proche de vous figurant dans la liste suivante. NORTH AMERICA CANADA Yamaha Canada Music Ltd.
- Page 352 Yamaha Web Site (English only) www.yamahasynth.com Yamaha Manual Library (English versions only) http://www2.yamaha.co.jp/manual/english/ This document is printed on chlorine free (ECF) paper with soy ink. M.D.G., Pro Audio & Digital Musical Instrument Division, Yamaha Corporation © 2001 Yamaha Corporation V702090 202CRCP12.2-03C0 Printed in Japan...