Table of Contents
Advertisement
Quick Links
Dear Customer,
Thank you for purchasing this quality product. Please read the
manual very carefully before using this device. Failure to follow
these instructions can cause measuring abnormality or damage to
the Oximeter.
No part of this manual may be photocopied, reproduced or
translated into another language without the prior written consent.
We reserve the right to revise and amend it at any time without
prior notice.
Version of the Manual: Ver 1.0
Issued Date: October 28
All rights reserved.
Notes:
The contents contained in this manual are subject to change
without prior notice.
Information furnished by Creative is believed to be accurate
and reliable. However, no responsibility is assumed by Creative
for its use, or any infringements of patents or other rights of
third parties that may result from its use.
User Manual for Handheld Pulse Oximeter
Instructions to User
, 2016
th
I
3502-2290079
Advertisement
Table of Contents

Subscribe to Our Youtube Channel
Related Manuals for Creative OXY-110


Summary of Contents for Creative OXY-110
- Page 1 The contents contained in this manual are subject to change without prior notice. Information furnished by Creative is believed to be accurate and reliable. However, no responsibility is assumed by Creative for its use, or any infringements of patents or other rights of third parties that may result from its use.
- Page 2 User Manual for Handheld Pulse Oximeter Instructions for Safe Operation Check the device to make sure that there is no visible damage that may affect user’s safety and measurement performance. It is recommended that the device should be inspected minimally before each use. If there is obvious damage, stop using the device.
- Page 3 User Manual for Handheld Pulse Oximeter have anaphylaxis. Do not apply to those who have anaphylaxis. For the individual patients, there should be a more prudent inspecting in the placing process. The sensor can not be placed on the edema and tender tissue. ...
- Page 4 User Manual for Handheld Pulse Oximeter equipment is protected against solid foreign objects of 12.5mm and greater, and protected against vertically falling water drops when enclosure tilted up to 15°. Please pay attention to the effects of lint, dust, light ...
-
Page 5: Table Of Contents
User Manual for Handheld Pulse Oximeter Table of Contents 1 Overview..................1 1.1 Appearance................1 1.2 Product Name and Model............3 1.3 Structure.................3 1.4 Features..................4 1.5 Intended Use................4 1.6 Working Environment............4 2 Preparation.................. 5 2.1 Charger Base Connection............5 2.2 Power Supply.................5 3 Make Measurement..............7 3.1 SpO... -
Page 6: Overview
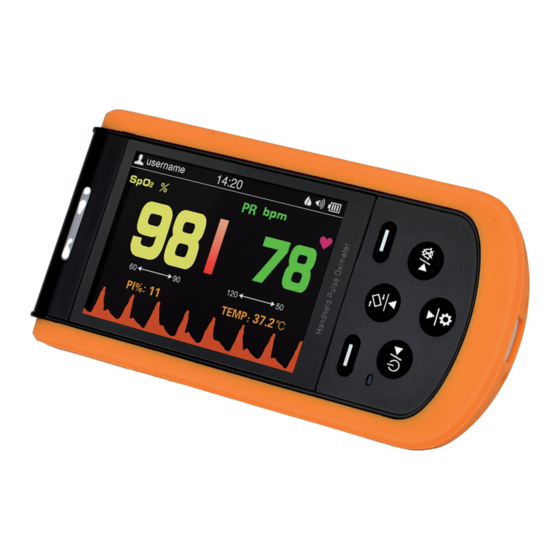
User Manual for Handheld Pulse Oximeter 1 Overview 1.1 Appearance Alert indicator Display screen Record/Back Menu/Confirm Rotate-lock /Up Power indicator Mute /Right Power/Left Setting/Down Figure 1.1 Front View... - Page 7 User Manual for Handheld Pulse Oximeter TEMP: Temperature SpO2 probe probe connector connector Figure 1.2 Upper-side view DC power input socket Figure 1.3 Bottom side view 1. Display screen: Display measurement result, trends and menus. (Power/Left): Power on/off the device by longtime pressing;...
-
Page 8: Product Name And Model
User Manual for Handheld Pulse Oximeter (Setting/Down): On measuring screen, longtime pressing to enter into setting screen; On menu or sub-menu screen, short time press it to move the cursor downwards or adjust the parameter value. (Menu/Confirm): Short time press it to enter into menu screen, or to confirm the selection. -
Page 9: Features
User Manual for Handheld Pulse Oximeter 1.4 Features It is lightweight, small in size and easy to carry Color LCD to display plethysmogram and parameters Measure SpO , Pulse Rate and Temperature simultaneously PI (Perfusion Index) display is available ... -
Page 10: Preparation
User Manual for Handheld Pulse Oximeter 2 Preparation 2.1 Charger Base Connection Put the device into the charger base properly, and note the polarity markings, as shown in figure 2.1. Oximeter Figure 2.1 Charger base connection 充电底座连接 Charger base... -
Page 11: Power Supply
User Manual for Handheld Pulse Oximeter 2.2 Power Supply 1. Internal power supply with built-in battery: Built-in battery specification: 2000mAh lithium battery. 2. External power from the AC power adapter: Use the AC power adapter provided by the manufacturer. Make sure the mains power supply is 100-240VAC with 50/60Hz. -
Page 12: Make Measurement
User Manual for Handheld Pulse Oximeter 3 Make Measurement 3.1 SpO Measurement Operation procedures: 1. Connect the SpO probe to the connector on the upper-side of the device marked with "SpO ". (Note: When disconnecting the connector, be sure to hold the head of the connector firmly and pull). - Page 13 User Manual for Handheld Pulse Oximeter recommended that the probe should NOT be applied to the same place for over two hours, change the measurement site periodically and when necessary. When the ambient temperature is over 35℃, please change the measuring site every two hours;...
-
Page 14: Temperature Measurement (Optional)
User Manual for Handheld Pulse Oximeter ☞ Connector with the label "SpO " can only be connected with probe, and connector with the label "TEMP" can only be connected with the temperature probe. 3.2 Temperature Measurement (optional) The infrared temperature probe is a delicate transducer. To operate please follow these steps and procedures. - Page 15 User Manual for Handheld Pulse Oximeter and the temperature unit " ℃ " is blinking, the user can begin to take the measurement. 3. Insert the tip of the temperature probe into the earhole and press the measuring key to start the measurement. A short beep means the measurement has finished and the result will be displayed on the big display screen on temperature probe and the display screen of the Oximeter.
-
Page 16: Operation
User Manual for Handheld Pulse Oximeter therefore pressing the power on/off key on the temperature probe will not cause any effect. 4 Operation 4.1 Power on/off the Oximeter Long pressing" " Power/Left key for 1~2 seconds, then the oximeter will be powered on. The oximeter will do self-test and then show the software version, as shown in figure 4.1 (refer to your oximeter for actual version). - Page 17 User Manual for Handheld Pulse Oximeter Wireless icon Rotate-lock icon Measurement mode Auto power off disable icon User ID Sound indicator Patient type Battery indicator mark value Pulse Strength high/low bar-graph limit setting range Pulse rate mark and unit Pulse symbol HR high/low limit Pulse rate value setting range...
- Page 18 User Manual for Handheld Pulse Oximeter sustaining for about 3 minutes, and if there is no any key operation in this period, then the device will power off automatically (if the auto power off function is turned on). During measurement, longtime pressing Rotate-lock/Up key ...
-
Page 19: Menu
User Manual for Handheld Pulse Oximeter blinks. During the measurement, over-limit event or probe off event can activate the alert indication sound. Refer to Section 6.2 for detailed alert indication sound. If the memory is full, the corresponding memory full icon ... - Page 20 User Manual for Handheld Pulse Oximeter Note: when the device is connecting the neonate SpO probe, then the User icon " " turns to grey " ", and the patient type on upper left corner turns to pink " ". Measurement mode: Select...
- Page 21 User Manual for Handheld Pulse Oximeter TEMP Record: Review the temperature record list. Date: Set the time and date, see Section 4.3.6 for details. Setting: Set the system parameter, including lightness, sound volume, display language, power saving mode etc., see Section 4.3.7 for details.
- Page 22 User Manual for Handheld Pulse Oximeter Move the cursor on "Edit" and press Confirm key " ", when the cursor turns to blue, then the user can edit the User ID, and move the cursor on "OK" to confirm the edit, the edit screen is as shown in figure 4.4B.
- Page 23 User Manual for Handheld Pulse Oximeter 4.3.3 Measurement Mode On main menu screen, move the cursor on "Measurement Mode" and press Confirm key " ", then the oximeter enters into Measurement Mode Setup screen, as shown in figure 4.6. Figure 4.6 Measurement mode setup screen 4.3.4 SpO Record On main menu screen, move the cursor on "SpO...
- Page 24 User Manual for Handheld Pulse Oximeter On main menu screen, move the cursor on "TEMP Record" and press Confirm key " ", then the oximeter enters into temperature record list screen, as shown in figure 4.8. Figure 4.8 TEMP record list screen 4.3.6 Date On main menu screen, move the cursor on "Date"...
- Page 25 User Manual for Handheld Pulse Oximeter Figure 4.9 Date setup screen Date setting procedure: 1) Move the cursor stays on the Year of the date, press Confirm key " " to active Year option, the cursor flashes on the Year of the date;...
- Page 26 User Manual for Handheld Pulse Oximeter Figure 4.10 System setting screen Description: Brightness: To set the brightness of backlight, 6 levels for optional, the factory default is level 3, as shown in figure 4.10A. Volume: To set the sound volume (including alert sound, ...
- Page 27 User Manual for Handheld Pulse Oximeter shown in figure 4.10G. Default setting: Enter into the factory default setting, as shown in figure 4.10H. Version: For viewing version number of the software, as shown in figure 4.10I Demo: Enter into the Demonstration mode, as shown in ...
- Page 28 User Manual for Handheld Pulse Oximeter Figure 4.10G TEMP unit setup Figure 4.10I Version info. Figure 4.10H Default setting Figure 4.10J Demo mode Notes: When the Auto Power Off is set to "On" option, if there is no ...
- Page 29 User Manual for Handheld Pulse Oximeter key operation for 3 minutes, then the oximeter will power off automatically. When the Power Saving Mode is set to "On" option, during the measurement, if there is no key operation for 1 minute, the screen display will be dim for power saving.
- Page 30 User Manual for Handheld Pulse Oximeter for adult is 50bpm and 60bpm for pediatric. Note: When the SpO reading is lower than or equal to the preset alert setting or the PR reading is higher than or equal to the preset high limit or the PR reading is lower than or equal to the preset low limit, then the over-limit alert event will be activated, that's, the alert sound "bibibibi..."...
- Page 31 User Manual for Handheld Pulse Oximeter Figure 4.12 Help information---SpO measurement...
-
Page 32: Record
User Manual for Handheld Pulse Oximeter Figure 4.12 Help information---TEMP measurement 4.4 Record 4.4.1 Data Recall On main default screen, short time press Record/Back key " " to enter into data recall screen, as shown in figure 4.13. - Page 33 User Manual for Handheld Pulse Oximeter Figure 4.13 SpO record record includes Spot-check Record and Continuous Record, Spot-check Record list shows the recording time, SpO value and pulse rate value, as shown in figure 4.14. corresponding User and User ID for the selected record Figure 4.14 Spot-check Record list If Continuos Record is selected, then the screen shows the...
- Page 34 User Manual for Handheld Pulse Oximeter key( " ") to select one record you need to review. Select one record you need to review, and press Confirm key " ", then the screen shows the corresponding User, User ID, and trend graph, as shown in figure 4.16. corresponding User and User ID for the...
- Page 35 User Manual for Handheld Pulse Oximeter corresponding User and User Recording ID for the time selected record trend graph PR trend graph Figure 4.16 Continuos record---Trend graph 4.4.2 Data Deletion On the record list screen shown in figure 4.14 or 4.15, move the cursor on the record you want to delete, and longtime pressing Mute/Right key("...
- Page 36 User Manual for Handheld Pulse Oximeter Figure 4.16 Delete records At this time, short time press Menu/Confirm (" ") key to confirm and delete the records. Or short time press Record/Back (" ") key to return to record list screen. 4.4.3 Data Upload If you want to upload the stored data (SpO , PR and TEMP values)
-
Page 37: Technical Specifications
User Manual for Handheld Pulse Oximeter 5 Technical Specifications A. Display Panel: 3.5 inch color TFT LCD; B. Power Supply: Internal power supply: 2000mAh lithium battery AC power adapter: 5VDC/1A, Working current: ≤180mA Input power for AC power adapter: <15VA The typical continuous operation time of the battery: 18 hours (when screen display is automatically off and bluetooth function is disabled). - Page 38 User Manual for Handheld Pulse Oximeter The SpO value update time is less than 30 seconds. The pulse rate value update time is less than 10 seconds. F. Perfusion Index Display Range: 0.2%~20% Temperature Measurement Measuring range: 32.0℃~43.0℃ Measuring accuracy: ±0.2℃ for temperature range from 35.0℃...
-
Page 39: Over-Limit Indication
User Manual for Handheld Pulse Oximeter Degree of protection against harmful ingress of liquids: The equipment is IP22 with protection against harmful solid foreign objects and ingress of liquid. Mode of operation: Continuous operation. Electro-Magnetic Compatibility: Group I, Class B 6 Over-limit Indication 6.1 Limit settings low limit setting range: 50% ~ 99%. -
Page 40: Packing List
User Manual for Handheld Pulse Oximeter 7 Packing List 1. An Oximeter 2. A SpO probe 3. User Manual 4. A oximeter rubber cover 5. A charging base 6. A temperature probe (optional) 7. Charging cable (optional) 8. A USB data cable (optional) Notes: 1. -
Page 41: Repair And Maintenance
User Manual for Handheld Pulse Oximeter 8 Repair and Maintenance 8.1 Maintenance The expected service life(not a warranty) of this device is 5 years. In order to ensure its long service life, please pay attention to the maintenance; If the battery is damaged, please contact your local sales representative or the manufacture. -
Page 42: Troubleshooting
User Manual for Handheld Pulse Oximeter 9 Troubleshooting Trouble Possible Reason Solution 1. The finger is not 1. Place the finger Unstable placed far enough correctly inside and try inside. again. Pulse Rate 2. The finger is 2. Reduce patient display shaking or the patient movement. - Page 43 User Manual for Handheld Pulse Oximeter 10 Frequently Asked Questions 1. Q: What's SpO A: SpO means the saturation percentage of oxygen in the blood. 2. Q: What's the normal range of SpO value for healthy people? A: The normal range varies by individual, but usually over 95%, otherwise, please consult your physician.
- Page 44 User Manual for Handheld Pulse Oximeter b) Exposure to excessive illumination, such as surgical lamps, bilirubin lamps, fluorescent lights, infrared heating lamps, or direct sunlight; c) Vascular dyes or external used color-up product such as nail enamel or color skin care; d) Excessive patient movement;...
-
Page 45: Appendix
User Manual for Handheld Pulse Oximeter Appendix I Key of Symbols Symbol Description %SpO The oxygen saturation Perfusion Index Pulse rate (Unit: beats per minute) Pulse bar graph Low battery voltage Symbols Battery is full on the Speaker mute icon screen Speaker volume icon spot-check record memory full... - Page 46 User Manual for Handheld Pulse Oximeter Symbol Description probe connector TEMP Temperature probe connector Power/Left Key Mode/Right Key Rotate-lock/Up Key Symbols Setting/Down Key on the panels Menu/Confirm key or Record/Back key CE mark Serial number Date of manufacture Manufacturer (including address) With Type BF applied part See User Manual Disposal of this device according to...
- Page 47 User Manual for Handheld Pulse Oximeter II Common Knowledge 1 Meaning of SpO is the saturation percentage of oxygen in the blood, so called O concentration in the blood; it is defined by the percentage of oxyhemoglobin (HbO ) in the total hemoglobin of the arterial blood.
- Page 48 User Manual for Handheld Pulse Oximeter Clinical application of pulse oximeters: SpO is an important physiological parameter to reflect the respiration and ventilation function, so SpO monitoring used in clinical becomes more popularly, such as monitoring the patient with serious respiratory disease, the patient under anesthesia during operation, premature and neonate.
- Page 49 User Manual for Handheld Pulse Oximeter hyperkinesias or body temperature decreasing 5 Factors causing low SpO value (pathology reason) Hypoxemia disease, functional lack of HbO Pigmentation or abnormal oxyhemoglobin level Abnormal oxyhemoglobin variation Methemoglobin disease Sulfhemoglobinemia or arterial occlusion exists near sensor ...
-
Page 50: Quality Inspection Certificate
User Manual for Handheld Pulse Oximeter Quality Inspection Certificate...
Need help?
Do you have a question about the OXY-110 and is the answer not in the manual?
Questions and answers