Table of Contents
Advertisement
Advertisement
Table of Contents

Subscribe to Our Youtube Channel
Related Manuals for contoure RV-190S-CON


Summary of Contents for contoure RV-190S-CON
- Page 1 1 cu.ft Stainless Steel Built-in Microwave Oven with Convection Model:RV-190S-CON Read these instructions carefully before using your microwave oven , and keep it carefully. If you follow the instructions, your oven will provide you with many years of good service.
-
Page 2: Precautions To Avoid Possible Exposure To Excessive Microwave Energy
ADDENDUM If the apparatus is not maintained in a good state of cleanliness, its surface could be degraded and affect the lifespan of the apparatus and lead to a dangerous situation. Specifications RV-190S-CON Model: 120V~60Hz Rated Voltage: 1500W Rated Input Power(Microwave):... -
Page 3: Important Safety Instructions
IMPORTANT SAFETY INSTRUCTIONS When using electrical appliances basic safety precautions should be followed, including following: WARNING - To reduce the risk of burns, electric shock, fire, injury to persons or exposure to excessive microwave energy: 1. Read all instructions before using the appliance. 2. -
Page 4: Grounding Instructions
THIS COULD RESULT IN VERY HOT LIQUID SUDDENLY BOILING OVER WHEN THE CONTAINER IS DISTURBED OR A UTENSIL IS INSERTED INTO THE LIQUID. To reduce the risk of injury to persons: 1) Do not overheat the liquid. 2) Stir the liquid both before and halfway through heating it. 3) Do not use straight-sided containers with narrow necks. -
Page 5: Radio Interference
1. A short power supply cord is provided to reduce the risks resulting from becoming entangled in or tripping over a longer cord. 2. Longer cord sets or extension cords are available and may be used if care is exercised in their use. - Page 6 8. Do not heat baby bottles or baby food in the microwave oven. Uneven heating may occur and could cause physical injury. 9. Do not heat narrow-necked containers, such as syrup bottles. 10. Do not attempt to deep-fry in your microwave oven. 1 1.
-
Page 7: Materials You Can Use In Microwave Oven
Materials you can use in microwave oven Utensils Remarks Aluminum foil Shielding only. Small smooth pieces can be used to cover thin parts of meat or poultry to prevent overcooking. Arcing can occur if foil is too close to oven walls. The foil should be at least 1 inch (2.5cm) away from oven walls. -
Page 8: Setting Up Your Oven
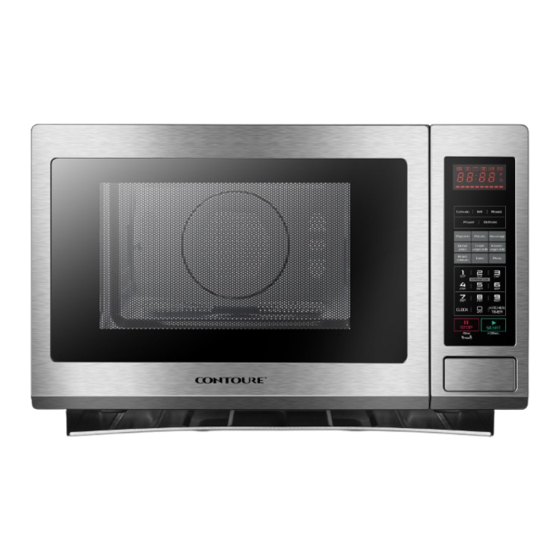
SETTING UP YOUR OVEN Names of Oven Parts and Accessories Remove the oven and all materials from the carton and oven cavity. Your oven comes with the following accessories: Glass tray Turntable ring assembly Instruction Manual A) Control panel B) Turntable shaft C) Turntable ring assembly D) Glass tray E) Observation window... -
Page 9: Operation
OPERATION Control Panel and Features (1) Convection (2) Grill (3) Roast (4) Power (5) Defrost (6) Auto Menu: Popcorn/Potato/Beverage/ Dinner Plate/Fresh Vegetable/ Frozen Vegetable Convection Menu: (10) Roast Chicken/Cake/Pizza (7) Number keys/ Convection Temperature keys (8) Clock setting (9) Stop/Clear (11) (10) Express Cook (11) Kitchen Timer... - Page 10 OPERATION INSTRUCTION 1.Clock Setting When the microwave oven is electrified,the oven will display "0:00", and buzzer will ring once. The input time should be within 1:00-12:59. Example: To set 12:12 . (1) Press the " Clock" button, and the buzzer will ring once. (2) Press the number keys: "1","2","1","2"...
- Page 11 (2) Set the cooking time. Example: Set 12 minutes 50 seconds, press "1", "2", "5", "0" in order. (3) Press " " to start cooking. The cooking time counts down, Start/+30SEC. ":" will light and " " indicator will flash. Grill Note: If half the grill time passes, the oven sounds twice, and this is normal.
- Page 12 6. Convection Roast Cooking 1) Press " Roast" once, the oven will display "325F", and the "Micro.", "Conv." indicator (Press the convection temperature key to select the temperature you need.) will light. 2) Press " " button to confirm the temperature. Roast 3) Press the number keys to set cooking time.
- Page 13 Note: In microwave, grill, convection or combination cooking state, 30 seconds' cooking time can be added by each pressing of "Start/ +30 SEC." button, and it's invalid at the functon of weight defrost, mulit-stage or auto menu cooking. 11. Auto Menu Cooking 1) In waiting state, press the button of "Popcorn", "Potato", "Beverage", "Dinner Plate", "Fresh Vegetable"...
- Page 14 Auto menu Chart Display Menu Weight (Oz) 1.75 OZ 1.75 OZ 3.00 OZ Popcorn 3.00 OZ 3.50 OZ 3.50 OZ 1 portion 2 portions Potato 3 portions about 8.80 OZ about 17.60 OZ Beverage about 26.40 OZ 8.00 OZ 8.00 OZ Dinner 12.00 OZ 12.00 OZ...
-
Page 15: Maintenance
MAINTENANCE Troubleshooting Check your problem by using the chart below and try the solutions for each problem. If the microwave oven still does not work properly, contact the nearest authorized service center. TROUBLE POSSIBLE CAUSE POSSIBLE REMEDY a. Electrical cord for oven is a. - Page 16 CONTOURE SPACE SAVER APPLIANCES CONTOURE Limited Warranty REGISTER ONLINE. IT’S QUICKY AND EASY! www.ContoureUSA.com Warranty registration is not mandatory, but doing so will help us to service you more quickly if you need to present a warranty claim. Please go online to complete and return this warranty registration to us. National Brands LLC. warrants this CONTOURE product (“product”) to be free of all defects in material and workmanship for the applicable period specified below commencing from the date of original purchase. This warranty extends to the original buyer only. Ninety (90) Day Full Warranty: Within ninety (90) days from the date of original purchase, National Brands LLC. in its sole discretion, will either repair or replace, free of charge, any part proving defective in material or workmanship. All warranty repairs and service must be performed at a National brands LLC. location of service by an authorized National brands LLC. technician. All expenses related to replacing or repairing a defective part under this ninety (90) day warranty shall be assumed by National Brands LLC., except the cost of transporting the product to and from National Brands LLC., which shall be assumed by the buyer. If the product is replaced, the replacement will be with a product that is identical or equivalent to the warranted product. If the product cannot be repaired or replaced, National brands LLC. will issue a refund to the buyer for the original purchase price less that amount directly ...
Need help?
Do you have a question about the RV-190S-CON and is the answer not in the manual?
Questions and answers