Table of Contents
Advertisement
Available languages
Available languages
Quick Links
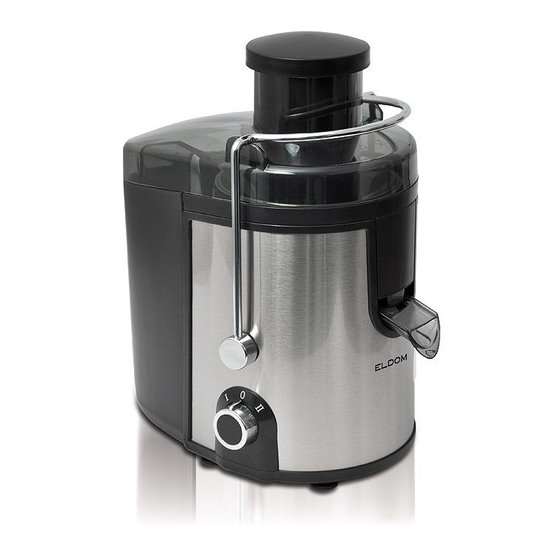
1. Popychacz
2. Tunel dozownika
3. Pokrywa
5. Kolektor soku
6. Wylewka z zaworem
9. Blokada pokrywy
10. Pojemnik na sok
DANE TECHNICZNE
- moc: 400W
- dopuszczalny czas
nieprzerwanej pracy: 2 minuty
- przerwa przed ponownym
(3)
(1) do tunelu dozownika (2)
z uwypukleniem w tunelu dozownika
(5)
(7)
(4) do kolektora (5)
(9)
(9) na pokrywie (3)
(10) pod otworem wylotowym (6)
SOKOWIRÓWKA SK12
fot. 1
fot. 2
1
Advertisement
Table of Contents

Related Manuals for Eldom SK12


Summary of Contents for Eldom SK12
- Page 1 SOKOWIRÓWKA SK12 1. Popychacz 2. Tunel dozownika 3. Pokrywa 5. Kolektor soku 6. Wylewka z zaworem 9. Blokada pokrywy 10. Pojemnik na sok DANE TECHNICZNE - moc: 400W - dopuszczalny czas nieprzerwanej pracy: 2 minuty - przerwa przed ponownym fot. 1 fot.
- Page 2 (10) „I” „II” „I” „II” „0”...
- Page 4 GWARANCJA E l d o m s p . z o . o .
- Page 5 JUICE EXTRACTOR SK12 General description 1. Pusher 2. Feeding tuble 3. Lid 4. Filter 5. Juicer collector 6. The spout with the valve 7. Pulp container 8. Control knob 9. Safety clamp 10. Juice jug Technical data - power: 400W...
- Page 6 Using the appliance The appliance will only function if all parts have been properly assembled and the lid has been properly locked in place with the clamp. - always operate the product on a flat, stable surface - put the plug in the wall socket - wash the fruit and/or vegetables and cut them into pieces that fit into the feeding tuble - make sure the juice jug has been placed under the spout.
-
Page 7: Troubleshooting
CLEANING The appliance is easier to clean if you do so immediately after use. Do not use abrasive cleaning agents, scourers, acetone, alcohol etc. to clean the appliance. All detachable parts are dishwasher-safe. Place the detachable plastic parts on the top tray of the dishwasher. Make sure they are placed well away from the heating element. -
Page 8: Safety Instructions
- never use the if the supply cord is damaged. If found damaged in any way, consult the producer’s authorized service centre. The list of service centres is to be found in the appendix and on www.eldom.eu, - refer servicing to an authorized service centre. Modifying the appliance or using spare parts... - Page 9 Technické údaje (11)
- Page 10 Obsluha (10) „1“ „2“ „1“ „2“...
- Page 12 E l d o m s p . z o . o .
- Page 13 BEDIENUNGSANLEITUNG ENTSAFTER SK12 Allgemeine Beschreibung 1. Stempel 2. Füllschacht 3. Deckel 4. Siebkorb mit Messern und Filter 5. Saftschale 6. Auslauf mit einem Ventil 7. Tresterbehälter 8. Ein- / Ausschalter 9. Deckelsicherheitsverriegelung 10. Saftauffangbehälter Technische Daten - Leistung: 400 W...
- Page 14 BEDIENUNG Das Gerät arbeitet nur dann, wenn alle Entsafterbauteile korrekt zusammengesetzt wurden, der Deckel aufgesetzt und mit Sicherheitsverriegelung abgesichert wurde. - Das zusammengesetzte Gerät auf einem stabilen und ebenen Untergrund stellen. - Das Gerät an den Netzstrom anschließen. - Obst und Gemüse abwaschen und nach Bedarf zerkleinern, so dass sie in den Füllschacht passen.
-
Page 15: Problemlösungen
REINIGUNG Das Gerät ist am leichtesten sofort nach dem Gebrauch zu reinigen. Zum Reinigen keine Scheuermittel, scharfen Putzmitteln, Aceton, Alkohol o. Ä. verwenden. Sämtliche abnehmbaren Gerätebauteile können in dem oberen Geschirrkorb der Spülmaschine gewaschen werden. Sie sind vom Erwärmer fern zu halten. Maximale Temperatur beträgt 50 Das Gerät vor dem Reinigen ausschalten, den Netzstecker aus der Steckdose entfernen und abwarten, bis der Siebkorbfilter (4) zum Stillstand gekommen ist. -
Page 16: Garantie
Beschädigung betrieben werden. Bei Beschädigung wenden Sie sich bitte an die Servicestelle des Herstellers; Die Kundendienststellen finden Sie am Ende der Gebrauchsanleitung oder auf der Internet-Seite: www.eldom.eu. - Das Gerät darf ausschließlich mit originalem Zubehör benutzt werden. - Reparaturen können ausschließlich von einer autorisierten Kundendienstwerkstätte durchgeführt werden. - Page 18 (10)
- Page 20 E l d o m s p . z o . o .
Need help?
Do you have a question about the SK12 and is the answer not in the manual?
Questions and answers