
Subscribe to Our Youtube Channel
Related Manuals for Sorotec COMPACT 0403


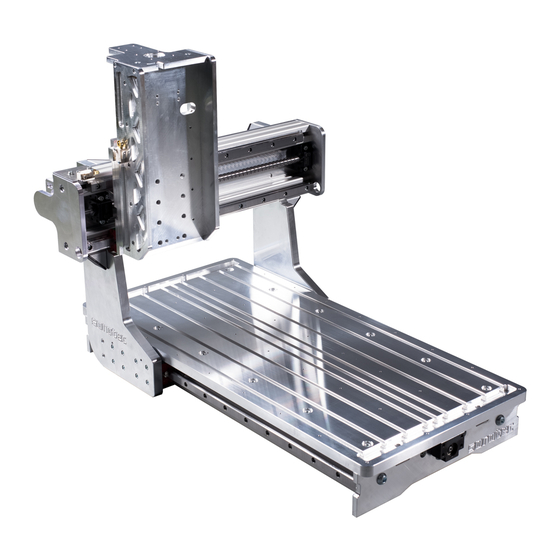
Summary of Contents for Sorotec COMPACT 0403
- Page 1 Assembly instructions CNC portal milling machine kit Compact-Line MPF.CLxxxx.01.B SOROTEC GmbH Tel.: +49 (0) 7227-994255-0 Withig 12 Fax: +49 (0) 7227-994255-9 77836 Rheinmünster E-Mail: sorotec@sorotec.de Version 2.1.0 Web: www.sorotec.de...
- Page 2 Compact-Line kit © 2022 Sorotec GmbH Reproduction, duplication or translation, also in extracts, without the written approval of Sorotec GmbH is not permitted. All rights under the Copyright Act remain the Sorotec GmbH expressly reserved. Technical changes reserved. Made in Germany.
-
Page 4: Required Tools
In the Sorotec shop you will find, components, but also to a high degree on the correct among other things: assembly and exact alignment. - Page 5 Because the head of the countersunk screw disappears into the material, the head height here is part of the length. So the length is measured over everything. But really: Only with the countersunk screw! SOROTEC GmbH Tel.: +49 (0) 7227-994255-0 Withig 12 Fax: +49 (0) 7227-994255-9 77836 Rheinmünster...
-
Page 6: Scope Of Delivery
6 linear rail Z 1): 220 mm lg. flange bracket X 320 mm lg. CL.FT.007.01 CL.ZFS.HGR20R.0220 CL.ZFS.HGR20R.0320 flange bracket Y motor flange Y CL.FT.008.01 CL.FT.014.01 flange bracket Z motor flange Z CL.FT.009.01 CL.FT.006.01 www.sorotec.de Page 5 / 22 V 2.1.0... - Page 7 6 CL.FT.032.01 mounting bracket front plate for drag chain see page 6 CL.PR.BW.604020 cylindrical pin DIN6325 table top (pre-assembled) 5x18 M6 see page 6 AL.ZS.05.18 www.sorotec.de Page 6 / 22 V 2.1.0...
- Page 8 DIN6912 M6x16 Note M6x20 The same number of standard parts is always M6x40 enclosed for all machines. In the case of smaller M8x12 M8x16 sizes, standard parts may be superfluous. M8x20 www.sorotec.de Page 7 / 22 V 2.1.0...
- Page 9 • Plate Z axis CL.FT.048.01 • Bracing Z-axis left CL.FT.049.01 • Bracing Z-axis right CL.FT.050.01 • Ball screw including nut CL.ZAN.KGS1605.0320KH • Linear guide rail short CL.ZFS.HGR20R.0274 • Linear guide rail long CL.ZFS.HGR20R.0370 www.sorotec.de Page 8 / 22 V 2.1.0...
-
Page 10: Preliminary Work
Note Floating and fixed bearings are easy to distingu- Fig. 2: Assembly of the grease nipples and spindle bearings ish: the fixed bearings have four mounting holes, the floating bearings only two. www.sorotec.de Page 9 / 22 V 2.1.0... - Page 11 These brackets are not installed on narrow ma- Figure 5). This can be done by breaking off with chines with the width „03“! Accordingly, the work a screwdriver, filing or grinding. steps for bracket assembly are omitted. www.sorotec.de Page 10 / 22 V 2.1.0...
- Page 12 M6x40 ; Slightly counter-tighten the screws. • Install the snap ring on the end of the ball screw. Fig. 7: X-axis spindle and reference switch www.sorotec.de Page 11 / 22 V 2.1.0...
- Page 13 • Degrease the surfaces to be glued and stick one rubber pad to the front and one to the rear of the front panel (not shown). Fig. 9: Installation of portal stringers and beam www.sorotec.de Page 12 / 22 V 2.1.0...
- Page 14 • Place the portal beam on the two portal walls as shown in Figure 11 and screw all angles to the Fig. 11: Installation of the portal beam on the portal cheeks portal walls with cylinder screws M8x16 Slightly counter-tighten the screws www.sorotec.de Page 13 / 22 V 2.1.0...
- Page 15 • Screw the flange bracket X to the portal beam Fig. 13: Screw connection of X-spindle nut and beam using cheese head screws M5x18 ; Slightly counter-tighten the screws. www.sorotec.de Page 14 / 22 V 2.1.0...
- Page 16 Fig. 15: Tightening the X spindle fixed bearing • Drive the cylindrical pins from the back into the sled Y until they protrude by about 3 ... 4 mm. Fig. 16: Cylindrical pins in sled Y www.sorotec.de Page 15 / 22 V 2.1.0...
- Page 17 ; Slightly counter-tighten the screws. Fig. 18: Installation of the Y spindle • Move sled Y to the fixed bearing by turning the ball screw until the fixing screws of the fixed bearing are just accessible. www.sorotec.de Page 16 / 22 V 2.1.0...
- Page 18 • Screw end plate Y left to the portal beam Fig. 20: Assembly of motor flange Y and left end plate using cylinder screws M8x20 www.sorotec.de Page 17 / 22 V 2.1.0...
- Page 19 • Place the shim between the reference switch and the switch carrier Y and screw it flush with the outer edge of the profile using cylinder screws M3x16 and washers Fig. 21: Mounting reference switch Y-axis www.sorotec.de Page 18 / 22 V 2.1.0...
- Page 20 Tightening torque: 6 Nm • Remove cylindrical pins (were only required for alignment during assembly). • Degrease the adhesive surface and stick a rubber pad to the guide plate Z. www.sorotec.de Page 19 / 22 V 2.1.0...
- Page 21 • Tighten the fixed bearing mounting screws Tightening torque: 10 Nm Fig. 26: Spindle grease fitting towards port (red arrows) www.sorotec.de Page 20 / 22 V 2.1.0...
- Page 22 • Tighten the fastening screws (braces the plate • Mount the reference switch together with the shim with washers and M3x16 screws on the left brace Fig. 29: Assembly of motor flange and stiffeners www.sorotec.de Page 21 / 22 V 2.1.0...
- Page 23 Claw couplings can cause loud noises during the claw coupling. operation. In this case, lubricate the plastic buffer with a little Vaseline. Never use normal grease or lubricating oil! Ordinary lubricants attack the plastic and can destroy it. www.sorotec.de Page 22 / 22 V 2.1.0...
Need help?
Do you have a question about the COMPACT 0403 and is the answer not in the manual?
Questions and answers