Table of Contents
Advertisement
Quick Links
Advertisement
Table of Contents

Related Manuals for Millenium HD-120


Summary of Contents for Millenium HD-120
- Page 1 HD-120 E-Drum Module...
- Page 2 Thomann GmbH Hans-Thomann-Straße 1 96138 Burgebrach Germany Telephone: +49 (0) 9546 9223-0 Internet: www.thomann.de 17.06.2022, ID: 461227 (V2) Software V1.8...
-
Page 3: Table Of Contents
6.1 Functions............................. 18 6.2 Selecting drum kits.......................... 19 6.3 Playing the drum kit........................21 6.4 Metronome function........................21 6.5 Adjusting the pedals........................23 6.6 MIDI implementation........................24 Technical specifications........................28 Plug and connection assignment....................30 Cleaning............................... 32 HD-120 E-Drum Module... - Page 4 Table of contents Protecting the environment......................33 HD-120 E-Drum Module...
- Page 5 HD-120 E-Drum Module...
-
Page 6: General Information
Our products and user manuals are subject to a process of continuous development. We there‐ fore reserve the right to make changes without notice. Please refer to the latest version of the user manual which is ready for download under www.thomann.de. HD-120 E-Drum Module... -
Page 7: Further Information
Personal consultation For personal consultation please contact our technical hotline. If you have any problems with the device the customer service will Service gladly assist you. 1.2 Notational conventions This manual uses the following notational conventions: HD-120 E-Drum Module... - Page 8 References to other locations in this manual are identified by an arrow and the specified page number. In the electronic version of the manual, you can click the cross-reference to jump to the specified location. Example: See Ä ‘Cross-references’ on page 8. HD-120 E-Drum Module...
-
Page 9: Symbols And Signal Words
NOTICE! This combination of symbol and signal word indicates a pos‐ sible dangerous situation that can result in material and environmental damage if it is not avoided. Warning signs Type of danger Warning – danger zone. HD-120 E-Drum Module... -
Page 10: Safety Instructions
With loudspeakers or headphones connected, the device can produce volume levels that may cause temporary or permanent hearing impairment. Do not operate the device permanently at a high volume level. Decrease the volume level immediately if you experience ringing in your ears or hearing impairment. HD-120 E-Drum Module... - Page 11 Unplug the external power supply before electrical storms occur and when the device is unused for long periods of time to reduce the risk of electric shock or fire. HD-120 E-Drum Module...
-
Page 12: Features
Features Features Space-saving, complete e-drum set for beginners 12 preprogrammed drum kits Metronome Connections for headphones, AUX, USB and MIDI including drum track, cabling, sticks, stick holders, headphones and seat HD-120 E-Drum Module... -
Page 13: Installation
Connecting a CD or MP3 player Connect a CD or MP3 player to the input socket [AUX] IN of the drum module. Connecting USB devices Connect external MIDI devices or your computer to the USB port of the drum module. HD-120 E-Drum Module... -
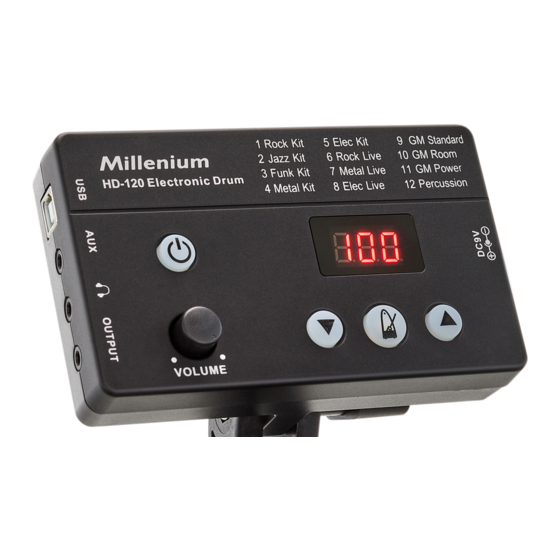
Page 14: Connections And Controls
Connections and controls Connections and controls Front panel ö & HD-120 E-Drum Module... - Page 15 Volume control. Controls the volume of the drum kits. Pressing turns the device on. Holding down turns the device off. [OUTPUT] Line output for external audio devices, designed as 3.5 mm jack socket Headphones output, designed as 3.5 mm stereo jack socket. HD-120 E-Drum Module...
- Page 16 Connections and controls [AUX] Input for external audio devices like MP3 or CD players, designed as 3.5 mm stereo jack socket. [USB] USB MIDI port, designed as USB-B socket HD-120 E-Drum Module...
- Page 17 Connections and controls Rear panel Holder for attaching the drum module to the drum set Connection socket for connecting cable to the drum set, designed as 25-pin D-sub connector socket HD-120 E-Drum Module...
-
Page 18: Operating
The current software version is displayed. Reset to factory defaults To reset the drum module to factory settings, turn it off first. Press and hold simulta‐ neously. The display shows ‘CLr’ . The drum module is reset to factory default settings. HD-120 E-Drum Module... -
Page 19: Selecting Drum Kits
A drum kit is a compilation in which a certain sound (Voice) and several sound parameters are assigned to each pad. Selecting different drum kits lets you customise the sound in seconds to the desired music genre. HD-120 E-Drum Module... - Page 20 ð The current kit name and kit number are displayed. The following drum sets are available: Number Drum kit Number Drum kit Rock Kit Metal Live Jazz Kit Elec Live Funk Kit GM Standard Metal Kit GM Room Elec Kit GM Power Rock Live Percussion HD-120 E-Drum Module...
-
Page 21: Playing The Drum Kit
Play the Hi-hat with fully pressed pedal and then open it suddenly. 6.4 Metronome function Switch on the drum module. Press to turn the metronome on. While the metronome is on, the indicator LED of the button is flashing. HD-120 E-Drum Module... - Page 22 To set the desired volume of the metronome, press and hold simultaneously until the display shows ‘Lu(number)’ . to set a value between ‘0’ (silent) and ‘9’ (maximum). Press to exit the setting mode. To turn off the metronome, press again . HD-120 E-Drum Module...
-
Page 23: Adjusting The Pedals
Step on the Hi-hat pedal and hold the pedal in this position. flashes green and orange during Hi-hat pedal setup. ð lights red, the Hi-hat pedal setup is finished. Now release the Hi-hat pedal. ð Pedal adjustment is complete. HD-120 E-Drum Module... -
Page 24: Midi Implementation
Recognized Remarks Basic channel Default 1-8, 10-16 Changed Mode Default Mode 3 Messages Altered ******** ******** Note number 0…127 0…127 True voice ******** 0…127 Velocity Note ON 1…127 1…127 Note OFF 1…127 Aftertouch Keys Channels Pitch bend HD-120 E-Drum Module... - Page 25 Operating Function Transmitted Recognized Remarks Control change Bank select Modulation Foot control Portamento time Data entry Volume Expression Sustain pedal Portamento ON/OFF Sostenuto pedal Soft pedal Resonance Release time Attack Time Cut off HD-120 E-Drum Module...
- Page 26 Chorus program Reverb level Chorus level All Sound Off Reset All Controllers All Notes Off Program change System exclusive System common Song Position Song Select Tune System real time Clock Command Aux messages Local ON/OFF All Notes OFF HD-120 E-Drum Module...
- Page 27 Operating Function Transmitted Recognized Remarks Active Sense Reset Mode 1: Omni on, poly. Mode 2: Omni on, mono. Mode 3: Omni off, poly. Mode 4: Omni off, mono. HD-120 E-Drum Module...
-
Page 28: Technical Specifications
Operating voltage / 300 mA , centre negative Dimensions (W × H × D) 451 mm × 726 mm × 286 mm Weight 20.5 kg Ambient conditions Temperature range 0 °C…40 °C Relative humidity 20 %…80 % (non-condensing) HD-120 E-Drum Module... - Page 29 Technical specifications Further information Rack included Seat included Bass drum pedal included Headphones included Mesh Head Pads Stereo pads Number of direct outputs HD-120 E-Drum Module...
-
Page 30: Plug And Connection Assignment
‘Ground’ and ‘Signal’, in a balanced transmission a second core is added. This also transfers the signal, but phase-shifted by 180°. Since the interference affects both cores equally, by subtracting the phase-shifted signals, the interfering signal is completely neutralized. The result is a pure signal without any noise inter‐ ference. HD-120 E-Drum Module... - Page 31 Plug and connection assignment Three-pole 1/8" mini phone jack (stereo, unbalanced) Signal (left) Signal (right) Ground, shielding HD-120 E-Drum Module...
-
Page 32: Cleaning
Stubborn dirt can be removed with a slightly dampened cloth. Never use cleaners containing alcohol or thinner. Do not place vinyl objects on the device, as vinyl may stick to the surface or cause it to discolour. HD-120 E-Drum Module... - Page 33 Dispose of this device through an approved waste disposal firm or through your local waste facility. When discarding the device, comply with the rules and regulations that apply in your country. If in doubt, consult your local waste disposal facility. HD-120 E-Drum Module...
- Page 34 Notes HD-120 E-Drum Module...
- Page 36 Musikhaus Thomann · Hans-Thomann-Straße 1 · 96138 Burgebrach · Germany · www.thomann.de...
Need help?
Do you have a question about the HD-120 and is the answer not in the manual?
Questions and answers