SII DPU-S445 User Manual
Dpu-s445 series thermal printer
Hide thumbs
Also See for DPU-S445:
- User manual (47 pages) ,
- User manual (48 pages) ,
- Technical reference (176 pages)

Related Manuals for SII DPU-S445


Summary of Contents for SII DPU-S445
- Page 1 USER’S GUIDE Thermal Printer DPU-S445 SERIES Read this user’s guide carefully before using the printer. Keep this user’s guide in a place where it can be accessed quickly. Seiko Instruments Inc.
- Page 2 DPU-S445 SERIES THERMAL PRINTER USER’S GUIDE Document Number: U00110291502 First Edition: April 2008 Second Edition: May 2008 Third Edition: July 2008 Copyright ©2008 by Seiko Instruments Inc. The information contained herein is the property of SII and shall not be reproduced in whole or in part without prior written approval of SII.
- Page 3 Product: AC adapter PW-0904-W1-E Directive: Title 2004/108/EC EC Electromagnetic Compatibility Directive 2006/95/EC EC Low Voltage Directive Standards EN 55022:2006 EN 61000-3-2:2006 EN 61000-3-3:1995 +Amendment1:2001 +Amendment2:2005 EN 55024:1998 +Amendment1:2001 +Amendment2:2003 EN 60950-1:2001 +Amendment11:2004 Product: Battery Charger PWC-L07A1-W1-E Directive: Title 2004/108/EC EC Electromagnetic Compatibility Directive 2006/95/EC EC Low Voltage Directive Standards...
- Page 4 Federal Communications Commission (FCC) compliance statement This equipment has been tested and found to comply with the limits for a Class B digital device, pursuant to part 15 of the FCC Rules. These limits are designed to provide reasonable protection against harmful interference in a residential installation.
-
Page 5: Table Of Contents
Keep this user’s guide in a place where it can be accessed quickly. For more detailed technical information on this printer, refer to the DPU-S445 SERIES THERMAL PRINTER TECHNICAL REFERENCE. The User’s Guide consists of the following sections. -
Page 6: Safety Precautions
SAFETY PRECAUTIONS The following symbols are used in this User’s Guide in order to make use of the printer properly and prevent the printer from being damaged. Follow the instructions marked with the symbol. WARNING CAUTION Symbol Examples The symbol The example on the left indicates warning or caution. - Page 7 WARNING DO NOT use the printer, the AC adapter, the AC cable and the battery charger in the country which has not complied with regulations. Doing so, we do not assure the safety of these products and you will be responsible for violation of regulations.
- Page 8 Doing so may cause explosion, overheating or fire leading to fire or injury. DO NOT put the printer into water in a place where it could get wet. Doing so may cause fire, a failure or other accidents. DO NOT touch the printer by wet hand.
- Page 9 CAUTION If the printer is not used for a long time, unplug the AC plug from the outlet and remove the battery pack from the printer. If not, it might cause fire or electric shock. When cleaning the printer, unplug the AC plug from the outlet and remove the battery pack from the printer.
- Page 10 DO NOT touch the cutter. Doing so may cause injury. Be sure to hold the battery cover to the printer when the battery pack is inserted in the printer. Fall of the battery pack due to the battery cover slid off may cause injury or any damages.
- Page 11 Precautions in the Battery pack (Option) If you find any of the following abnormalities in the battery pack, remove the battery pack from the printer and keep away from fire. When the battery pack gave out a nasty smell, reached an extraordinarily high temperature or showed any unusual sign.
- Page 12 DO NOT apply strong impact to the battery pack with a hammer or a nail, and DO NOT crush it. Doing so may cause liquid leakage, explosion, overheating or fire leading to fire or injury. DO NOT put the battery pack into water. Always keep it away from rain and water.
-
Page 13: Operating Precautions
When cleaning the TH, wipe the thermal head with a cotton swab or other soft material. u Remove the battery pack from the printer if the printer is not used for a long time. If not, it may cause overdischarge and shorten life span of the battery pack. - Page 14 The AC adapter, the battery charger and the battery pack may become warm when in use. This is normal and is not a malfunction. u When the battery pack is used at low temperature, the length of time the printer can be used may be shortened.
- Page 15 HINT • Items To Remember This box contains helpful hints to remember when using the printer.
-
Page 16: Preparation
1 PREPARATION Once you have opened the carton, make sure it contains the printer and all accessories. Printer Keep the package and packing materials for future transportation or long-term storage. The following are available as options: Specified AC cable Specified Battery charger *1: Additional clamped ferrite core on AC cable will be implemented to the production line. -
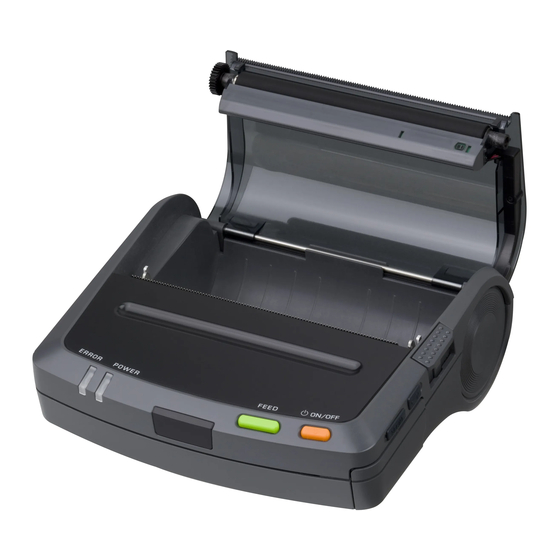
Page 17: Each Part Of Printer
⑭ (1) POWER switch The POWER switch turns the printer ON or OFF. To turn the printer on, hold down the POWER switch until the POWER lamp lights. To turn the printer off, hold down the POWER switch until the POWER lamp goes off. - Page 18 (13) Power connector Connects the AC adapter to this connector. (14) Paper slot Paper inlet for the paper sheet. (15) Battery release lever Releases the battery pack from the printer. (16) Battery cover Covers and Holds placed battery pack in the printer.
- Page 19 Lamp Display Lamp display Power OFF Power ON (Print-ready) Initializing Out-of-paper Paper cover open Battery low, power failure Thermal head temperature error Recharging Function setting mode Function setting mode shifting NV memory loading Hardware error Display Pattern ○: On, ─: Off Items Blink ○─○─○─○─○─○─○─○─○─○...
-
Page 20: Power Connection
Pack, for details on the recharging method. NOTE - Before installing or removing the battery pack, turn the printer off. - If the printer is not used for a long time, remove the battery pack from the printer. Installing the battery pack Remove the battery cover. - Page 21 • Even if the battery pack is not used, its performance will be deteriorated with time. • If the Auto Power Off function is Enabled, the printer turns off automatically when it is not operated for 30 minutes to save the battery.
-
Page 22: Connecting The Ac Adapter
Connecting the AC Adapter (1) Connect the AC cable to the AC adapter. (2) Insert the DC jack of the AC adapter to the power connector of the printer. (3) Insert the AC plug of the AC cable to an electric outlet. -
Page 23: Paper Setting
4 PAPER SETTING This printer can feed cut sheets and paper roll. The printer function setting for cut sheets is different from that for paper roll. See Section 6 Function Setting for details. Setting Cut Sheets (1) Turn the printer on. - Page 24 DO NOT block the paper outlet or hold the paper that is being loaded. Otherwise, it may cause a paper jam. DO NOT touch the platen roller or the printer gear. If doing so, it may cause printer poor quality or printer malfunction.
-
Page 25: Test Printing
(1) Make sure that the thermal paper is loaded in the printer and the printer is off. If the paper is not loaded, load the paper as instructed in Section 4, Paper Setting, and turn the printer off. -
Page 26: Function Setting
To enter the function setting mode, do as follows: (1) Make sure that the thermal paper is loaded in the printer and the printer is off. If the thermal paper is not loaded, load the thermal paper as described in Section 4, Paper Setting, and then turn the printer off. -
Page 27: Changing Settings
• If you do not press any switch within 30 seconds after a message is printed, the printer turns off. The printer is now in the function setting mode. You can set functions by pressing switches. Changing Settings In the function setting mode, you can initialize or modify settings. - Page 28 POWER switch. Load Default Setting? HINT • There are DIP switches from 1 to 4 in the printer, so set 8 bits within DIP switches respectively. • In function setting mode, the POWER lamp blinks once by pressing either the POWER switch or the FEED switch.
- Page 29 (1) and set DIP switch 1 again. DIP Switch setting mode. If you press the POWER switch, the message shown at the following is printed. The printer leaves the function setting mode and turns off. The function setting is now complete. Setting Mode Finished.
- Page 30 Software DIP Switch Setting List : Factory settings DIP switch 1 Posi Function -tion Data 1 Busy control bit8 control 0 Xon/Xoff control 1 1 bit bit7 Stop Bit 0 2 bits 1 Even bit6 0 Odd Parity 1 Yes (Even or Odd) bit5 0 None 1 8 bits...
- Page 31 DIP switch 2 Posi- Function tion Auto Status 1 Disable bit8 Output 0 Enable 1 JIS code Kanji Code bit7 0 Shift-JIS Code 1 24 dots bit6 Font Size 0 16 dots Auto Power 1 Disable bit5 0 Enable Character 1 ANK bit4 0 IBM Compatible...
- Page 32 AC 0 Enable *1 : When Paper Mode of DIP switch 3 is set as Mark Roll Paper, the printer operates paper feeding to backward approximately 5 mm just before printing process after operations such as the power on, resetting, FEED switch or page feed.
-
Page 33: Connecting To The Host Device
IrDA (Ver1.2). Moreover, the Bluetoorh supported model supports Bluetooth (Ver.2.0+EDR)-compliant wireless communication. The printer function setting differs depending upon a communication method to be used. See Section 6 FUNCTION SETTINGS for details. An interface cable is required to perform serial or USB communication. See Section 11 SPECIFICATIONS for details of interface specifications. - Page 34 (2) Open the interface connector cover and connect the interface cable. The connector of serial interface cable has lock for preventing from falling off. (3) Turn the printer on and send data from the host device to the printer. (4) Verify that the data is printed correctly.
- Page 35 (3) Place the infrared transmitter/receiver of the host device and the infrared transmitter /receiver of the printer as shown in the figure. (4) Check communication status from the host device. (5) Send data from the host device to the printer. Verify that the printer prints it correctly. 15°...
- Page 36 (1) Turn the printer off. (2) Turn the printer on without connecting the USB interface cable to it. (3) Check communication status from the host device. (4) Send data from the host device to the printer. Verify that the printer prints it correctly. WARNING The printer may affect medical or other electronic devices.
-
Page 37: Recharging The Battery Pack
AC adapter. The battery pack can also be recharged with exclusive battery charger. Recharging the Battery Pack in the Printer An AC adapter and an AC cable are required to recharge the battery pack in the printer. (1) Turn the printer off. - Page 38 HINT • The printer can print or receive data while it is recharging the battery pack, too. While printing or receiving data, the POWER lamp lights continuously and the printer pauses to recharge. The printer recharges the battery again after printing and receiving data are completed.
- Page 39 NOTE When the battery charger is connected to the outlet, do not bring any metal object into contact with the metal terminal. Unplug the battery charger from the outlet after using. Remove the recharged battery pack from the battery charger within 24 hours. HINT •...
-
Page 40: Thermal Head Maintenance
9 THERMAL HEAD MAINTENANCE The thermal head of this printer does not require user maintenance. If paper dust accumulates, clean the thermal head to maintain maximum print quality for an extended time. Cleaning the Thermal Head (1) Turn the printer off. -
Page 41: Troubleschooting
Are used communication method and the function setting of the printer correct? · Is the Bluetooth or IrDA communication status good ? · Are the communication conditions for the printer and the host device correct ? · Is specified paper being used ? Is the paper orientation (top/bottom) correct ? The ERROR lamp is lit or the POWER lamp blinks. -
Page 42: Specifications
11 SPECIFICATIONS Printer Specifications Item Specification Model DPU-S445-00A-E (Bluetooth unsupported model) DPU-S445-01A-E (Bluetooth supported model) Printing method Thermal Characters per line 52 Character size (H × W) Standard size: 24 dots × 12 dots (H × W) Kanji size: 24 dots × 24 dots... -
Page 43: Interface Specifications
4 3260-8S3 HIROSE ELECTRIC CO.,LTD. or corresponsive product. · USB interface Item Specification Version Ver 2.0 based Printer data transmission mode Bulk transfer (12M bps) • Connector signals Signal Vbus Mini B type · Infrared interface Item Specification Version IrDAVer 1.2 based... - Page 44 List of Compliance with Regulation This printer and accessories comply with the regulation under countries as shown below. Be sure to use the products in the following countries because acceptable one differs in each countries. Regulation DPU-S445-00A-E under (Bluetooth countries unsupported model) ○...
-
Page 45: Options And Consumable Parts
12 OPTIONS AND CONSUMABLE PARTS Options Name Specified Battery pack Specified AC adapter Specified AC cable (for specified AC adapter) For Japan For USA, Canada For EU, EFTA Specified Battery charger Specified AC cable (for specified battery charger) For Japan For USA, Canada For EU, EFTA Specified Serial cable... - Page 46 Seiko Instruments Inc. 1-8, Nakase, Mihama-ku, Chiba-shi, Chiba 261-8507, Japan Print System Division Telephone:+81-43-211-1106 Facsimile:+81-43-211-8037 Seiko Instruments USA Inc. Thermal Printer Div. 2990. Lomita Blvd., Torrance, CA 90505, USA Telephone:+1-310-517-7778 Facsimile:+1-310-517-8154 Seiko Instruments GmbH Siemensstrasse 9, D-63263 Neu-lsenburg, Germany Telephone:+49-6102-297-0 Facsimile:+49-6102-297-222 Seiko Instruments (H.K.) Ltd.
Need help?
Do you have a question about the DPU-S445 and is the answer not in the manual?
Questions and answers