
Subscribe to Our Youtube Channel
Related Manuals for GERMANICA AF28L


Summary of Contents for GERMANICA AF28L
- Page 1 MULTI FUNCTION AIR FRYER OVEN AF28L INSTRUCTION MANUAL Please read this manual carefully before using, and keep it for future reference.
-
Page 3: Table Of Contents
CONTENTS General Safety Product Overview Installation Oven Functions Overview Operation Temperature Working mode Cancel Button Start Button Cooking Function Air Fry Function Toast Function Grill Function Rotisserie Function Defrost Function Dehydrate Function Air Fryer Cooking Times Cleaning and Maintenance Replacing the Oven Light FAQs Specifications Customer Helpline... -
Page 4: General Safety
GENERAL SAFETY IMPORTANT INFORMATION Read this manual thoroughly before you start using the Air Fryer. The safety precautions instructions reduces the risk of fire, electric shock and injury when correctly complied to. Please follow all instructions and take notice of all warnings. The lightning flash with symbol within the triangle is intended to warn you of a non-insulated dangerous voltage in the... - Page 5 GENERAL SAFETY (Cont.) • Do not touch hot surfaces. Use handle. • The outside of the oven, including the door, is hot during and after use. • Always use heat-resistant gloves, pads, or oven mitts when handling hot materials, and when placing items in or removing items from the oven, including trays, racks, accessories, or containers.
- Page 6 GENERAL SAFET (Cont.) WHILE COOKING • Do not place oversized foods or metal utensils (except for Germanica accessories) into your oven. • Do not place paper, cardboard, or nonheat-resistant plastic into your oven, or any materials which may catch fire or melt.
- Page 7 GENERAL SAFET (Cont.) ELECTRICAL SAFETY AND POWER CORD HANDLING • Voltage: Make sure that your outlet voltage and circuit frequency correspond to the voltage stated on the appliance rating plate. • Power outlet: Connect the appliance to a properly earthed power outlet, which must be easily accessible so that you can unplug it if necessary.
- Page 8 GENERAL SAFETY (Cont.) • Do not use the appliance for anything other than its intended purpose. Drying of food or clothing and heating of warming padsband similar items may lead to risk of injury, ignition or fire. • The appliance is not intended for use by persons (including children) with reduced physical, sensory or mental capabilities, or lack of experience and knowledge, unless they have been given supervision or instruction on the use of the appliance by a person responsible for their safety.
-
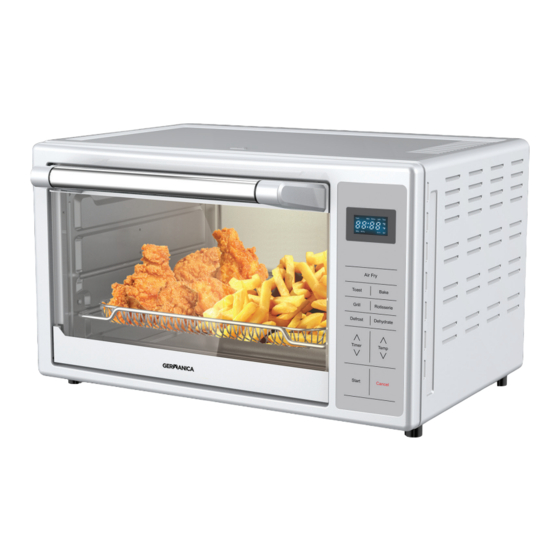
Page 9: Product Overview
PRODUCT OVERVIEW AIR FRYER DIGITAL SCREEN DOOR HANDLE VIEWING WINDOW FEET CONTROL PANEL ACCSESORIES... -
Page 10: Installation
INSTALLATION Before installing your appliance, read all safety instructions in this manual, especially the sections on electrical safety and installation. UNPACKING • When unpacking the appliance, be sure to keep all the packaging materials until you have made sure your new appliance is undamaged and in good working order. - Page 11 INSTALLATION (Cont.) IMPORTANT ADVICE The plug must be connected to an appropriate outlet that is installed and earthed in accordance with local standards and requirements. If unsure, consult an electrician or a service representative. Do not, under any circumstances, cut or remove the third (grounding) prong from the power plug. ROTISSERIE SHAFT &...
-
Page 12: Oven Functions Overview
Oven Functions Overview... - Page 13 CONTROL PANEL...
-
Page 14: Temperature Working Mode
OPERATION (Cont.) TEMPERATURE WORKING MODE SETTINGS: The temperature working mode can be adjusted when the oven is at standby mode, the default temperature working mode is “C°”: 1. User can long-press the “TEMP ” button for about 3s to ensure the oven working at “C°”... -
Page 15: Cooking Function
OPERATION (Cont.) TO SELECT THE COOKING FUNCTION: 1. In standby mode, user can press either of the function button to select the cooking function, the icon of selected function flash in control panel. 2. After pressed the function button to select the desired function, the default cooking data shown in LED display. -
Page 16: Air Fry Function
OPERATION (Cont.) “AIR FRY” FUNCTION The Air Fry function good for cooking a variety of French fries or chicken wings, under intense heat and maximized airflow to cook foods crispy and brown; food are ideally baked using this function. Open the door, place the food on the air fry basket. Insert the basket into the middle rack position and close the door. -
Page 17: Toast Function
OPERATION (Cont.) “TOAST” FUNCTION Different types of bread require different settings. Lighter breads and waffles require lighter setting. Darker breads, muffins and English muffins require a darker setting. Open the door, place the bread (4 or 6 slices) on the Wire Rack. Insert the rack into the middle rack position and close the door. -
Page 18: Grill Function
OPERATION (Cont.) GRILL FUNCTION The Grill function is good for cooking open-faced sandwiches, thin cuts of meat (like Bacon), poultry and fish, sausages and vegetables. Grilling can also be used to brown the tops of casseroles, gratins and desserts. Open the door, place the food on the Wire Rack /food tray, Insert the rack/tray into the middle rack position and close the door. -
Page 19: Rotisserie Function
OPERATION (Cont.) “ROTISSERIE” FUNCTION The Rotisserie function is a rotating roast, good for whole chicken roasting. Place whole chicken on the rotisserie rod and fixed by the fork both side, insert the rod into the rotisserie hole position and close the door. NOTE: Need put the Food tray at bottom rack slot to collect oil drip during cooking, and put some water in food tray before cooking,... -
Page 20: Defrost Function
OPERATION (Cont.) “DEFROST” FUNCTION The Defrost function is good for defrosting frozen meats. Open the door, place the food on the food tray, Insert the tray into the middle rack position and close the door. Press the “DEFROST” button to select the Defrost function. TIMER User can press the “TIMER... -
Page 21: Dehydrate Function
OPERATION (Cont.) “DEHYDRATE” FUNCTION The Dehydrate function combines low and stable heat with airflow to evenly dry out foods without cooking. Good for drying fruit or vegetables chips. Open the door, place the food on the Wire Rack/food tray, Insert the rack/tray into the middle rack position and close the door. -
Page 22: Air Fryer Cooking Times
OPERATION (Cont.) AIR FRYER COOKING TIMES (APPROXIMATE) Vegetables Temp Celsius Time Minutes Asparagus (slices 2.5cm) Beets (whole) Broccoli (florets) Brussel Sprouts (halved) Carrots (slice 1cm) Cauliflower (florets) Corn on the cob Eggplant (3.5cm Cubes) Fennell (quartered) Green Beans Kale Leaves Mushrooms (sliced1/2cm) Onions (pearl) Parsnips (1cm Chunks) - Page 23 OPERATION (Cont.) Pork and Lamb Temp Celsius Time Minutes Bacon (Regular) 5 to 7 Bacon (Thick) 6 to 10 Lamb Loin Chops (2.5cm thick) 8 to 12 Lamb Roast bone in (2.2kg) Lamb Roast boneless (600g) Loin (1KG) Pork Chops, bone in (2.5cm 185g) Rack of Lamb (680G - 900g) Sausages Tenderloin (500g)
- Page 24 OPERATION (Cont.) Chicken Temp Celsius Time Minutes Breast, bone in (566g) Breasts, boneless (110g) Drumsticks (1.13kg) Game Hen (halved 1kg) Legs Turkey, bone in 800g Schnitzel tenders Thighs, bone in 1kg Thighs, boneless (680g) 18-20 Whole Chicken (3kg) Wings (1kg) Beef Temp Celsius Time Minutes...
- Page 25 OPERATION (Cont.) Frozen foods Temp Celsius Time Minutes Cheese Sticks (310g) Chicken Nuggets (340g) Crumbed Prawns Fish Fillets (1cm, 280g) Fish Fingers (285g) French Fries Thick (180g) French Fries Thin (560g) Onion Rings (340g) Pot Sticker Dumplings (280g) Potato Gems Spring Rolls (280g) 12 to 14...
-
Page 26: Cleaning And Maintenance
CLEANING AND MAINTENANCE Clean oven accessories (including trays, etc.) and oven interior after every use. NOTE: • Do not use abrasive cleaners, metal scouring pads, or metal utensils on any part of the oven, including trays and other accessories. These will scratch or damage their surfaces. -
Page 27: Replacing The Oven Light
REPLACING THE OVEN LIGHT Always Unplug oven and let coll before Replcing Remove the wire rack from the oven before replacing the light. 2. The light is positioned on the right-hand side of the oven cavity. Securely position your fingers on the outside of the glass cover and turn the glass cover 1/4 turn counter-clockwise. -
Page 28: Faqs
FAQS If experiencing issues with your oven and isn’t operating correctly please check the following pages for solutions to the problems. If none of the solutions offered help solve the problem with your appliance then please contact our call centre on info@ayonz.com. DO NOT ATTEMPT TO REPAIR THE APPLIANCE YOURSELF. -
Page 29: Specifications
SPECIFICATIONS Power Supply 220-240V ~ 50Hz Rated Power 1800W 510 (w) x 400 (d) x 305 (h) mm Dimensions Door Open: 570.3 (d) mm Without handle: 343 (d) mm Weight Net: 9.5 kg / Gross: 11.5 kg... -
Page 32: Customer Helpline
CUSTOMER HELPLINE: info@ayonz.com DISTRIBUTED BY: Ayonz Pty Ltd...
Need help?
Do you have a question about the AF28L and is the answer not in the manual?
Questions and answers