Table of Contents
Advertisement
Quick Links
Advertisement
Table of Contents

Subscribe to Our Youtube Channel
Related Manuals for Saswell SAS6000UTK-7-WIFI


Summary of Contents for Saswell SAS6000UTK-7-WIFI
- Page 1 SAS6000UTK-7-WIFI SAS6000UTK-7-WIFI Instruction for Installation and Operation Installation Instruction Operation TEL:8675561218391/2/3/4/5 Factory:3/4/6 F Building A,East 8th Region, FAX:8675561218396 shangxueIndustry&Science Park,Buji town, Mail:info@saswell.com ShenzhenCity,Guangdong,China...
-
Page 2: Table Of Contents
Content Installation Instruction Operation Instruction Specifications/Feature Pre-installation checklist Time setting Remove old thermostat System setting Lable wires and remove old wallplate Fan setting New thermostat installation Program setting The wiring diagram Permanent hold override Vacation hold override Alternate wiring-conventional system Temporary hold override Alternate wiring-for heat pumps only Screen cleaning... -
Page 3: Installation Instruction
Installation Instruction Check to make sure your package includes the following items: SAS6000UTK-7-WIFI SAS6000UTK-7-WIFI Instruction for Installation Operation SAS6000UTK-7-WIFI thermostat Instruction for Installation (wallplate attached to back) and Operation Wall anchors and Printed in China www.saswell.com mounting screws (2 each) Wire labels This thermostat only work for 2.4Ghz.Before install ,adjust your router to 2.4Ghz... -
Page 4: Remove Old Thermostat
Remove Old Thermostat Lable Wires and Remove Old Wallplate 1. Turn off power at heating/cooling system (or fuse/circuit-breaker panel). 1. Use a screwdriver to disconnect wires one by one. As you disconnect each wire , wrap it with the label matching the letter on your old thermostat. 2. - Page 5 4. Mark wallplate mounting position 3. Grasp top and bottom of wallplate and pull to remove from thermostat. Level wallplate if desired. Mark positions of Pull wires through wallplate. both screw holes. Wallplate...
-
Page 6: New Thermostat Installation
New Thermostat Installation The Wiring Diagram Remove jumper wire between 1. Match each labeled wire with 1. Drill holes at pencil-marked locations: RC and (R)RH terminals same letter on terminal. before using on a DUAL (Use HEAT PUMP letters if TRANSFORMER system 2. -
Page 7: Alternate Wiring-Conventional System
Alternate Wiring-Conventional System The Wiring Diagram If labels do not match terminals, connect 2H/2C System wires as shown here (see notes, below). Remove metal jumper connecting 1H/1C System RH and RC only if you must connect both RH and RC wires. Remove metal jumper connecting Heat Relay 1 RH and RC only if you must connect... -
Page 8: Alternate Wiring-For Heat Pumps Only
Alternate Wiring-For Heat Pumps Only Batteries Installation If labels do not match letters on the thermostat, Battery Location: check the chart at right and connect to terminal Batteries are optional (to provide backup power) if your thermostat was wired as shown here (see notes, below). to run on AC power when installed. - Page 9 Important safety information Operation Instruction Always turn off power at the main power source by unscrewing fuse or switching SAS6000UTK-7-WIFI circuit breaker to the off position before installing, removing, cleaning, or servicing this thermostat. Read all of the information in this manual before installing this thermostat.
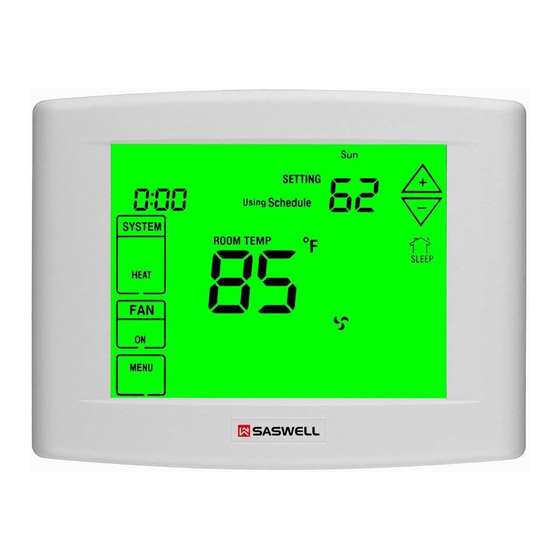
- Page 10 Menu driven programming The screen displays the set temperature, the room temperature and current Operating Ambient : 32℉ to 122℉ (0℃ to 50℃) time simultaneously SAS6000UTK-7-WIFI Operating Humidity : 90% non-condensing max Fan switch with on and auto Auto change over Shipping Temperature Range : 14℉...
-
Page 11: Time Setting
Time Setting System Setting 2.Press“ SET TIME ” to set current time and week. 1.Press“ MENU ” to display 1.Press the “ SYSTEM ” to select the system: the first function menu . AUTO: Auto Changeover is used in areas where both heating and cooling may be required on the same day. -
Page 12: Fan Setting
Fan Setting Program Setting 1.Press “ MENU ” button to 2.Press “ SET SCHED ” to enter set program 1.Press the “ ” to select fan opertion : display main menu button. mode. AUTO: Fan Auto is the most commonly selected setting and runs the fan only when the heating or cooling system is on. - Page 13 4.Press day buttons(Mon-Sun) to select 8.Press “ NEXT STEP ”for setting the days to set program schedule. program for the rest day(s) of the NEXT STEP It can be a single day the week week. or a roup of days of the week 5.Select 4 different time period for setting 9.After you have complete the settings, program schedule.
-
Page 14: Permanent Hold Override
Permanent Hold Override Default setting 1.Press “ MENU ” button to display main menu button. The thermostat is programmed with the energy saving settings shown in the table below for all days of the week. If this program suits your needs, simply set 2. -
Page 15: Vacation Hold Override
Vacation Hold Override Temporary Hold Override This feature can suspend the program schedule for extended period of days. This function can be set in the main interface directly. 1.Press “ MENU ” button to display main menu button. 1.Set the temperature Press “... -
Page 16: Screen Cleaning
Screen Cleaning 1.Press “ MENU ” button to 2.Press “ OTHER ” to display the hidden 4.After 30 seconds, press “ DONE ” to CLERN display main menu button. menu button. resume normal operation, or press “ CLEAN DISPLAY ” again if you CLEANDISPLAY require more time for cleaning. -
Page 17: Configurtion Menu
Configurtion Menu The configuration menu allows you to set certain thermostat operating 4.Press the “ OTHER ”for display other menu. characteristics to your system or personal requirements. 1.Press the “ SYSTEM ” 3.Press the “ MENU ”for 5.Press the “ CONFIG ”... - Page 18 1.System type option 4.Manual/Autochangeover option Parameter options:(1H,2H,HP1,HP2) Parameter options:(0,1) 1H: 1 heat/1 cool conventional 2H: 2 heat/2 cool conventional 0: Manual changeover 1: Auto changeover HP1: 1 compressor heat pump HP2: 2 compressors or 2 speed compressor heat pump Factory default:0 Factory default:2H 5.Auto changeover dead band option 2.Fan control option...
- Page 19 7.First heating cycle rate 10.Compressor lockout delay option Parameter options:(FA,SL) Parameter options:(0,5) To protect the compressor from short cycling, you can select compressor off-time cycle FA: Fast rate, heating will activate 0.6℉below set point between 0 or 5 minutes SL: Slow rate, heating will activate 1.2℉below set point Factory default:5 Factory default:FA 8.First cooling cycle rate...
- Page 20 12.Temperature recalibration option 16.Sceond stage cooling rate option Parameter options:(-4~+4) Parameter options:(FA,SL) FA: Fast second stage cooling rate. Second stage cooling will activate 1.5℉above first stage Factory default:0 cooling 13.℉ or ℃ readout option SL: Slow second stage cooling rate. Second stage heating will activate 2.5℉above first stage cooling ℉...
- Page 21 18.UV lamp replacement run time option 21.Heat pump compressor lockout option Parameter options:(UO,UF) Parameter options:(0℉,15℉, 20℉,25℉, 30℉,35℉,40℉) UO: It means starts to counting for 0 day to 400 day UF: It means cancel the function 0 : No heat pump compressor lockout 15℉,...
- Page 22 In case of difficulty 23.Audible beeper option We provided several FAQs. Parameter options:(YES,NO) YES: Thermostat will keep when any button touched Please follow the guide and make reference to the manual. NO : Thermostat will turn off the voice How to install? Why does the temperature display Please check user instruction on differ from the actual temperature?
- Page 23 Thermostat is calling for heating or Thermostat display has Chg UV/ How do I open the back cover? Does it work with Amazon Echo/ Chg Filter icon flashing : Alexa or the new Google home? Grasp top and button of wall plate and cooling, however there is no output :...
- Page 24 Why couldn’t register APP account? Is thermostat WIFI frequency 2.4 Ghz or 5Ghz? Check your WIFI connect,it should This thermostat only work for 2.4 connect to your router. Ghz.Before install ,adjust your router to 2.4Ghz. Insert router name and account get failed :...
Need help?
Do you have a question about the SAS6000UTK-7-WIFI and is the answer not in the manual?
Questions and answers