Table of Contents
Advertisement
Available languages
Available languages
Quick Links
APERTURA RAPIDA
FAST OPENING
P. max
Attacchi
Connections
Velocità massima in tubazione
Max. piping speed
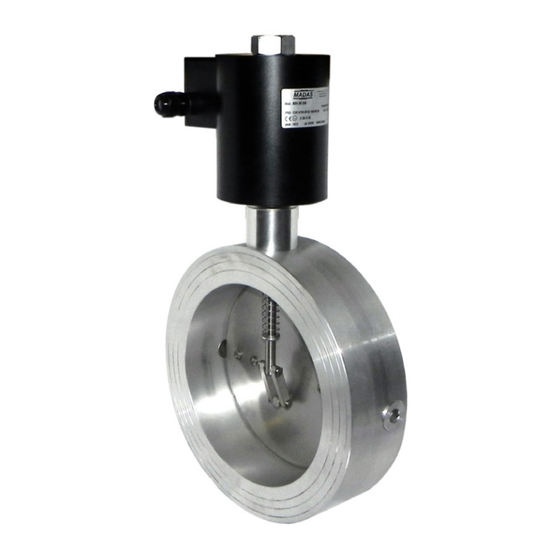
ELETTROVALVOLA AUTOMATICA A FARFALLA TIPO MBV CON BOBINA
AUTOMATIC BUTTERFLY SOLENOID VALVE TYPE MBV WITH COIL
DN 40 - DN 50 - DN 65 - DN 80 - DN 100 - DN 125 - DN 150 - DN 200
MBV...
I T
E N
200 mbar
30 m/s
Madas Technical Manual - 1|1.8a - REV. 0 of 21
S
eCtion
1
MADE IN ITALY
E N
F R
E S
Jun 2019 - MBV
th
C
hapter
1.8a
Advertisement
Table of Contents

Related Manuals for Madas MBV Series


Summary of Contents for Madas MBV Series
- Page 1 DN 40 - DN 50 - DN 65 - DN 80 - DN 100 - DN 125 - DN 150 - DN 200 Connections Velocità massima in tubazione 30 m/s Max. piping speed Jun 2019 - MBV Madas Technical Manual - 1|1.8a - REV. 0 of 21...
-
Page 2: Indice - Index
Disegni - Drawings ............................19 Dimensioni (tabella 1) - Dimensions (table 1)......................21 Bobine e connettori (tabella 2) - Coils anc connectors (table 2) ................22 Codifica prodotto / Product encoding ........................23 Madas Technical Manual - 1|1.8a - REV. 0 of 21 Jun 2019... -
Page 3: Legenda Simboli
• Il prodotto deve essere utilizzato unicamente allo scopo per il quale è stato costruito. • Il fabbricante non è responsabile per danni causati da un utilizzo improprio dell’apparecchio. Madas Technical Manual - 1|1.8a - REV. 0 of 21 Jun 2019... -
Page 4: Dati Tecnici
• Inserire all’interno dei bulloni le apposite rondelle per evitare danneggiamenti alle flange in fase di serraggio; • Durante la fase di serraggio prestare attenzione a non “pizzicare” o danneggiare la guarnizione; Madas Technical Manual - 1|1.8a - REV. 0 of 21 Jun 2019... - Page 5 • Fissare il connettore (7) alla bobina (2) serrando (coppia consigliata 0,4 N.m ± 10%) la vite centrale (8); • La valvola deve essere collegata a terra o tramite la tubazione o mediante altri mezzi (es. ponti a cavi). Madas Technical Manual - 1|1.8a - REV. 0 of 21 Jun 2019...
- Page 6 • La valvola deve essere collegata a terra tramite la tubazione o mediante altri mezzi (es. ponti a cavi). 3.4 - INSTALLAZIONE IN LUOGHI A RISCHIO DI ESPLOSIONE (DIRETTIVA 2014/34/UE) L’elettrovalvola non è idonea per l’utilizzo in luoghi a rischio di esplosione. Madas Technical Manual - 1|1.8a - REV. 0 of 21 Jun 2019...
-
Page 7: Manutenzione
• Svitare la vite (o dado) (1) di bloccaggio della bobina (2) e rimuoverla dal cannotto assieme alle apposite guarnizioni/dischetti; • Inserire nel cannotto la nuova bobina + guarnizioni + dischetti e fissare il tutto tramite l’apposita vite (o dado); Madas Technical Manual - 1|1.8a - REV. 0 of 21 Jun 2019... - Page 8 IMPORTANTE: Prestando attenzione a non pizzicare i due cavetti, inserire nel perno centrale (17): nuovo connettore/ scheda + rondella dentata (20) + dado (21). Con chiave a tubo da 8mm serrare il dado (21); Procedere come riportato ai punti c-f indicati in 3.2. Madas Technical Manual - 1|1.8a - REV. 0 of 21 Jun 2019...
- Page 9 Riavvitare e serrare la ghiera di posizionare l’O-Ring fissaggio con chiave commerciale da 35 mm • Terminate le operazioni suddette, procedere al cablaggio della bobina appena installata come indicato in 3.2 Madas Technical Manual - 1|1.8a - REV. 0 of 21 Jun 2019...
-
Page 10: Trasporto, Stoccaggio E Smaltimento
= Lotto in uscita anno 2016 settimana n° 18 • 8414 = numero progressivo commessa riferito all’anno indicato • 00001 = numero progressivo riferito alla q.tà del lotto Madas Technical Manual - 1|1.8a - REV. 0 of 21 Jun 2019... -
Page 11: General Information
• The manufacturer is not responsible for any damage caused by improper use of the device. Madas Technical Manual - 1|1.8a - REV. 0 of 21 Jun 2019... -
Page 12: Technical Data
• Insert the relative washers inside the bolts in order to prevent damage to the flanges during tightening; • When tightening, be careful not to “pinch” or damage the gasket; Madas Technical Manual - 1|1.8a - REV. 0 of 21 Jun 2019... - Page 13 • Secure the connector (7) to the coil (2), tightening (recommended tightening torque 0.4 N.m ± 10%) the centre screw (8); • The valve needs to be earthed either through the pipe or through other means (ex. cable jumpers). Madas Technical Manual - 1|1.8a - REV. 0 of 21 Jun 2019...
- Page 14 • The valve needs to be earthed either through the pipe or through other means (ex. cable jumpers). 3.4 - INSTALLATION IN PLACES WHERE THERE IS THE RISK OF EXPLOSION (DIRECTIVE 2014/34/EU) The solenoid valve is not suitable for use in potentially explosive areas. Madas Technical Manual - 1|1.8a - REV. 0 of 21 Jun 2019...
-
Page 15: First Start-Up
• Loosen the screw (or nut) (1) that locks the coil (2) and take it out from the armature assembly along with the seals/discs; • Place the new coil + seals + discs inside the armature assembly and secure with the relative screw (or nut); Madas Technical Manual - 1|1.8a - REV. 0 of 21 Jun 2019... - Page 16 IMPORTANT: Being careful not to pinch the two cables, in the centre pin (17) insert: the new connector/board + toothed washer (20) + nut (21). With an 8mm socket spanner, tighten the nut (21); Proceed as specified in points c-f in section 3.2. Madas Technical Manual - 1|1.8a - REV. 0 of 21 Jun 2019...
- Page 17 O-Ring ring nut again with a 35 mm commercial spanner • On completion of the above operations, proceed with wiring the coil just installed, as shown in 3.2 Madas Technical Manual - 1|1.8a - REV. 0 of 21 Jun 2019...
-
Page 18: Transport, Storage And Disposal
= Lot issued in year 2016 in the 18th week • 8414 = progressive job order number for the indicated year • 00001 = progressive number referring to the quantity of the lot Madas Technical Manual - 1|1.8a - REV. 0 of 21 Jun 2019... - Page 19 2 Versione con bobina incapsulata Encapsulated coil version Madas Technical Manual - 1|1.8a - REV. 0 of 21 Jun 2019...
- Page 20 19. Morsettiera posteriore (bobina) 19. Rear terminal board (coil) 20. Rondella dentata 20. Toothed washer 21. Dado fissaggio connettore/scheda 21. Connector/board fastening nut 22. O-Ring bobina 22. Coil O-Ring Madas Technical Manual - 1|1.8a - REV. 0 of 21 Jun 2019...
- Page 21 DN 80 DN 100 DN 125 DN 150 DN 200 Le dimensioni sono indicative, non vincolanti - The dimensions are provided as a guideline, they are not binding Madas Technical Manual - 1|1.8a - REV. 0 of 21 Jun 2019...
- Page 22 Tipo connettore / Connector type CN-2100 = Energy Saving 24 Vdc CN-2110 = Energy Saving 24 Vac CN-2120 = Energy Saving 110 Vac CN-2130 = Energy Saving 230 Vac Madas Technical Manual - 1|1.8a - REV. 0 of 21 Jun 2019...
- Page 23 Disponibili versioni con: regolazione di portata minima (codice MBVP); regolazione portata (codice MBVF); combinate (codice MBVPF). Are available versions with: Minimum flow adjustment (MBVP code); flow adjustment (MBVF code); combined (MBVPF code). Madas Technical Manual - 1|1.8a - REV. 0 of 21 Jun 2019...
- Page 24 Nos reservamos el derecho de realizar cualquier cambio técnico y estructural. Sede legale: Via V. Moratello, 5/6/7 - 37045 Z.A.I. Legnago (VR) Italy Unità locale: Via M. Hack, 1/3/5 - 37045 Z.A.I. Legnago (VR) Italy Tel. +39 0442/23289 - Fax +39 0442/27821 - http://www.madas.it - e-mail: info@madas.it...
Need help?
Do you have a question about the MBV Series and is the answer not in the manual?
Questions and answers