
Subscribe to Our Youtube Channel
Related Manuals for Van Der Stahl FEP-N2 Series


Summary of Contents for Van Der Stahl FEP-N2 Series
- Page 1 Printed DEC 2016 7th Edition 7.01E OPTIONAL HOT STAMP PRINTER FOR IM P U LSE SE A LER FEP-N2 SERIES OPERATING INSTRUCTIONS F TYPE www.vanderstahl.com...
- Page 2 FEP-N2 Series Operating Instructions Ver. 7.01E...
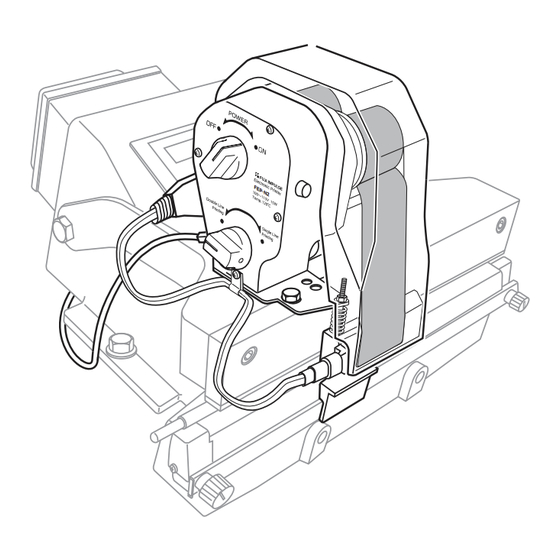
- Page 3 FEP-N2 series is installed on Van der Stahl Scientific sealers such as OPL, FA, Fi and V-402 / VG-602/402 series. As the sealer head operates up and down, the print tape (dry ink) transfers the letters onto the pouch film.
- Page 4 FEP-N2 Series Operating Instructions Ver. 7.01E Table of Contents Accessories for FEP-N2, FEP-OS-N2, and FEP-V-N2 ……………………………………………………………………… 5 Accessories for FEP-N2 (inside printing device) ……………………………………………………………………………… 6 Accessories for FEP-OS-N2 (outside printing device) ……………………………………………………………………… 6 Accessories for FEP-V-N2 (outside printing device) ………………………………………………………………………… 7 For safety operation ……………………………………………………………………………………………………………………… 12 For smooth operating ……………………………………………………………………………………………………………………...
- Page 5 FEP-N2 Series Operating Instructions Ver. 7.01E Model FEP-N2, FEP-OS-N2, FEP-V-N2 Printing method Hot foil transfer method Power voltage AC100V 50/60Hz Power consumption Temperature 120℃ 2Line:9mm(H)×36mm(W) Printing area 1Line:4mm(H)×36mm(W) Weight 1.2kg Cable tie Print tape (black) ………… 1pc. HTD(for PE/PP) ……… 1 roll Use to tie printer power HTP(for PET/Ny) ………...
- Page 6 FEP-N2 Series Operating Instructions Ver. 7.01E TYPES IN THE CASE DESCRIPTION SIZE 4 pcs. 1 pc. 6 pcs. 3 pcs. 2.4mm 2 each 4.8mm 1 pc. ) 1 pc. TYPES INSTALLED IN THE PRINTER (CASSETTE CASE) SIZE DESCRIPTION ( SAMPLE ) 3 pcs. 36mm Type cassette case ………...
- Page 7 ……… 1 pc. The hot stamp printer FEP-N2, FEP-OS-N2, and FEP-V-N2 can only be used by mounting to Van der Stahl Scientific sealers listed in the below table. Please make sure that the printer can be installed to your sealer.
- Page 8 FEP-N2 Series Operating Instructions Ver. 7.01E The print area of FEP-N2 (inside printing device), FEP-OS-N2 (outside printing device), and FEP-V-N2 (outside printing device) is indicated in the below chart. FEP-N2 Seal length 200 or 300mm 450 or 600mm Seal width Seal width: 2mm Seal width: 2mm When installed to a sealer 10.5mm 13mm...
- Page 9 FEP-N2 Series Operating Instructions Ver. 7.01E Routine maintenance parts, which will need to be replaced after extensive use, are sold individually as detailed below. Cord no. Parts name Sales unit 53501 Print tape (black) HTD 10 rolls / set 534091 Print tape (black) HTP 10 rolls / set Different codes Type (print slug) 53545...
- Page 10 Do not subject the print tape to unnecessary shock or impact. It may negatively affect the printing result. If the print tape is not designated by Van der Stahl Scientific is used, there may be a negative impact on the printer quality and/or the printing result.
- Page 11 FEP-N2 Series Operating Instructions Ver. 7.01E...
- Page 12 Do not modify the printer Warning Modification of the FEP-N2 series or the use of unspecified parts may not only lead to damage of the printer, but also there is a risk of danger to an operator. Please do not tamper with the printer. Accidents or damage caused by modification by the customer is the sole responsibility of the customer.
- Page 13 FEP-N2 Series Operating Instructions Ver. 7.01E Do not use parts other than those specified Warning When replacing parts, always use only specified parts sold through Van der Stahl Scientific. We are not responsible for malfunctions caused by the use of unspecified parts. Do not use in the following places Caution Do not operate the printer in the following places since there is a danger of malfunction:...
- Page 14 FEP-N2 Series Operating Instructions Ver. 7.01E ● Maintenance of types Always keep types clean. The types can easily be damaged, especially when you seal and print on a bag that contain water or when operating the printer in a moist environment. To prevent damage, wash the types using a tooth brush etc., after each use and allow them to dry.
- Page 15 FEP-N2 Series Operating Instructions Ver. 7.01E Power switch Power lamp Feed roller Winding roller You can turn ON/OFF the printer by turning the dial. The tape pressure roller fixes print tape when the power is FEP-N2 Printing line selector switch Switch between one-line and two-line printing by turning this switch.
- Page 16 FEP-N2 Series Operating Instructions Ver. 7.01E A method to mount a printer to the sealer varies according to each printer model. Read this chapter thoroughly before mounting the printer and properly fix it to the sealer. TIPS When mounting a printer to the sealer, it is required to open/raise the pressure lever (upper jaw) of the sealer.
- Page 17 FEP-N2 Series Operating Instructions Ver. 7.01E Remove a silver sticker adhered to the top side of pressure lever. You can see holes where FEP Silver sticker frame mounting bolts are fixed through. adhered to where Open/raise sealer’s pressure lever. a printer is mounted. TIPS For how to lift up the pressure lever, please refer to the operating Drawing spring base instructions of the sealer.
- Page 18 FEP-N2 Series Operating Instructions Ver. 7.01E Remove a silver sticker adhered to the top side of pressure lever. You can see holes where FEP Silver sticker frame mounting bolts are fixed through. adhered to where Open/raise sealer’s pressure lever. a printer is mounted. TIPS For how to lift up the pressure lever, please refer to the operating instructions of the sealer.
- Page 19 FEP-N2 Series Operating Instructions Ver. 7.01E FEP-V-N2 is a printer specifically made Attention for Van der Stahl Scientific V-402 and VG-602/402 series. FEP-N2 nor FEP-OS- N2 cannot be mounted to these sealers. Fix a type contact bracket and adjustment axis bracket to the sealer. Type contact bracket...
- Page 20 FEP-N2 Series Operating Instructions Ver. 7.01E Use only as described in this manual. There is a risk of danger and malfunctions may result if the machine is used not in accordance with this manual. TIPS At the time of factory shipment, a roll of print tape and some of the types are mounted to the printer.
- Page 21 FEP-N2 Series Operating Instructions Ver. 7.01E When the printer is ready to print, place a bag to the seal area and start sealing. The beautiful print can be created while you seal. Printing is made on the position where a rubber compression pad or type contact plate (for FEP-OS-N2 and FEP-V-N2) is positioned.
- Page 22 Do not replace parts according to other methods not described in the operating instructions. It is Warning dangerous if incorrect methods are used. Always use only specified parts sold through Van der Stahl Scientific. Unspecified parts may cause Warning malfunction of the machine.
- Page 23 FEP-N2 Series Operating Instructions Ver. 7.01E Winding roller Remove the used print tape from a winding Feed roller roller and discard it. Remove a paper core from a feed roller and attach it to the winding roller and use it to reel in the used tape. At the time of factory shipment, a TIPS paper core is installed to the...
- Page 24 FEP-N2 Series Operating Instructions Ver. 7.01E Next, put the print tape edge between the drive Feed roller roller and tape pressure roller. Attach to the paper core on the winding roller using Transparent tape transparent tape as in the right illustration. Tape pressure roller Drive roller Turn the power switch clockwise to the ON position.
- Page 25 FEP-N2 Series Operating Instructions Ver. 7.01E When replacing the print tape, turn OFF Warning the power switch and allow types and a type cassette case to cool completely before print tape replacement. There is a danger of burning. See “ ” for how to 12-1 Replacing print tape of FEP-N2 replace the print tape of FEP-N2.
- Page 26 FEP-N2 Series Operating Instructions Ver. 7.01E Install the print tape to the feed roller. Make a loop with the tape as in the right illustration. Matte surface must come outside of the loop. Matte surface Put the heater section unit through the print tape Roulette knob loop.
- Page 27 FEP-N2 Series Operating Instructions Ver. 7.01E Essential tools: tweezers, opener Types are sold individually or as a set. A heater section unit and types will be Warning extremely hot when the power switch is turned ON. Make sure those parts are cooled enough before replacing types. FEP-N2 Remove a print tape cover and print tape.
- Page 28 FEP-N2 Series Operating Instructions Ver. 7.01E Insert the type cassette case into the heater section unit. Set the print tape properly referring to “ 12-1 ” “1 Replacing print tape of FEP-N2 Type cassette case Replacing print tape of FEP-OS-N2 and FEP- ”. V-N2 When printing only a few characters, set e.g.) When printing “50g”...
- Page 29 FEP-N2 Series Operating Instructions Ver. 7.01E...
- Page 30 FEP-N2 Series Operating Instructions Ver. 7.01E The following adjustments will be required through daily maintenance. Read this chapter carefully before adjusting any parts. Adjust parts according to the following directions. Do not adjust parts according to other methods not Warning described in the operating instructions since it can cause burning or malfunction of the printer. Always unplug power plug before adjusting any parts.
- Page 31 FEP-N2 Series Operating Instructions Ver. 7.01E You can change print tape feed amount by switching print line setting between one line or two lines with a printing line selector switch. At the time of factory shipment, two line printing mode is selected. By changing the setting to one-line, print tape feed amount is adjusted to about 5mm that is the length used for printing one line.
- Page 32 FEP-N2 Series Operating Instructions Ver. 7.01E When a print tape slides off either to the right or left, you can adjust the tape position by moving a tape adjuster. FEP-N2 Tape adjuster FEP-N2 ■ When print tape slides off to the right: Loosen screws that fix the tape adjuster. Slide the right side of adjuster towards you to front.
- Page 33 FEP-N2 Series Operating Instructions Ver. 7.01E If you are experiencing problems with the machine or for how to replace parts not explained in this operating instructions, please contact Van der Stahl Scientific.
- Page 34 FEP-N2 Series Operating Instructions Ver. 7.01E Power AC100V Power switch Power lamp Frame unit Type unit The owner of the equipment is responsible for proper disposal of the equipment. When you need to dispose of the machine, please follow the guidance of your local authority. For further information we advise you to contact your local waste facility.
- Page 35 FEP-N2 Series Operating Instructions Ver. 7.01E When ordering spare parts, please consult the exploded view diagram / spare parts list on the following pages and provide both the part name and code number to your local dealer.
- Page 36 FEP-N2 Series Exploded View 34 Frame unit Drive roller unit Tape pressure roller unit...
- Page 37 FEP-N2 Series Spare Parts List ● Specify the part number and the product name when ordering. ● If there is no number, just specify the product name. ● The mark (#) indicates the parts are commonly used for all FEP-N2 ● ...
- Page 38 1652 Plum Lane, Redlands, CA 92374 800-550-3854 Y6087 DEC 2016 7th Edition www.vanderstahl.com FEP-N2 Series Operating Instructions Ver. 7.01E...
Need help?
Do you have a question about the FEP-N2 Series and is the answer not in the manual?
Questions and answers