Table of Contents
Advertisement
Advertisement
Table of Contents

Related Manuals for Korg ToneWorks PXR4


Summary of Contents for Korg ToneWorks PXR4
- Page 2 • Be careful not to let metal objects get into the equipment. If some- thing does slip into the equipment, unplug the AC adapter from the wall outlet. Then contact your nearest Korg dealer or the store where the equipment was purchased.
-
Page 3: Table Of Contents
Table of Contents Introduction ... 6 Printing conventions in this manual...6 Display screens in this manual ...6 Main features ...6 Features of the PXR4 and their function...7 1. Top panel ...7 2. Side panels...8 3. Front panel ...9 4. Rear panel...9 5. - Page 4 Step 2. Creating/selecting a song ...23 1. Creating a new song ...23 2. Selecting a different song ...23 To select the next-numbered song...23 To select the previous-numbered song...23 3. Changing the name of a song...24 To change the name of a song...24 Step 3.
- Page 5 3. Saving an effect program ...38 To save an effect program ...38 4. Loading/saving an effect user file ...39 To save to a different effect user file ...39 Loading a different effect user file ...40 Step 8. Tempo/rhythm settings ...40 1.
- Page 6 P.3-3 InsTrack (Insert Track): Insert blank space into a track P.3-4 ErsTrack (Erase Track): Erase data from a track ...59 P.3-5 DelTrack (Delete Track): Delete data from a track P.3-6 ExpTrack (Exp/Cmp): Expand/compress a region of a track ...60 P.3-7 CpyV-Trk: Copy a virtual track ...61 P.3-8 DelV-Trk: Delete a virtual track...61 P4.
- Page 7 If you are unsure about your rights to a work, please consult a copyright attor- ney. KORG TAKES NO RESPONSIBILITY FOR ANY INFRINGEMENT COMMITTED THROUGH USE OF KORG PRODUCTS.
-
Page 8: Introduction
Printing conventions in this manual [ ]: Keys, and knobs on the panel of the PXR4 are enclosed in [square brackets]. “ ”: Parameters that appear in the display are enclosed in double quotation marks. -
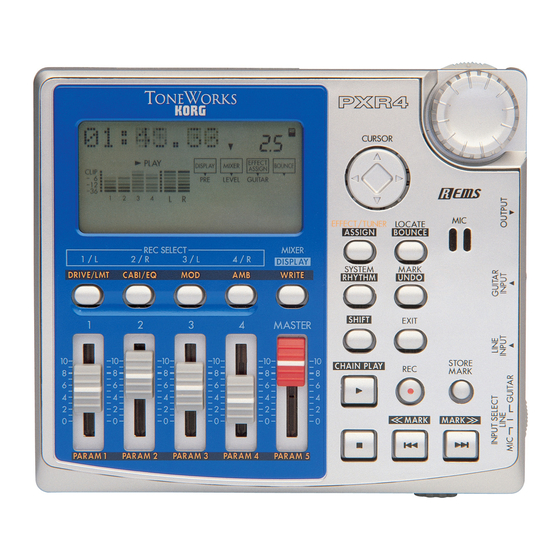
Page 9: Features Of The Pxr4 And Their Function
Features of the PXR4 and their function 1. Top panel 1. Display This area displays level meters for recording and play- back, time information (locate), page information, and various parameters. 2. [REC SELECT] keys These keys switch each track between playback and recording. -
Page 10: Side Panels
Introduction 14. [EXIT] key This key returns to a desired page specified for each mode or page. When time information is displayed, pressing this key will briefly display the name of the currently selected song. 15. [STORE MARK] key This key registers the desired location of the song as a Mark. -
Page 11: Front Panel
3. Front panel 1. [PHONE] jack Connect a set of headphones to this jack (stereo mini). 2. [PHONE LEVEL] knob: 0...10 This knob adjusts the volume of the headphones. Higher settings will produce a louder volume. 3. [INPUT TRIM] knob: 0...10 This knob adjusts the input level. -
Page 12: Display Screen
Introduction 6. Display screen 8 – 14 1. Page parameter display/Location counter display This area displays the current time and parameter information. 2. Page guide display This area shows the direction of the pages to which you can move from the current page by using the [CURSOR] key. - Page 13 14. Battery empty icon This will blink when the battery runs low. ( p.14) 15. Effect chain This area indicates the on/off status of each effect module. 16. Display indicator These indicate the type of level that is shown by the level meters.
-
Page 14: Connections
Introduction Connections The diagrams below show some basic examples of how the PXR4 can be connected. Refer to these diagrams, and make connections as appropriate for your equipment. Connections must be made with the power turned off. Input Set the [INPUT SELECT] switch to the input jack that you want to use. -
Page 15: More About Cards
Doing so may damage the SmartMedia. More about cards The PXR4 can use SmartMedia with a power supply volt- age of 3.3 V and a capacity of 4–128 Mbytes, or SmartMe- dia with ID. Never use other types of SmartMedia, since they may cause the PXR4 to malfunction. -
Page 16: Battery Empty Indicator
Turning on the display backlight If you are using the PXR4 in a dimly lit location, or if the display is difficult to read, you can turn on the backlight. Slide the [POWER/BACK LIGHT] button to the “... -
Page 17: Turning The Power Off
Listening to the demo songs The included card contains demo songs. Here’s how you can listen to these demo songs. Connect headphones or a monitor amp to the PXR4. Make connections as described on p.12. Turn on the power of the PXR4. ( p.13) -
Page 18: Quick Start
Quick start This section explains easy operation of the PXR4. To begin, here’s how to connect your guitar, record your play- ing on one track, and then play it back. 1. Preparations Insert the card Insert the card (SmartMedia) into the card slot. -
Page 19: Create A New Song
Turn the power on Turn on the [POWER/BACK LIGHT] switch located on the rear panel of the PXR4, and the start-up screen will appear in the display. If the display is too dark to read, turn on the backlight. ( p.14) 3. -
Page 20: Record
Quick start 4. Record ( p.25) Specify the recording track Press the track 1 [REC SELECT] key to make the “ ” symbol appear for track 1. Check the input level Hold down the [SHIFT] key and press the [MIXER] to switch the “DISPLAY”... -
Page 21: Playback
Press the [STOP] key When you have finished playing, press the [STOP] key. Recording will stop, and the “REC” icon will dis- appear. 5. Playback ( p.31) Press the [REW] key The counter time will move to the beginning of the song. -
Page 22: Operation
Mixer operations are performed in this mode. You can adjust volume, pan, and effect send levels for each track. In addition, there is also a Tuner mode in which the PXR4 functions as a tuner. 2. Selecting and setting parameters... -
Page 23: Editing A Parameter Value
By continuing to hold down the mode key you pressed, you can move through the pages after entering the mode in the same way as by pressing the [CURSOR] down key. In Effect mode, you can hold down the [SHIFT] key and press the [CURSOR] left or right key to jump to the selection page for each effect module. -
Page 24: Tuning
Operation 3. Tuning The PXR4 has a built-in tuner function. This lets you tune an instrument connected to the [GUI- TAR IN] jack or [LINE IN] jack, or by using the internal mic. Tuning your guitar Connect your guitar to the [GUITAR INPUT] con- nector. -
Page 25: Step 2. Creating/Selecting A Song
Step 2. Creating/selecting a song 1. Creating a new song Before you can make a new recording, you must create a new song. Access the song creation page. If no songs are recorded on the card, the display will automatically indicate “MakeNew!” when you turn on the power. -
Page 26: Changing The Name Of A Song
Operation If you are in the middle of the song, press the [REW] key to move to the beginning of that song, and then press the [REW] key once again to move to the previous song. When you switch songs, the volume level of each track will change to the level at which the faders were when you switched songs. -
Page 27: Step 3. Recording
Recording on two tracks Here’s how to record on two tracks simultaneously. Connect the input device. Lower the PXR4’s [MASTER] fader, set the [INPUT SELECT] switch to LINE, and connect your keyboard etc. to the [LINE INPUT] jack. [OUTPUT L/R]... -
Page 28: Additional Recording
2. Additional recording ” symbol for the Using virtual tracks to record The PXR4 is a four-track recorder, but each track has 8 vir- tual tracks (A–H). You can select one of these for record- ” (REC) icon in the dis- ing, and then switch virtual tracks to use the PXR4 as though it were a 32-track recorder. -
Page 29: Overdubbing - Listening To The Playback While You Record Another Track
Adjust the recording level of your input device, and record. Refer to “1. Recording methods” steps 1 –4 . Overdubbing – listening to the playback while you record another track The technique of listening to the playback of previously- recorded tracks while you record another track is called “overdubbing.”... -
Page 30: Count-In - Recording After A Specified Number Of Measures
PXR4 at the moment recording begins. Specify the number of measures until when record- ing will begin. -
Page 31: Bounce - Combining Multiple Tracks
Use the dial to specify the number of measures that will be recorded. (You can specify up to 999 mea- sures.) If this is “Off,” recording will continue until you press the [STOP] key during recording. Press the [EXIT] key several times to return to Locate mode. Set the current time to the measure at which you want to begin recording. -
Page 32: Combining Three Tracks And One External Input Source Onto One Track
Operation which is inconvenient for listening while you record. If you turn the “AutoPan” setting “On,” the panning of the bounce source tracks will automatically be set appropriately for the bounce destination, and the monitor sound will also be auto- matically panned to the center. -
Page 33: Layering Additional Performances Onto One Track
Refer to “1. Recording methods,” steps 1 –9 . Step 4. Playback This section explains basic playback on the PXR4, and how to play back songs consecutively. 1. Playback Select the song that you want to play back, and set the time location. -
Page 34: Half-Speed Playback
Operation Half-speed playback During playback, you can press and hold the [PLAY] key to play back at half-speed. Consecutive playback (Chain Play) – playing songs one after another Here’s how songs you created can be played automati- cally in order of their song number. Hold down the [SHIFT] key and press the [PLAY] key. -
Page 35: Using Marks To Change The Time Location
keys to change the blinking unit. Moving toward the right will switch screens, allowing you to move in smaller units. If “LocMoni” ( p.63) is turned “On,” you will be able to lis- ten to the sound while you change the time location. Press the [EXIT] key to return to normal Locate mode. -
Page 36: Deleting A Mark
Operation song. Move to the next or previous mark. Hold down the [SHIFT] key and press the [FF] key to move to the mark with the next time location, or press the [REW] key to move to the mark with the previous time location. -
Page 37: Setting The Intime, Outtime, Totime, And Endtime To Marked Locations
Setting the InTime, OutTime, ToTime, and EndTime to marked locations You can register marks at each of the InTime, OutTime, ToTime, and EndTime locations used in track editing ( p.43). If you want to set these locations without regard to marks, select the mark that is closest to the desired time, and press the [CURSOR] down key to switch to the time dis- play for that mark. -
Page 38: Using Effects
Operation Step 7. Using effects The PXR4 provides 77 types of effects. It contains 100 pre- set and 100 user effect programs that combine these effects in various ways. The preset memories contain effect programs created by professional musicians and studio engineers. -
Page 39: Editing An Effect
The combination of effect modules that can be used simul- taneously and the order of their connection is referred to as a “chain.” The PXR4 provides eight chains that are suit- able for various purposes: [CHAIN1]–[CHAIN8]. The fac- tory preset settings contain 100 effect programs, each of which consists of one of these chains. -
Page 40: Editing An Effect
Operation [CHAIN 4] This chain is suitable for mic input. LIMITER GATE MIC SIM [INSERT] stereo-in – stereo-out [MASTER] stereo-in – stereo-out [FINAL] stereo-in – stereo-out [CHAIN 5] This chain lets you use modulation and delay simultaneously. [CHAIN 6] This chain can be used to adjust the final level during mixdown. -
Page 41: Using The Faders To Edit The Effect
Adjust the volume of the effect. After making settings in step 3 , press the [CURSOR] right key to display the “ProgMVol” (effect volume setting) page. While you listen to the output, use the dial to adjust the setting. Using the faders to edit the effect When editing an effect module (“DRIVE/LMT,”... -
Page 42: Loading/Saving An Effect User File
If no effect user file (1.EFF) has been saved on the card, the data stored in the PXR4 itself (the default settings) will be loaded. Simply exchanging cards will not change the contents of the effects. -
Page 43: Step 8. Tempo/Rhythm Settings
1. Setting the tempo and time signature On the PXR4, you can set one tempo for a song. Display the “Tempo” page. Press the [SYSTEM] key to display the “Tempo” page. -
Page 44: Changing The Tempo Of The Rhythm
To change the tempo, select the rhythm, and then edit “BPM” to set the tempo. Step 9. Song editing The PXR4 provides the following editing operations for managing songs. Undo is not available for song edit operations. 1. Song editing operations Song Name –... -
Page 45: Delete Song - Deleting A Song
When the Delete operation is completed, the display will indicate “Finish!” Step 10. Track editing The PXR4 provides the following track editing operations. For details on each parameter, refer to p.56. Virtual Track: select a virtual track Copy Track: copy a track... - Page 46 Operation Select the track for which you want to select a virtual track. Use the [CURSOR] left/right keys to select a track 1–4 whose virtual track you will select. Select the virtual track. Use the dial to select the virtual track “A”–“H” that you want to record.
- Page 47 Use the dial to select the number of times to copy the data. For this example, select “3” as the number of times. Then press the [CURSOR] right key. Select “EditMode” (editing unit). For this example, select “Fast.” If the editing location turns out to be inaccurate, undo the operation, and then select “Best”...
-
Page 48: Insert Track - Inserting A Blank Space
Operation SOR] right key to execute the operation. When the copy has been completed, the display will indicate “Finish!.” Press the [PLAY] key to play back, and verify that the copy occurred as you intended. You can press the [UNDO] key to return to the state prior to executing. -
Page 49: Delete Track - Deleting A Track
DestTrk DestTrk Blank As an example, here’s how to erase the In–Out region of track 1. Register marks at the desired In and Out time loca- tions. ( p.35) Display the “EditTrk” (track edit) page. ( Copy Track 2 ) Select “ErsTrack”... -
Page 50: Expansion/Compression - Expanding/Compressing A Track
Operation Select the “DestTrk.” Use the dial to select the track number from which data will be deleted. For this example, select track “1.” Then press the [CURSOR] right key. Select the “EditMode.” ( Copy Track) Select the “InTime” and “OutTime.” For each point, use the dial to select a mark number that you registered. -
Page 51: Copy Virtual Track - Copying To A Virtual Track
Use the dial to select the number of times that the data will be copied. For this example, select “3” as the number of times that the data will be copied. Then press the [CURSOR] right key. Select the “InTime,” “OutTime,” “ToTime,” and “EndTime.”... - Page 52 Operation Select the “DestTrk.” Use the dial to select the copy destination track num- ber. For this example, select track “1.” Then press the [CURSOR] right key. Select the “DestVTrk.” Use the dial to select the copy destination virtual track number.
-
Page 53: Step 11. Mixdown
Adjust the level and pan etc. of each track, and play back to check the song. Connect your external recording device. Connect the [LINE OUT] jack of the PXR4 to your tape recorder or MD recorder, etc. Begin mixdown. Start recording on your external recording device, and play back the PXR4. -
Page 54: Step 12. Saving To Your Computer
A card for use with the PXR4 must not be formatted on a computer or digital camera etc. The card must be formatted by the PXR4 itself. -
Page 55: Macintosh Users
“CrdReady.” A drive named “Removable Disk” will be added to your computer. If you are connecting the PXR4 for the first time, the device driver will be installed now. Back up the data to your computer. When you open the removable disk drive that was added in step 3 , you will see the contents of the SmartMedia that is inserted in the PXR4. -
Page 56: Saving Song Files Via Card
“PXR4.INI”. This file contains the number of the song that is currently being edited on this card. The presence or absence of this file will not affect the opera- tion of the PXR4. If this file does not exist, the first song will be used. 2.”... -
Page 57: Card Management
file named “CDRECVRY.LOG.” The presence or absence of this file will not affect the opera- tion of the PXR4. 3. Card management If the available capacity of the card decreases or if the data on the card becomes damaged, you can “recover”... -
Page 58: Parameters
Parameters This section explains the function of the parameters that appear in the display each time you press a key. LOCATE Here you can check the current location, set the counter display, and use the counter to change the current time. P1. -
Page 59: System
SYSTEM P1. Tempo: tempo setting Here you can set the tempo, time signature, and rhythm of the currently selected song. 1. BPM (Beats Per Minute) ... [040…240] Specifies the tempo. 2. Beat ... [1/4…8/4, 1/8…8/8] Specifies the time signature. 3. Rhythm... [Off, 01…50] Turns rhythm on/off and specifies the rhythm pattern. -
Page 60: Delsong: Delete A Song
Parameters P.2-3 DelSong: Delete a song This operation deletes the selected song. 1. DestSong ... (1…99) Confirm the number of the song that will be deleted. 2. Del OK?... [Yes, No] When you select “Yes” and press the [CURSOR] right key, the display will ask “Sure?,”... -
Page 61: Instrack (Insert Track): Insert Blank Space Into A Track
3. CpyTimes... [01…99] Specify the number of times the data will be copied. 4. EditMode ... [Fast, Best] Select the unit of time by which the data will be edited. (Fast): The data will be copied in 1-frame (36 msec) units. -
Page 62: Deltrack (Delete Track): Delete Data From A Track
Parameters P.3-5 DelTrack (Delete Track): Delete data from a track This operation deletes track data from the In–Out region of the edit destination track (“DestTrk”). When this operation is executed, the track data of the In– Out region will disappear, and the track data that follows the deleted data will be shifted forward. -
Page 63: Cpyv-Trk: Copy A Virtual Track
The processing time until the operation is completed (“Finish!”) will be longer in proportion to the length of the specified region (In–Out). P.3-7 CpyV-Trk: Copy a virtual track This operation copies all track data of the edit source track (“SrcTrk”) to the specified virtual track of the edit destina- tion track (“DestTrk”). -
Page 64: Cdfxsave: Saving An Effect User File
Parameters 2. Free[%] ... This indicates the percentage (%) of space available on the currently-used card (i.e., space that can be written). P.4-2 CdFxSave: Saving an effect user file This operation saves the effect user data to the card. 1. Save Num... [1, 2] Select the save destination for the effect data. -
Page 65: Record: Recording Settings
External input when the recorder is recording Off: Tracks selected for recording will always use the external input. 2. AutoPan ... [Off, On] Specify whether the pan (stereo position) setting will be set automatically when bounce-recording to a single record track. ( p.29) 3. -
Page 66: P6. Usb Comm: Usb Connections
ALL: Delete the undo data of all songs. P6. USB comm: USB connections When connecting the PXR4 to your computer, make set- tings in this page. ( p.52) EFFECT Here you can select effect settings. For an effect, you can select either GUITAR, INSERT, MASTER, or FINAL as the effect assign (insert location). -
Page 67: Cabinet: Cabinet Module
P.1-3 Cabinet: Cabinet module 1. Cabinet... [***] Select the type of cabinet. P.1-4 Modulation: Modulation module 1. Modulation ... [***] Select the type of modulation. P.1-5 Ambience: Ambience module 1. Ambience ... [***] Select the type of ambient effect. P.1-6 NR/Gate: NoiseReduction/Gate module 1. -
Page 68: Mark
Parameters standby. MARK In these pages you can use marks to change the current time location, and can also delete marks. This page cannot be selected if no marks have been registered. P.1-1 SelectMark: Select a mark Here you can select a mark, and change the current time to the location of that mark. -
Page 69: Sendl: Send Level Adjustment (L Ch.)
EFFECT ASSIGN Here you can select the effect insert location, and select the effect type. The PXR4 has one built-in effect unit, and you can select one of the following locations into which it will be inserted. Hold down the [SHIFT] key and press the [EFFECT] key to switch this setting. -
Page 70: Bounce
Parameters Select this when you want to record while applying a ste- reo effect. MASTER: Stereo-in stereo-out Select this when you want to send the “Send” signals from each track to the effect, enhancing the overall depth and balance. FINAL: Stereo-in stereo-out Select this when you want to make overall adjustments to the song in the master LR bus. -
Page 71: Rec Select
(OFF): This is the normal recording mode. REC SELECT These keys select the track(s) for recording. When you select a track for recording, a appear for the track number below the level meter dis- play. The tracks that can be recorded will differ depending on whether you are using normal recording or bounce recording. -
Page 72: Transport Keys
Parameters In the effect pages, the faders can be used to edit the effect. In the mixer pages, the faders can be used to edit the pan and effect send of each track. In order to use this function, the System mode “Mixer” page setting “FadrCtrl”... - Page 73 2. REC When you press this key, the recorder will enter record- standby mode (the “ ” indicator will blink). In order to enter record-standby mode, the [REC SELECT] key of at least one track must be pressed to display a “ track number located below the level meter.
-
Page 74: Effect Parameters
Effect parameters The contents of the effect parameters are explained for each effect module. The effect modules that can be selected will differ for each chain. ( p.82) DRIVE/LMT BLOCK 1. DRIVE TopBoost (TOP BOOST) This model simulates the distortion of the VOX AC30. 1. - Page 75 If the sound is distorted, slightly lower each of the LEVEL, TREBLE, MIDDLE, and BASS settings. * The parameters are the same as “CLASSIC COMP.” 2. LIMITER Limiter (LIMITER) This limits the peaks of the input signal to the specified level. 1.
-
Page 76: Cabi/Eq Block
When recording on the PXR4, using this block will give your instrument the same sense of presence as if you were actually playing through a guitar amp. - Page 77 The Bass Cabinet block simulates a wide range of speaker and cabinet characters, from vintage tube amps to modern solid state amps. When recording on the PXR4, this block can give your instru- ment a sense of presence as though you were playing through an amp.
- Page 78 When using the built-in condenser mic of the PXR4, you can simulate the mic that is most appropriate for the source being recorded.
-
Page 79: Modulation Block
MODULATION BLOCK 1. MODULATION Chorus (CHORUS) StChorus (STEREO CHORUS) These effects give the sound depth and warmth by modulat- ing the delay time. 1. TIME ... [1...10]: Adjusts the delay time, controlling the frequency range at which the effect will apply. Adjusting this toward 0 will cause the modulation to occur at a higher pitch. - Page 80 Effect parameters PitchSft (PITCH SHIFTER) StPitch (STEREO PITCH SHIFTER) These are pitch shifter effects with a ±2 octave range of adjust- ment. 1. -----(BLANK)... 2. -----(BLANK)... 3. PITCH ... [–24...+24]: Adjusts the pitch change amount. 4. FINE ... [–50...+50]: Fine adjustment of pitch change amount.
-
Page 81: Ambience Block
B WahDwn (BASS WAH DOWN) This is a wah in which the filter operates in the opposite direc- tion from BASS WAH UP. * The parameters are the same as “BASS WAH UP.” Filter1 (FILTER1) This is a band pass filter with a fixed frequency. It is placed before the drive block. -
Page 82: Nr/Gate Block
Effect parameters PPDelay (STEREO PING PONG DELAY) This is a stereo delay in which the sound bounces between left and right. 1. TIME ...[0...1.75s]: Adjusts the delay time. 2. FEEDBACK... [0...10]: Adjusts the feedback (delay repeats). 3. TONE ... [0...10]: Adjusts the tone of the delayed sound. -
Page 83: Effect Program List
Effect Program List Prog name Prog name Chain# For 00 ACOU SIM Chain1 E.Guitar 25 B OCTAVE 26 B CHORUS Chain3 Bass Guitar 01 CL COMP Chain1 E.Guitar 02 50'S Chain1 E.Guitar 27 B BOOTS 28 B OVDRV 03 60'S Chain1 E.Guitar 04 70'S Chain1 E.Guitar... -
Page 84: Effect Chain List
Effect parameters Effect Chain List For each chain, the following effects can be selected. [DRIVE/LMT] CHAIN1 CHAIN2 CHAIN3 TopBoost Limiter B Comp US HI-G B Ovdrv Brit Stk B Dist BigFuzz B Octave Seattle B OctDst Mtl Dist Fat Dist ClasDist Tube OD ClasComp... - Page 85 [MOD] CHAIN1 CHAIN2 CHAIN3 CHAIN4 Chorus Chorus Chorus Chorus Flanger Flanger Flanger Flanger ModDelay ModDelay ModDelay ModDelay ModDelay* Tremolo Tremolo Tremolo Tremolo PitchSft PitchSft PitchSft PitchSft Phaser Phaser Phaser Phaser Octave Octave Octave Octave WahUp WahUp B WahUp WahUp WahDwn WahDwn B WahDwn WahDwn Filter1...
-
Page 86: Appendices
Appendices Troubleshooting No sound Is the power of the PXR4 and/or connected devices turned on? ( p.14) Are the amp or headphone connections correct? Can’t hear the playback The [MASTER] fader or [PHONES] knob may have been set to “0.”... - Page 87 Set the counter display to “FreeTime” and check the amount of recordable time. ( p.56) Is the bounce setting (“BOUNCE”) appropriate? ( p.29) If the bounce setting (“BOUNCE”) is set to “CONV,” the recording will be created as a new song. ( p.51) Can’t record two tracks simultaneously The “EFFECT ASSIGN”...
- Page 88 Appendices Is the return level set to “0” or close to “0”? Press the [EFFECT] key to access Effect mode, press the [CURSOR] right key several times to display “EffRetLv,” and raise the return level. Final effect does not apply Is the effect insert location correct? Hold down the [SHIFT] key and press the [EFFECT] key, and set “EFFECT ASSIGN”...
-
Page 89: Messages
Turn off the power, re-insert the card, and then turn the power on once again. Display indicates “CdRecvry” Did you turn off the power of the PXR4 while the card was being accessed? ( p.61) It is possible that the data in the card has been dam- aged. -
Page 90: Error Messages
An operation is being performed. Please wait until this message disappears. Error messages Batt Low The batteries have run down. The PXR4 cannot be operated. Turn off the power, and either replace the batteries or connect the AC adapter. Then turn the power on again. - Page 91 Use Delete Song to delete unneeded songs. EvntFull Recording is not possible, since there are not enough free events in the song. To increase the number of free events, use “DelV-Trk” ( p.49) to delete unneeded tracks. In >Out When executing a track editing operation such as “CopyTrk,”...
- Page 92 200%). Re-set the time settings to appropriate values. UndoOver The Undo memory area of the PXR4 is full. Execute “CdRecvry” ( p.62). If an error message still appears, use “DelV-Trk” ( p.49) to delete unneeded tracks. If the message still appears, delete unneeded songs.
-
Page 93: Rhythm Pattern List
Rhythm pattern list Metro01 Metro01 Metro01 Metro01 Metro02 Metro02 Metro02 Metro02 3/4_1 3/4_2 Metro01 8beat09 16beat09 Rock08 Metro02 8beat10 16beat10 Rock09 8beat01 16beat01 16beat11 Metal 8beat02 16beat02 Rock01 R&R 8beat03 16beat03 Rock02 Funk01 8beat04 16beat04 Rock03 Funk02 8beat05 16beat05 Rock04 Funk03 8beat06 16beat06... -
Page 94: Specifications
Appendices Specifications <Recorder section> Number of tracks: 4 tracks 4 tracks simultaneous playback/2 tracks simultaneous playback Recording format: 16 bit MPEG1 Layer 2 compression 32 kHz Recording time: Hi Quality = approx. 11 minutes/1 when using 16 MB track SmartMedia Standard = approx. -
Page 95: Included Items
Rated level [LOW]: –44dBu@TRIM=max –4dBu@TRIM=min [HIGH]: –38dBu@TRIM=max +2dBu@TRIM=min Source impedance: <LINE INPUT> Connector: mini-stereo phone jack Input impedance: 10 k Maximum level: +2dBu Rated level: –50dBu@TRIM=max –10dBu@TRIM=min Source impedance: <OUTPUT> Connector: mini-stereo phone jack Output impedance: Maximum level: +0dBu Rated level: –12dBu Load impedance: greater than 10 k... -
Page 96: Index
Appendices Index AutoIn ... 62 AutoPan ... 63 Backed up ... 52 Bounce... 29, 68 Card ... 12, 51 Format... 62 View card information ... 61 Card recovery... 54, 62 Chain Play ... 32 Convert ... 51 Counter display ... 32, 56 Count-In... - Page 97 Pan ... 35, 66 Parameter... 20 Parameter value... 21 [PLAY]... 70 Playback... 31 Double-speed playback... 31 Half-speed playback ... 32 Position ... 66 Post-fader level ... 26 Pre-fader level... 25, 67 Punch-in/out ... 27 Manual punch-in... 28 Manual punch-out ... 28 [REC] ...
-
Page 98: Block Diagram
Appendices Block diagram TUNER INPUT SELECT ASSIGN GUITAR INPUT LINE INPUT TRIM GUITAR EFFECT INSERT EFFECT TRK1 Level Pan1 SELECT Send-L1 Send-R1 POST TRK2 Level Pan2 SELECT Send-L2 Send-R2 POST TRK3 Level Pan3 SELECT Send-L3 Send-R3 POST TRK4 Pan4 Level SELECT Send-L4 Send-R4... - Page 99 Please also retain your receipt as proof of purchase otherwise your product may be disqualified from the manufacturer’s or distributor’s warranty. KORG INC. 15 - 12, Shimotakaido 1 - chome, Suginami-ku, Tokyo, Japan. 2001 KORG INC. IMPORTANT NOTICE TO CONSUMERS...