
Summary of Contents for BLACKWELL NH70
- Page 2 Thank you for purchasing this BLACKWELL watch. The following instructions are provided to help you familiarize yourself with the proper operation and care of your BLACKWELL watch. To ensure correct use, please read and follow the instructions carefully.
- Page 3 CONTENT AUTOMATIC NH70 Selestial P.03 9030 Van Alen P.05 9132 Color Touch P.08 STP1-11 P.12 Hamptons QUARTZ VD31 Grandeur, Guggen & Hudson P.15 2035 The MET P.20 P.21 PRECAUTIONS AND PREVENTIVE MEASURES...
- Page 4 (NH70) first click position 1. Unscrew the crown and pull the crown to the first click. 2. Turn the crown to set the hour and minute hands. 3. Push the crown back to the normal position and screw in the crown.
- Page 5 (NH70) There are two methods to wind up the watch: 1. Manual winding. (Rotate the unscrewed crown clockwise at normal position.) The movement is fully wound up by turning the crown a minimum 15-20 times. It will start to move naturally after shaking slightly.
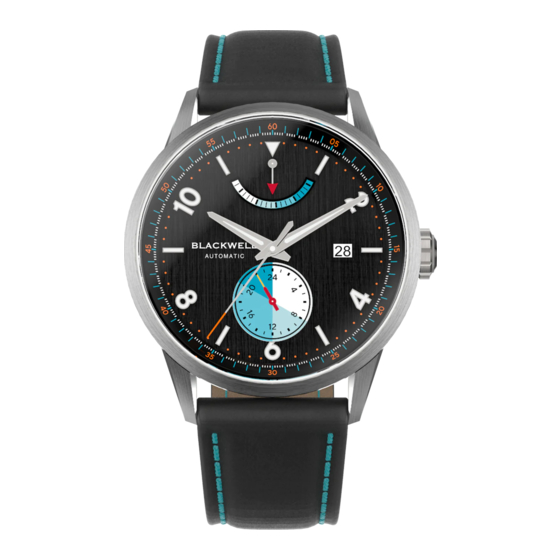
- Page 6 DISPLAYS (9039) Hour hand Minute hand Inner Ring Crown Crown [A] position (Normal position) Crown [B] position Second hand...
-
Page 7: Setting The Time
SETTING THE TIME (9039) 1. Gently unscrew the crown and pull it out to the [B] position. 2. Turn the crown to set hour and minute hands. 3. Push the crown back into the [A] position. - Page 8 WIND UP THE MAINSPRING (9039) 1. Manual winding. Gently unscrew the crown. Rotate the crown clockwise at the [A] position. 2. Wind 15~20 times clockwise until second hand starts to move naturally.
- Page 9 DISPLAYS (9132) Power Reserve Display Crown [A] position (Normal position) Crown [B] position Crown [C] position 24-hour Sub-Eye...
- Page 10 SETTING THE TIME (9132) 1. Gently unscrew the crown and pull it out to the [C] position. 2. Turn the crown to set hour and minute hands. 3. Push the crown back into the [A] position.
-
Page 11: Setting The Date
SETTING THE DATE (9132) 1. Gently unscrew the crown and pull it out to the [B] position. 2. Turn the crown clockwise to set the date. 3. Push the crown back into the [A] position. - Page 12 WIND UP THE MAINSPRING (9132) 1. Manual winding. Gently unscrew the crown. Rotate the crown clockwise at the [A] position. 2. Wind 15~20 times clockwise until second hand starts to move naturally.
- Page 13 DISPLAYS (STP1-11) Frosted display Date window...
- Page 14 SETTING THE TIME (STP1-11) Pull the crown out to the [C] position. Turn the crown until the hour and minute hands are set. Push crown back to the [A] position.
- Page 15 SETTING THE DATE (STP1-11) Pull the crown out to the [B] position. 2. Turn crown until yesterday’s date appears. 3. Pull the crown out to the [C] position. Turn the crown to set the correct date. Push crown back to the [A] position.
- Page 16 DISPLAYS (VD31) CROWN a: Normal position b: First click position c: Second click position Dual time 24-hour Date...
- Page 17 setting the time (VD31) Hour hand Second hand CROWN Minute hand Pull the crown to the second click when the second hand is at the 12 o’clock position. Turn to set the hour and minute hands. Push the crown back into the normal position in accordance with a time signal.
- Page 18 setting the date (VD31) CROWN Pull the crown out to the first click. Turn clockwise until the desired date appears. Push the crown back into the normal position. Date It is necessary to adjust the date on the first day after a 30-day month and February. •...
- Page 19 DUAL TIME FUNCTION (VD31) While staying in a different time zone from where you usually use this watch, you can set the dual time hour hand to indicate the local time of where you are staying. Quick setting of the dual time hour hand: CROWN Keep at the normal position.
- Page 20 setting the dual time (VD31) Precise adjustment of the dual time hour hand Pull the crown to the second CROWN position when the second hand is at the 12 o'clock position. Press to set the dual time hour hand to indicate the local time of where you are staying.
- Page 21 setting the time (2035) first click position 1. Pull the crown to the first click. 2. Turn the crown to set the hour and minute hands to set the time. 3. Push the crown back to the normal position. normal position...
- Page 22 Shocks Avoid thermal or other shocks as it may harm your watch. In the event of a violent shock, please contact BLACKWELL. Harmful Products Avoid direct contact with solvents, detergents, and perfumes, cosmetic products etc., since they may damage the bracelet, the case and/or the gaskets.
- Page 23 Water Resistance [5atm / 50m / 165ft] Watches water resistant from 50 meters / 165 feet. [10atm / 100m / 330ft] Watches water resistant from 100 meters / 330 feet. [20atm / 200m /660ft] Watches water resistant from 200 meters / 660 feet. According to the water resistance 1-3 listed above, watches are protected against: 1-2-3 Water splashes / Rain...
- Page 24 Limited Warranty Your BLACKWELL watch is warrantied by BLACKWELL and THE MONTRICHARD GROUP for a period of Twenty-Four (24) Months from the date of purchase under the terms and conditions of this warranty. The international BLACKWELL warranty covers material and manufacturing defects. If your BLACKWELL watch is beyond repair, BLACKWELL and The MONTRICHARD GROUP guarantees its replacement with a BLACKWELL watch of identical or similar characteristics.
- Page 25 (knocks, dents, crushing, broken crystal, etc.) 3. Incorrect use of the watch and non-observance of the instructions provided by BLACKWELL. 4. The BLACKWELL watch handled by non-authorized persons or which has been altered in its original condition beyond BLACKWELL’S control.
Need help?
Do you have a question about the NH70 and is the answer not in the manual?
Questions and answers