Advertisement
Available languages
Available languages
Quick Links
Advertisement

Related Manuals for Clearaudio VTA-Lifter


Summary of Contents for Clearaudio VTA-Lifter
- Page 1 VTA-Lifter User manual Bedienungsanleitung © clearaudio electronic GmbH, 2022-01 Made in Germany...
- Page 2 Please take a moment to read this owner’s manual to ensure a correct set up and to avoid any possible damage. VTA-Lifter Clearaudio wishes you a lot of enjoyment with your new (2). Clearaudio electronic GmbH Page / Seite 2...
- Page 3 Safety instructions 1. Special information If necessary, service for all Clearaudio products should be done by authorized personal only. In case of any repair, Clearaudio products need to be send to your nearest authorized Clearaudio distributor or dealer. VTA-Lifter Always use the original packging if you send the to the dealer! Clearaudio offers a range of professional accessories for your turntable.
- Page 4 User manual / Bedienungsanleitung Contents 1. Package contents ..............5 2. Installation on Clearaudio turntables ........6 - 8 3. Technical details ..............9 Page / Seite 4 © clearaudio electronic GmbH, 2022-01...
- Page 5 Please store the original packaging in case of transportation and shipping. Please use the list below in order to check the complete contenct of your Clearaudio VTA Lifter Pic. 1: Package contents...
- Page 6 Now you can mount the Solution base on the turntable chassis again. 2.2. Tonearm set up (only for Clearaudio Radial tonearms) To install a Clearaudio radial tonearm (e.g. Unify, Satisfy and Universal) please pull the cable VTA-Lifter carefully trough the hole of the (2).
- Page 7 User manual / Bedienungsanleitung Now turn the level completely to the “+” side, to tighten the tonearm with the two (2) delivered VTA-Lifter maggots screws (see pic. 4 + 5) on the side of the (2). Pic. 4: Tighten the tonearm Pic.
- Page 8 This drilling template is only for 9 inch tonearms. You will find the the correct pivot to spindle in the user manual of the tonearm. VTA-Lifter Pic. 8: Mounting the on a non-Clearaudio turntable Page / Seite 8 © clearaudio electronic GmbH, 2022-01...
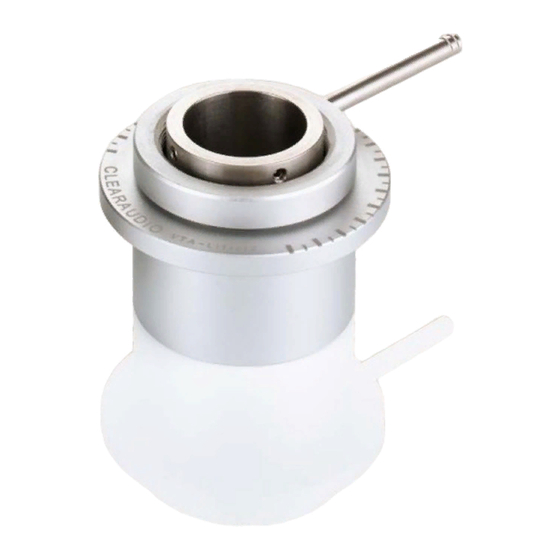
- Page 9 User manual / Bedienungsanleitung 3. Technical details Used materials: Stainless steel Weight: approx. 196g Widht ø: 59.5mm Height: 45.5mm Diameter of bore: 46.5mm Made in Germany Page / Seite 9...
- Page 10 Sämtliche Hinweise beugen Fehlbedienungen vor und dienen langjähriger Freude im Umgang mit VTA-Lifter dem clearaudio (2). Für ihren Kauf möchten wir uns bedanken und wünschen ihnen viel Freude mit dem clearaudio- Produkt. clearaudio electronic GmbH Page / Seite 10 © clearaudio electronic GmbH, 2022-01...
- Page 11 1. Besondere Hinweise Konnten Sie das clearaudio Produkt trotz Handhabung laut der Bedienungsanleitung nicht korrekt installieren oder haben Sie noch weitere Fragen, wenden Sie sich bitte zunächst an Ihren clearaudio Fachhändler. Sollte ein erneuter Versand nötig sein ist dabei unbedigt auf korrekte bzw. sichere Verpackung zu achten.
- Page 12 User manual / Bedienungsanleitung Inhaltsverzeichnis 1. Lieferumfang ................ 13 2. Installation auf clearaudio Laufwerken ....... 14 - 16 3. Technische Daten ..............17 Page / Seite 12 © clearaudio electronic GmbH, 2022-01...
- Page 13 Fertigung in einer besonders sicheren und auf das Produkt abgestimmten Verpackung, die einen sicheren Transport garantiert. Bitte bewahren Sie diese Verpackung für den Fall eines Transports auf. VTA-Lifter Kontrollieren Sie den Lieferumfang Ihrer neu erworbenen clearaudio gemäß unten aufgeführter Übersicht: Abb. 1: Lieferumfang...
- Page 14 Zylinderkopfschrauben (3 x 8) an der Unterseite der Basis handfest an (Abb. 3). Nun können Sie die Tonarmbasis wieder auf Ihr Laufwerkschassis montieren. 2.2. Einbau des Tonarms Nehmen Sie nun den Tonarm (clearaudio Satisfy , Unify oder Universal) mit RCA-Verkabelung und VTA-Lifter führen Sie das Kabel vorsichtig durch die Öffnung im (2).
- Page 15 User manual / Bedienungsanleitung VTA-Lifter Bevor Sie den Tonarm und den (2) miteinander verschrauben drehen Sie den Hebel komplett zur markierten “+” Seite. Die Befestigung kann nun mit den zwei mitgelieferten Madenschrauben an VTA-Lifter den Seiten des s (2) erfolgen (siehe Abb. 4 + 5).
- Page 16 Diese Bohrschablone ist nur für 9 Zoll Tonarme geeignet. Den korrekten Achsabstand Tellerspindel zu Tonarmdrehpunkt für längere Tonarme entnehmen Sie bitte der entsprechenden Anleitung. Abb. 9: Montage des VTA-Lifter s auf einem Laufwerk anderer Hersteller Page / Seite 16 © clearaudio electronic GmbH, 2022-01...
- Page 17 User manual / Bedienungsanleitung 3. Technische Daten Eingesetzte Werkstoffe: Edelstahl Gewicht: ca. 196 g Breite ø: 59,5 mm Höhe: 45,5 mm Bohrungsdurchmesser: 46,5 mm Made in Germany Page / Seite 17...
- Page 18 User manual / Bedienungsanleitung Page / Seite 18 © clearaudio electronic GmbH, 2022-01...
- Page 19 User manual / Bedienungsanleitung Made in Germany Page / Seite 19...
- Page 20 Irrtümer vorbehalten- Kopien und Abdrucke – auch nur auszugsweise – bedürfen der schriftlichen Genehmigung durch die clearaudio electronic GmbH. Clearaudio Electronic accepts no liability for any misprints. Technical specifications are subject to change or improvement without prior notice. Product availability is as long as stock lasts.
Need help?
Do you have a question about the VTA-Lifter and is the answer not in the manual?
Questions and answers