
Subscribe to Our Youtube Channel
Related Manuals for MSA Cairns XR2


Summary of Contents for MSA Cairns XR2
- Page 1 Operating Manual MSA Cairns XR2 Technical Rescue Helmet Order No.:PQ120200/00 Print Spec: 10000005389 (EO) MSAsafety.com...
- Page 2 The warranties made by MSA with respect to the product are voided if the product is not installed and used in accordance with the instructions in this manual. Please protect yourself and your employees by following the instructions.
-
Page 3: Table Of Contents
5.1.1 Routine Cleaning 5.1.2 Advanced Cleaning Inspection 5.2.1 Routine Inspection 5.2.2 Advanced Inspection Disassembling / Reassembling 5.3.1 Suspension Padding 5.3.2 Chinstrap 5.3.3 Suspension and Headband Assembly 5.3.4 Front Plate 5.3.5 Rear Cover Storage Replacement Parts and Accessories Warranty and Product Registration Contacting MSA... -
Page 4: Dangers, Warnings And Cautions
All plastics can degrade over time. Inspect routinely and replace damaged plastic components immediately. Use only components and accessories that are included with the original helmet or approved by MSA. Using unauthorized components or accessories can adversely affect helmet performance. -
Page 5: Description
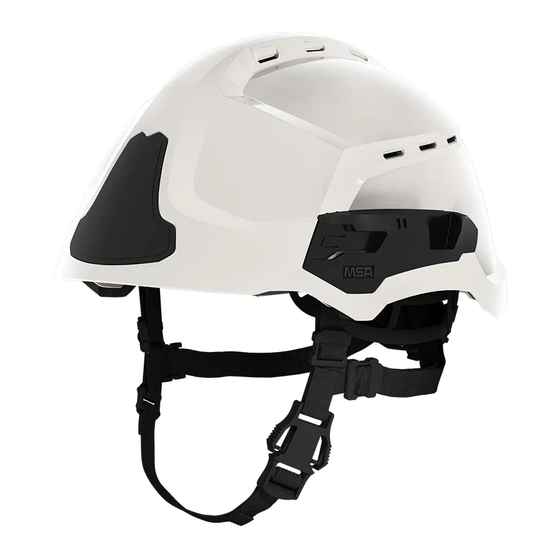
2 Description Description Overview The helmet consists of the following components: Figure 1 Overview MSA Cairns XR2 Shell Chinstrap Accessory interface Suspension padding Front plate Knob for headband adjustment Ocular visor (option) Technical Specifications Helmet sizes: from 6-1/2 to 8-1/8 inches (52 cm to 65 cm) Weight (helmet only): 1.65 lb ±... -
Page 6: Use And Adjustment
Do not store equipment that is not explicitly authorized by MSA in or on the helmet. The storage of gloves, wedges, lights, and other equipment in or on the helmet can dramatically change the protective capacity of the helmet. -
Page 7: Advanced Adjustments
3 Use and Adjustment (1) Close the chinstrap buckle (if not possible, loosen the adjustment). (2) Tighten the side and rear adjustments to achieve a tight, yet comfortable fit (ear should be comfortable). (3) Complete the adjustment with the chinstrap adjustment. Advanced Adjustments The following adjustments can be used to optimize wearing and comfort of the helmet after an initial assessment. - Page 8 3 Use and Adjustment (1) Release the nape strap by pushing the adjustment clip. (2) Place the strap in the desired position. (3) Release the adjustment clip. (4) Verify that the position is the same on both sides.
-
Page 9: Accessories
4 Accessories Accessories Responder Goggles (GA3705) Installation (1) Insert the plastic clip through the attachment slot until it clicks in position. (2) Repeat the operation for the other side Removal (1) Push the plastic clip and slide it out of the attachment slot. (1) Grab the goggle frame with both hands and bring it down under the helmet brim. -
Page 10: Ocular Visor (Ga3702)
4 Accessories • Mesh face shields are not suitable for wildland firefighting and only suitable for non-firefighting associated activities such as wood cutting, road clearance, etc. Additionally, they should not be used where there is a risk of exposure to heat, flame, sparks, splashes of harmful or molten liquids, or electricity. -
Page 11: Face Protection Visors (Mesh Ga3703 / Clear Ga3704)
4 Accessories (2) Tilt the ocular visor towards the face for an optimal fit. (3) Push the visor up to put it back in standby position. The ocular visor can be adjusted to optimize the distance between visor and face. 4.2.2 Face Protection Visors (Mesh GA3703 / Clear GA3704) Installation (1) Insert the visor attachment clips in the rail and push until it clicks. -
Page 12: Neck Protector (Ga3709)
4 Accessories Neck Protector (GA3709) Installation (1) Place the neck protector upside down above the helmet. (2) Insert the central clip (B). (3) And continue with (A) and (C). Removal (1) To remove the neck protector, release the clips by pressing them. Headlamp If the headlamp is removed from the helmet, the following components should be installed. -
Page 13: Care And Maintenance
Avoid unnecessary impacts which may cause damage to the helmet or its accessories (goggles, visor, etc.). • Replace any damaged parts only with genuine MSA parts, as only these original parts are authorized and ensure the performance of the helmet. -
Page 14: Routine Cleaning
(such as visors or ratchet), etc., the helmet should be taken to the trained maintenance technician or an MSA approved maintenance center. Failure to follow these warnings can result in serious personal injury or death. -
Page 15: Advanced Inspection
5 Care and Maintenance 5.2.2 Advanced Inspection WARNING! Only a manufacturer-trained organization, verified organization, or verified Independent Service Provider (ISP) can perform advanced inspection. Failure to follow this warning can result in serious personal injury or death. Advanced inspection includes all of the items listed for 5.2.1 Routine Inspection as well as the following items. - Page 16 5 Care and Maintenance Figure 2 Exploded View Suspension / headband assembly Shell Accessory Interface Neck pad Suspension padding Rear cover Front plate Chinstrap Suspension holders Reflective stickers (option) If any of the following conditions exist, replace the relevant part or assembly. Helmet shell •...
-
Page 17: Disassembling / Reassembling
5 Care and Maintenance • Visible impacts inside the helmet shell Suspension and headband assembly • Plastic suspension assembly: visible cracks, damaged attachment points / clips preventing secured attachment to the helmet • Headband: broken / blocked ratchet knob, visible cracks, missing Velcro attachment points, damaged / missing neck Suspension padding Torn fabric, missing foam, stiff foam, damaged stitching, damaged / missing Velcros Chinstrap... -
Page 18: Chinstrap
5 Care and Maintenance 5.3.2 Chinstrap Disassembling (1) Push and release the rear clip and pull the rear straps through the headband (between ratchet pad and rear headband). (2) Push and release the side clips and pull the chinstrap out . Reassembling (1) Attach the side clips (push down until it click is heard) ensuring buckle is on the left (wearer’s perspective). -
Page 19: Storage
WARNING! Do not store equipment that is not explicitly authorized by MSA in or on the helmet. The storage of gloves, wedges, lights, and other equipment in or on the helmet can dramatically change the protective capacity of the helmet. -
Page 20: Replacement Parts And Accessories
6 Replacement Parts and Accessories Replacement Parts and Accessories Please see our catalog, visit MSAFIRE.com or contact your authorized MSA fire service distributor for a full line of genuine MSA accessories and replacement parts. Description Type GA3712 Painted shell vented XR2... - Page 21 6 Replacement Parts and Accessories Figure 4 Exploded View of the Helmet, Spare Parts and Accessories...
-
Page 22: Warranty And Product Registration
Finally, in the unlikely event a safety notification or warranty service is required, MSA will have the ability to contact you. Your completed registration also helps us to keep you updated on support, service, product information and promotions/special offers. -
Page 23: Contacting Msa
8 Contacting MSA Contacting MSA Keep these instructions in a safe place so you can refer to them in the future. For questions regarding the operation of this helmet or suggestions and comments about it, contact Customer Service at 1-877-MSA-FIRE. - Page 24 For local MSA contacts, please visit us at MSAsafety.com...
Need help?
Do you have a question about the Cairns XR2 and is the answer not in the manual?
Questions and answers