
Related Manuals for Ocean Digital WR-880N


Summary of Contents for Ocean Digital WR-880N
- Page 1 Internet Radio WR-880N User Manual Please read this user manual carefully before using the receiver Please read this user manual carefully before using the receiver.
-
Page 3: Table Of Contents
Contents 1. Introduction to the WR-880N Internet Radio ........4 2. Internet Radio Connections ...............6 3. Location of Controls ................7 4. Remote control .................9 5. Choosing options and functions ............10 6. Network Setup ................11 7. Overview of Radio modes and functions ..........13 8. -
Page 4: Introduction To The Wr-880N Internet Radio
Introduction to the WR-880N Internet Radio The WR-880N Internet Radio is an audio component for integration into your home HiFi System as an added source of audio entertainment. The radio has eleven different operating modes providing a comprehensive set of enhancements to audio entertainment and a gateway into the world of digital audio. - Page 5 Introduction to the WR-880N Internet Radio 10) Alarm (Wi-Fi and Internet) • Wake up alarm Clock with option to automatically set the Time of Day to Internet time standard 11) Configuration (no Wi-Fi and Internet) • Set up, options and information center...
-
Page 6: Internet Radio Connections
Internet Radio Connections Wi-Fi Wireless Network Modem/Router (Need Network Name and Passcode or Password to Connect to Network) (Internet Service Provider) WR-880N Wi-Fi Streaming Player Bluetooth Internet Radio TF card Local Radio Speaker Media Center Alarm Clock Sleep Timer Aux-In(Play pre-amplifier level audio source) -
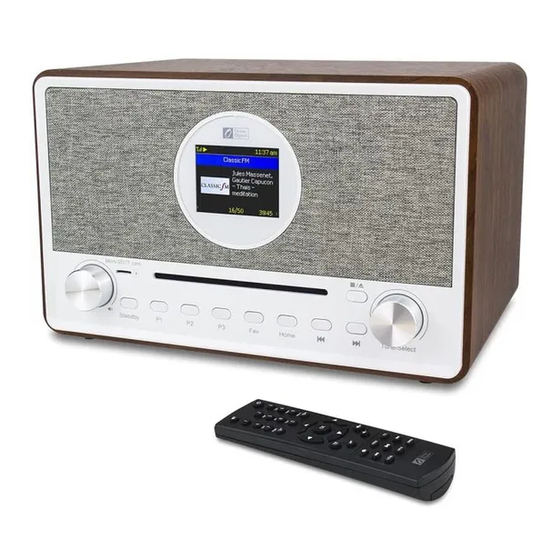
Page 7: Location Of Controls
Location of Controls Color Display 2.4" TFT LCD Brightness controlled Remote control by Tune/Select knob Infrared sensor in Standby rotate clockwise Go back to or counter-clockwise main menu Press to remove CD; to control the Stop the CD player volume level Micro SD/ CD Player TF card... - Page 8 Location of Controls On/Off DC 12V Input Switch from A/C Adaptor Headphone 3.5 MM To connect (Volume adjusted the USB-disc by Tune/Select) 3.5mm line out socket 3.5mm Aux in socket - 8 -...
-
Page 9: Remote Control
Remote control Alpha Numeric (Press keys to ON/Standby Mute cycle through characters) Go to Preset My Favorite (Save in My Favorite) Navigation (Forward, Back, Up, Down) Alarm (Control & Setup) Select (Confirm & Go) Sleep Timer (Control & Setup) Volume Control Menu (Go to Mode selection) -
Page 10: Choosing Options And Functions
Choosing options and functions All user input is information that the Radio uses to provide the desired audio entertainment with select (enter) a confirmation and go command. The Tune/Select control knob is used for navigating LCD displays and lists by rotating clockwise (CW) or counter clockwise (CCW) to change or highlight information displayed on the LCD screen and confirms a selection when it is pressed and released. -
Page 11: Network Setup
Network Setup The Internet Radio must have a high bandwidth internet connection and a wireless (Wi-Fi) home network connected to it to be fully functional. Plug the A/C Power adaptor into a wall socket and the back of the Radio. Turn On the rear panel On/Off switch - the display will show a list of available languages. - Page 12 2 minutes to complete the connection. 3) Select Add AP (Smart Config) – Download APP ESPTouch (it configures ESP32 devices such as the WR-880N) and install on a smart phone, tablet or other device that can use APPs. Start the APP to complete the connection.
-
Page 13: Overview Of Radio Modes And Functions
Overview of Radio modes and functions To Select any mode use the Home button on the front panel or the ) on remote controller to display the My Favorite screen: Wi-Fi signal bar Navigate through the modes to find and Select any of these functions: 1) My Favorite —... - Page 14 Overview of Radio modes and functions 8) Micro SD — Play music files stored on a Micro SD/TF card 9) Alarm — two separate alarm clocks with the time of day automatically synchronized to the internet time standard. 10) Sleep Timer — Select a time delay before the Radio goes to Standby mode while playing your selected audio entertainment source.
-
Page 15: My Favorite
My Favorite This mode displays a list of up to a maximum of 99 audio sources that have been Preset (stored) using the Preset button on the remote controller ( ) while an audio source is playing. Press and hold button until the Preset symbol ( ) is displayed in the top left corner of the LCD. -
Page 16: Internet Radio
Internet Radio Select Internet Radio mode using the Home button or Mode button on the front panel or the remote controller and navigate the extensive list of worldwide radio stations using these options: 1) Skytune – Select a radio station using the structured lists that aid and reduce the task of finding the right station. - Page 17 Internet Radio A maximum of 99 Presets can be put in the list before the next Preset will overwrite the first entry. Use list Edit options to move an entry Down, Up or Delete by highlighting the station to edit and pressing the Forward button ( ► ) on remote controller or press and hold the on the front of the radio.
-
Page 18: Media Center
Media Center The Radio supports the industry standard Universal Plug and Play (UPnP) standards. The Radio can browse and play music files stored on a UPnP server provided the server has been setup to allow sharing of files on the network. -
Page 19: Micro Sd
Micro SD The radio can playback audio files on Micro SD/TF cards if they are stored in MP3 format. To start playing music files insert the Micro SD/TF card into the card reader slot and the radio will start to play the first track automatically. Press to go to the next track, or press to go back to the previous... -
Page 20: Bluetooth Speaker
Bluetooth Speaker After selecting Bluetooth the display will display the Radio Bluetooth identifier code and connection status. If it is not connected “pairing” must take place with the audio source Bluetooth device. When the Radio identification code appears in the list of local Bluetooth devices, on the Bluetooth source device, pair the two devices so that they can recognize each other and will automatically connect whenever the Radio is in range and in Bluetooth mode. -
Page 21: Cd Player
CD player Select CD Player mode (press Home button and navigate to CD mode) and insert a CD into the CD player slot. The radio will automatically start playing the first track on the CD with the next track to be played selected automatically according to the playback option selected In Configuration mode under Playback Setup i.e. -
Page 22: Usb
The radio can playback audio files on a USB-disc if they are stored in MP3 format. To start playing music files insert the USB-disc player cable into the USB connector and the first music files will start playing automatically with its number displayed. To change to a different track rotate the Tune/Select knob or press the Previous ( ) or Next (... -
Page 23: Alarm & Snooze
Alarm & Snooze There are two separate wake up alarms that can be set up independently to start at a given time, with selectable sounds, at adjustable volume and with repeat options, on their own or at the same time e.g. set Alarm 1 for normal wake time and Alarm 2 to wake in case of falling asleep again . -
Page 24: Sleep Timer
Sleep Timer Set a time delay before the Radio automatically goes to Standby mode allowing the listening of audio entertainment while falling asleep. After selecting the sleep timer a list of delay times will be displayed – select the appropriate time and exit sleep timer setup by using the back button ( ) on the radio or ( ◄... -
Page 25: Configuration
Configuration Select Configuration for a list of adjustments and options to be displayed, navigate the list and select the desired function by rotating the Tune/Select knob or the up/down (▲/▼) button on the remote controller to go forwards or backwards in the decision tree and press Tune/Select or OK to make selections. - Page 26 Configuration Power-on options Resume from last or go to Standby Dimmer Options to set LCD brightness levels in play and Standby – set Dim and Bright light levels independently from dark to full brightness EQ [current setting] Options for playback sound e.g. Flat, Rock, Classical Buffer Time [current setting] Select either a 2 or 5 second buffer (storage) of streaming information to be stored before restoring audio after short breaks in the Internet...
-
Page 27: Skytune Web Application For Internet Radio Www.skytune.net
Skytune Web Application for Internet Radio www.skytune.net Browse / Search On the opening page click Browse / Search at the lower right side of the page. Enter the name of a Radio Station or Browse the structured list of stations available, select the one of interest and click on the heart symbol ( ) when the station logo is displayed. - Page 28 Skytune Web Application for Internet Radio www.skytune.net Once the IP address has been entered make selection to save or listen, click Send. The Radio My Favorite page will be displayed with your list of Preset stations that can be edited using the tools provided on the web page. Request to add Radio Station If you know the name of a Radio Station but it is not in the list a request can be made to have it added.
- Page 29 Skytune Web Application for Internet Radio www.skytune.net Adding a Radio Station To add a Radio Station its name and URL can be entered in the Add Channel section along with selecting the Country where it is located and Genre of audio entertainment it provides. Smart Phone, Tablet or Computer Control With device connected to the same Wi-Fi network as the Radio use web browser to edit lists and add radio stations.
-
Page 30: Problems And Solutions
Problems and Solutions Cannot connect to the Wi-Fi Network a) Common Causes • Incorrect passphrase / passcode / password for the selected Network. • Location of the Radio has a weak Wi-Fi signal – if possible check with another Wi-Fi connected device in the same location. b) Unusual Causes •... - Page 31 • There are too many users at this time – some stations have a limited number of users they can support at any given time. • The station link is out of date – it is updated regularly but might take some time for the next update. Alternatively contact Ocean Digital support at www.oceandigitalshop.com •...
-
Page 32: Technical Specification
Technical Specification A/C Adaptor Power Input: 100 – 240 Volts 50/60 Hz 1.0 Amp. DC Power Input: 12 Volts 2 Amp. Remote Controller: 2 x AAA Battery (Not included) Wi-Fi Wireless Network: IEEE 802.11b/g/n (5 GHz only version ac – not supported) Frequency: 2.4 GHz Security: WEP, WPA, WPA2... - Page 33 This system is financed by the industry and ensures environmentally responsible disposal and the recycling of valuable raw materials. Ocean Digital Technology Ltd. Flat B, 12/F., Yeung Yiu Chung (No.8) Ind. Bldg., 20 Wang Hoi Road, Kowloon Bay, Hong Kong Email: support@oceandigital.com.hk...
Need help?
Do you have a question about the WR-880N and is the answer not in the manual?
Questions and answers