
Related Manuals for Singer C5105


Summary of Contents for Singer C5105
- Page 1 C5105, C5205, C5305 INSTRUCTION MANUAL ИНСТРУКЦИЯ ПО ЭКСПЛУАТАЦИИ KULLANIM KILAVUZU...
- Page 2 This household sewing machine is designed to comply with IEC/EN 60335-2-28 and UL1594. IMPORTANT SAFETY INSTRUCTIONS When using an electrical appliance, basic safety precautions should always be followed, including the following: Read all instructions before using this household sewing machine. Keep the instructions in a suitable place close to the machine.
- Page 3 • Keep fingers away from all moving parts. Special care is required around the sewing machine needle. • Always use the proper needle plate. The wrong plate can cause the needle to break. • Do not use bent needles. • Do not pull or push fabric while stitching. It may deflect the needle causing it to break.
- Page 4 For Europe only: This appliance can be used by children aged from 8 years and above and persons with reduced physical, sensory or mental capabilities or lack of experience and knowledge if they have been given supervision or instruction concerning use of the appliance in a safe way and understand the hazards involved.
- Page 5 SINGER is the exclusive trademark of The Singer Company Limited S.à.r.l. or its Affiliates ©2019 The Singer Company Limited S.à.r.l. or its Affiliates. All rights reserved. Eng 4...
- Page 6 Эта машина разработана в соответствии с Европейским стандартом IEC/EN 60335-2-28 и UL1594. ИНСТРУКЦИЯ ПО ТЕХНИКЕ БЕЗОПАСНОСТИ При работе с элек трическими приборами всегда с о бл юд а й те о с н о в н ы е м е р ы п р ед о с то р ож н о с т и . Прежде...
- Page 7 • Не пользуйтесь машиной, если поврежден шнур или штепсель, если происходят сбои в работе, если машина падала или повреждена, если произошло намокание машины. В этих случаях обратитесь к уполномоченному продавцу или в авторизованный Сервисный центр для проверки машины и ее настройки или...
- Page 8 • П ед а л ь и с п ол ь з у ет с я т ол ь к о д л я у п р а вл е н и я работой машины. Не кладите на нее сверху никаких посторонних...
- Page 9 Для стран Европейского Содружества: Эта швейная машина может использоваться детьми только старше 8 лет и людьми с ограниченными ф и з и ч е с к и м и , с е н с о р н ы м и и л и п с и х и ч е с к и м и возможностями, а...
- Page 10 через водоносные слои в пищевую цепочку и отрицательно влиять на ваше самочувствие и даже повредить ваше здоровье. SINGER ® зарегистрированная торговая марка компании The Singer Company Limited или ее филиалов. © 2019 The Singer Company Limited или ее филиалов. Все права защищены. Rus 5...
- Page 11 Bu ev tipi dikiş makinesi, IEC/EN 60335-2-28 ve UL1594 yönetmeliklerine uygun şekilde tasarlanmıştır. ÖNEMLİ GÜVENLİK TALİMATLARI Elektrikli bir cihaz kullanılırken aşağıdakiler de dahil olmak üzere temel güvenlik önlemleri daima izlenmelidir: Bu ev tipi dikiş makinesini kullanmadan önce tüm talimatları okuyun. Talimatları, makineye yakın, uygun bir yerde bulundurun.
- Page 12 • Parmaklarınızı, hareket eden tüm parçalardan uzak tutun. Dikiş makinesi iğnesinin çevresine özellikle dikkat edin. • Daima doğru iğne plakasını kullanın. Yanlış plaka, iğnenin kırılmasına sebep olabilir. • Eğik iğneleri kullanmayın. • Dikiş yaparken kumaşı çekmeyin ve itmeyin. İğnenin yönünü değiştirerek kırılmasına yol açabilir. •...
- Page 13 YALNIZCA AVRUPA İÇİN: Aletin güvenli bir şekilde kullanımına ilişkin ilgili eğitim veya denetimin verilmiş olması ve mevcut olan tehlikeleri anlamaları durumunda bu alet, 8 yaş ve üzerindeki çocuklar ve fiziksel, algı veya zihinsel becerilerinde, tecrübe veya bilgisinde eksiklik olan kişiler tarafından kullanılabilir. Çocuklar, alet ile oynamamalıdır.
- Page 14 İKİ KAT YALITIMLI ÜRÜNLERİN BAKIMI İki kat yalıtımlı bir üründe topraklama yerine iki yalıtım sistemi temin edilir. İki kat yalıtımlı bir üründe topraklama temin edilmez ve sonradan da eklenmemelidir. İki kat yalıtımlı bir ürünün bakımı, sistem hakkında bilgi ve büyük özen gerektirir ve yalnızca yetkili servis personeli tarafından gerçekleştirilmelidir.
- Page 15 ücretsiz olarak temin etmekle yükümlü olabilir. Elektrikli aletler, şehir çöplüklerine atılırsa tehlikeli maddeler, suya sızıp yemek zincirine karışarak sağlığınıza zarar verebilir. SINGER, Singer Company Limited şirketinin veya bayilerinin tescilli bir ticari markasıdır. ©2019 Singer Company Limited veya bayileri. Tüm hakları saklıdır.
-
Page 16: Table Of Contents
TABLE OF CONTENTS 1. KNOWING YOUR SEWING Zigzag stitching -------------------------------- 41 Adjusting stitch width and length MACHINE Multi-stitch zigzag ------------------------------42 Machine identificatio ------------------------9-10 Shell stitch ---------------------------------- 43-44 Accessories ---------------------------------------11 Satin stitch, Placement of patterns Sewing on a button --------------------------- 44 Setting up your machine -----------------------12 Blindhem stitch ---------------------------- 45-46 Spool pins, Presser foot lifter -----------------13... - Page 17 СОДЕРЖАНИЕ 1.ЗНАКОМСТВО СО ШВЕЙНОЙ МАШИНОЙ Пришивание пуговицы ----------------------- 44 Части машины ------------------------------- 9-10 Потайная подрубочная строчка -----45-46 Принадлежности ------------------------------ 11 Декоративные и эластичные Подключение машины ----------------------- 12 строчки ------------------------------------------ 47-54 Прямая эластичная строчка, Стержни для катушек, Рычаг подъема лапки ---- 13 С...
- Page 18 İÇİNDEKİLER 1. MAKİNENİZİ TANIMA Dalgalı kenar dikişi -------------------------- 43-44 Makinenin tanıtılması ------------------------- 9-10 Saten dikişi, Desenlerin yerleştirilmesi Düğme dikme ------------------------------------ 44 Aksesuarlar ----------------------------------------11 Gizli dikiş ------------------------------------- 45-46 Makinenin ayarlanması --------------------------12 Dekoratif ve esnek dikişler ----------------- 47-54 Makara pimleri, Baskı ayağı kaldırma kolu ---13 Düz esnek dikiş, Pal peteği dikişi, Yama dikişi plakası, Overlok dikişi, Civankaşi dikişi,...
-
Page 19: Knowing Your Sewing Machine
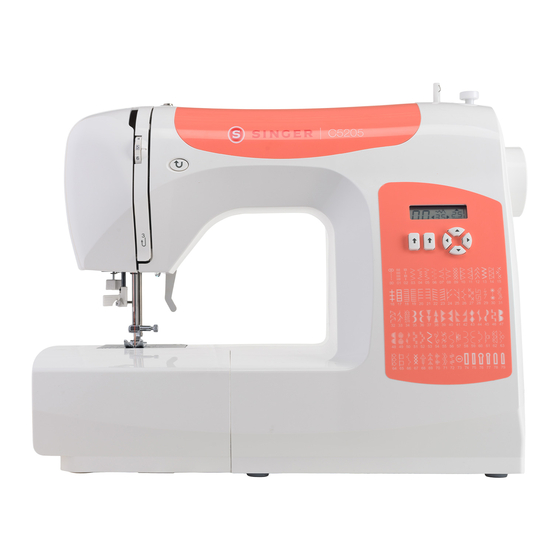
1. KNOWING YOUR SEWING MACHINE 1. ЗНАКОМСТВО СО ШВЕЙНОЙ МАШИНОЙ 1. MAKİNENİZİ TANIMA MACHINE IDENTIFICATION 1. Bobbin winding tension disk 2. Thread take-up 3. Thread tension control 4. Face cover 5. Thread cutter 6. Removable extension table / Accessory box 7. - Page 20 ЧАСТИ МАШИНЫ MAKİNENİN TANITILMASI Диск натяжения намотки шпульки 1. Masura sarma tansiyon diski Нитепритягиватель 2. Horoz Регулятор натяжения верхней нити 3. İplik tansiyonu ayarlama düğmesi 4. Alın kapağı Боковая панель Нож для обрезания нитей 5. İplik kesici Съемная рабочая поверхность/ 6.
-
Page 21: Accessories
ACCESSORIES ПРИНАДЛЕЖНОСТИ AKSESUARLAR 1. Needles 8. Darning plate 2. Bobbins 9. Zipper foot 3. Auxiliary spool pin 10. Buttonhole foot 4. Spool pin felt discs 5. Spool pin cap 6. Buttonhole opener/Seam Ripper and Brush 7. Screwdriver for needle plate The Foot that comes on your Sewing machine is called the General Purpose Foot and will be used for the majority of your sewing. -
Page 22: Setting Up Your Machine
SETTING UP YOUR MACHINE Всегда отключайте машину ПОДКЛЮЧЕНИЕ МАШИНЫ от электросети, вынув вилку из розетки. MAKİNENİN AYARLANMASI A l w a y s d i s c o n n e c t t h e Daima Fişi prizden çekerek machine from power supply makineyi elektrik beslemesinden by removing the plug from... -
Page 23: Spool Pins, Presser Foot Lifter
SPOOL PINS Spool Катушка СТЕРЖНИ ДЛЯ КАТУШЕК Makara Spool pin felt discs MAKARA PİMLERİ Фетровая прокладка Makara pimi tespit diskleri HORIZONTAL SPOOL PIN Vertical spool pin ГОРИЗОНТАЛЬНЫЙ СТЕРЖЕНЬ ДЛЯ КАТУШКИ Вертикальный YATAY MAKARA PİMİ стержень для катушки Dik makara pimi Pull the spool pin towards you. -
Page 24: Darning Plate
DARNING PLATE ШТОПАЛЬНАЯ ПЛАСТИНА YAMA DİKİŞİ PLAKASI Use the darning plate when you need to control fabric feeding for button sewing, free motion work and free motion darning. Raise needle and presser foot, and position darning plate onto the needle plate with the two pins on the back inserted to the holes of needle plate. -
Page 25: Winding The Bobbin
WINDING THE BOBBIN НАМОТКА НИТИ НА ШПУЛЬКУ MASURANIN SARILMASI Be sure to use Class 15 bobbins. 1.Place a spool of thread on the spool pin, and secure it with the spool pin cap. Pull the thread out from the spool and place it through thread guides as shown in illustration.Be sure to pull thread securely into the bobbin winding tension disk. -
Page 26: Removing Bobbin Case From Shuttle
REMOVING BOBBIN CASE FROM SHUTTLE ИЗВЛЕЧЕНИЕ ШПУЛЬНОГО КОЛПАЧКА ИЗ ЧЕЛНОКА MEKİĞİN YUVASINDAN ÇIKARILMASI 1. Raise the needle to its highest position by rotating the hand wheel toward you (counter-clockwise). 2. Open the bobbin access cover by pulling it down. With your fingers, pull open the bobbin case latch as shown, and take out the bobbin case from the shuttle. -
Page 27: Inserting Bobbin Case Into Shuttle
INSERTING BOBBIN CASE INTO SHUTTLE Locating groove Паз УСТАНОВКА ШПУЛЬНОГО КОЛПАЧКА Tespit yuvası В ЧЕЛНОК MEKİĞİN YUVASINA TAKILMASI 1. Hold the latch open, with locating pin straight up. 2. Slide the bobbin case onto the center spindle of the shuttle, keeping the thread toward you. NOTE: Be sure the locating pin fits into the locating groove at the top of the shuttle. - Page 28 ① ③ ② ④ ⑤ C.Thread the machine with your left hand while firmly gripping the thread with your right hand in the following order as illustrated. *Pass the thread through the thread take-up (3) from right to left. *Pass the thread through the eye of the needle (5) from front to back. (See following page for instructions on operation of the Automatic Needle Threader.) IMPORTANT: To verify that the machine is threaded properly in the tension discs, do this simple check:...
-
Page 29: Using Automatic Needle Threader
USING AUTOMATIC NEEDLE THREADER ИСПОЛЬЗОВАНИЕ АВТОМАТИЧЕСКОГО НИТЕВДЕВАТЕЛЯ OTOMATIK IPLIK TAKICI ÖZELLIĞININ KULLANILMASI Raise the needle to its highest position by rotating the hand wheel towards you (counter-clockwise). 1. Hook thread into thread guide as illustrated. 2. Pull down lever while holding the end of thread. 3. -
Page 30: Picking Up Bobbin Thread
PICKING UP BOBBIN THREAD ПОДЪЕМ НИЖНЕЙ НИТИ MASURA İPLİĞİNİN TUTULMASI 1. Raise the presser foot lifter. 2. Holding needle thread loosely with your left hand, turn hand wheel toward you (counter-clockwise) with your right hand, first lowering the needle and continuing until the needle comes to its highest position. -
Page 31: Needle, Thread And Fabric Chart
Jersey / Tricot 16/100 purple band * For best sewing results, always use a SINGER branded needle. ТАБЛИЦА СООТВЕТСТВИЯ ТКАНЕЙ, НИТЕЙ И ИГОЛОК Используемая ткань определяет выбор иглы и нити. Следующая таблица является практическим руководством по подбору нитей и игл. Всегда обращайтесь к ней... -
Page 32: İğne, Iplik Ve Kumaş Tablosu
Yelken bezi sarı bantlı 11/80 turuncu bantlı Pamuk örgülü Yapışkanlı Örgü 2045 14/90 Polyester Örgüler Çift Örgü sarı dip mavi bantlı Polyester Jarse / Triko Naylon 16/100 mor bantlı * En iyi dikiş sonuçları için daima bir SINGER marka iğne kullanın. -
Page 33: Changing The Needle
CHANGING THE NEEDLE Flat side ЗАМЕНА ИГЛЫ Плоская сторона Needle İĞNENİN DEĞİŞTİRİLMESİ Düz taraf Игла İğne Always disconnect the machine from power supply by removing the plug from the wall-outlet. Stop pin 1. Raise the needle bar to its highest position by turning Стопор... -
Page 34: Adjusting Top Thread Tension
ADJUSTING TOP THREAD TENSION РЕГУЛИРОВКА НАТЯЖЕНИЯ ВЕРХНЕЙ НИТИ ÜST İPLİK TANSİYONUNUN AYARLANMASI Under side Изнанка Alt taraf Top side Лицевая сторона Üst taraf Well balanced Top stitch too tight Top stitch too loose Правильно отрегулированное Верхняя нить сильно Верхняя нить слабо натяжение... - Page 35 STRAIGHT STITCHING ПРЯМАЯ СТРОЧКА DÜZ DİKİŞ The correct appearance of your stitching is largely determined by the balanced tension of both top and bobbin threads. The tension is well balanced when these two threads ‘lock’ in the middle of layers of the fabric you are sewing. If, when you start to sew, you find that the stitching is irregular, you will need to adjust the tension control.
-
Page 36: Functions Of Control Panel, Straight Stitch Needle Position
FUNCTIONS OF CONTROL PANEL ФУНКЦИИ ПАНЕЛИ УПРАВЛЕНИЯ KONTROL PANELİNİN FONKSİYONLARI Stitch length Stitch width/needle position of straight stitch Длина стежка Ширина стежка/положение иглы для прямой строчки Dikiş uzunluğu Düz dikişin genişliği/iğne pozisyonu LCD display Stitch pattern number ЖК-дисплей Номер строчки LCD ekran Dikiş... -
Page 37: Düz Dikiş Iğne Pozisyonu
Manual adjustment buttons Manual adjustment buttons for stitch length for stitch width/needle position Кнопки ручной настройки Кнопки ручной настройки длины стежка ширины стежка/положения иглы Dikiş uzunluğu manuel ayarlama Dikiş genişliği/iğne pozisyonu düğmeleri manuel ayarlama düğmeleri STITCH LENGTH AND STITCH WIDTH / NEEDLE POSITION ADJUSTMENT BUTTONS Your sewing machine will produce your stitching requirements at an 5/Default stitch Length and Width. -
Page 38: Adjusting Bobbin Thread Tension
ADJUSTING BOBBIN THREAD TENSION НАТЯЖЕНИЕ НИЖНЕЙ НИТИ MASURA İPLİK TANSİYONUNUN AYARLANMASI BOBBIN THREAD TENSION REQUIRES ADJUSTMENT LESS FREQUENTLY THAN THE TOP THREAD TENSION. Fabric puckers If the tension is well balanced, but the fabric puckers badly, Ткань морщится both top and bobbin thread tensions may be too tight and Kumaş... -
Page 39: Changing Presser Foot
CHANGING PRESSER FOOT ЗАМЕНА ПРИЖИМНОЙ ЛАПКИ BASKI AYAĞININ DEĞİŞTİRİLMESİ Be sure needle is in the up position. Raise presser foot lifter. Presser foot lifter Рычаг подъема прижимной лапки 1. Push presser foot release lever to remove the foot. Baskı ayağı kaldırma kolu 2. -
Page 40: Helpful Messages
HELPFUL MESSAGES СЕРВИСНЫЕ СООБЩЕНИЯ FAYDALI MESAJLAR If an incorrect operation is made, a helpful message will be displayed. When a helpful message is displayed, fix the problem following the instructions belo . В случае осуществления неправильной операции на дисплей будут выводиться сервисные... -
Page 41: Reverse Operation Button
REVERSE OPERATION BUTTON КНОПКА ШИТЬЯ В ОБРАТНОМ НАПРАВЛЕНИИ GERİ DİKİŞ DUĞMESİ DUAL PURPOSE REVERSE/TACKING STITCH BUTTON КНОПКА ШИТЬЯ В ОБРАТНОМ НАПРАВЛЕНИИ И ЗАКРЕПКИ ÇİFT AMAÇLI GERİ DİKİŞ/PUNTERİZ DİKİŞ DUĞMESİ * Reverse stitch function for straight and zigzag stitches ( Reverse sewing is carried out while the reverse stitch button is pushed. -
Page 42: Quick Reference Table Of Stitch Length And Width
2. STARTING TO SEW QUICK REFERENCE TABLE OF STITCH LENGTH AND WIDTH КРАТКАЯ СПРАВОЧНАЯ ТАБЛИЦА ДЛИНЫ И ШИРИНЫ 2. НАЧИНАЕМ ШИТЬ СТЕЖКА 2. DİKİŞE BAŞLAMA DİKİŞ UZUNLUĞU VE GENİŞLİĞİ HIZLI REFERANS TABLOSU PATTERN No. NEEDLE POSITION LENGTH НОМЕР СТРОЧКИ ПОЛОЖЕНИЕ ИГЛЫ ДЛИНА... - Page 43 PATTERN No. PATTERN No. НОМЕР СТРОЧКИ НОМЕР СТРОЧКИ DESEN No. DESEN No. WIDTH LENGTH WIDTH LENGTH ШИРИНА ДЛИНА ШИРИНА ДЛИНА GENİŞLİK UZUNLUK GENİŞLİK UZUNLUK AUTO AUTO AUTO AUTO MANUAL MANUAL MANUAL MANUAL АВТО АВТО АВТО АВТО РУЧНАЯ РУЧНАЯ РУЧНАЯ РУЧНАЯ OTO- OTO- OTO-...
- Page 44 PATTERN No. PATTERN No. НОМЕР СТРОЧКИ НОМЕР СТРОЧКИ WIDTH LENGTH WIDTH LENGTH DESEN No. DESEN No. ШИРИНА ДЛИНА ШИРИНА ДЛИНА GENİŞLİK UZUNLUK GENİŞLİK UZUNLUK AUTO AUTO AUTO AUTO MANUAL MANUAL MANUAL MANUAL АВТО АВТО АВТО АВТО РУЧНАЯ РУЧНАЯ РУЧНАЯ РУЧНАЯ OTO- OTO- OTO-...
- Page 45 PATTERN No. PATTERN No. НОМЕР СТРОЧКИ НОМЕР СТРОЧКИ WIDTH LENGTH WIDTH LENGTH DESEN No. DESEN No. ШИРИНА ДЛИНА ШИРИНА ДЛИНА GENİŞLİK UZUNLUK GENİŞLİK UZUNLUK AUTO AUTO AUTO AUTO MANUAL MANUAL MANUAL MANUAL АВТО АВТО АВТО АВТО РУЧНАЯ РУЧНАЯ РУЧНАЯ РУЧНАЯ OTO- OTO- OTO-...
-
Page 46: Pattern Number Reference Guide
PATTERN NUMBER REFERENCE GUIDE СПРАВОЧНАЯ ТАБЛИЦА ПО ВЫБОРУ СТРОЧЕК DESEN NUMARASI REFERANS KILAVUZU 60 stitch model Модель, выполняющая 60 строчек 60 dikiş modeli 80 stitch model Модель, выполняющая 80 строчек 80 dikiş modeli 100 stitch model Модель, выполняющая 100 строчек 100 dikiş... -
Page 47: Straight Stitching
STRAIGHT STITCHING 100 stitch model : ПРЯМАЯ СТРОЧКА 80 stitch model : 60 stitch model : DÜZ DİKİŞ Straight stitch is most frequently used for all types of sewing. Let’s begin by following the steps below. NOTE: Based upon the weight of the fabric, slight “fine tuning” of the tension may be desired. -
Page 48: Выполнение Прямых Швов
Düz dikiş, tüm dikiş tipleri için en sık kullanılan dikiş türüdür. Dikiş yapmak için, aşağıdaki adımları takip edin. NOT: Kumaşın ağırlığına göre, tansiyonun hafif “ince ayarlanması” istenebilir. A. İplik tansiyonu ayarlama düğmesi 1. AYARLAMALAR B. Geri dikiş düğmesi Baskı Ayağı- Genel Amaçlı Ayak C. -
Page 49: Keeping Seams Straight Hand-Look Quilt Stitch
HAND-LOOK QUILT STITCH 100 stitch model : 80 stitch model : ИМИТАЦИЯ РУЧНОГО СТЕЖКА 60 stitch model : (КВИЛТИНГ) EL GÖRÜNÜMLÜ KAPİTONE DİKİŞ This stitch is designed to look like hand sewing for topstitching and quilting. Эта строчка имитирует ручной стежок для прострочки... - Page 50 INSERTING ZIPPERS To sew down the right side, attach left side of zipper foot to presser foot holder so that the needle passes through the opening on the left side of the foot. To sew down the left side, attach right side of foot to foot holder.
-
Page 51: Zigzag Stitching
ZIGZAG STITCHING Under side 100 stitch model : Изнанка СТРОЧКА ЗИГЗАГ 80 stitch model : Alt taraf 60 stitch model : ZİG-ZAG DİKİŞ SETTINGS :Presser foot - General Purpose Foot Top side :Thread tension control - 5 Лицевая сторона Üst taraf НАСТРОЙКИ... -
Page 52: Adjusting Stitch Width And Length Multi-Stitch Zigzag
MULTI-STITCH ZIGZAG 100 stitch model : ТРЕХСТУПЕНЧАТЫЙ ЗИГЗАГ 80 stitch model : 60 stitch model : ÇOKLU ZİG-ZAG DİKİŞ SETTINGS : Presser foot - General Purpose Foot : Thread tension control - 5 НАСТРОЙКИ : Прижимная лапка – универсальная : Регулятор натяжения верхней нити – 5 AYARLAMALAR : Baskı... -
Page 53: Shell Stitch
SHELL STITCH 100 stitch model : БЕЛЬЕВАЯ СТРОЧКА 80 stitch model : 60 stitch model : DALGALI KENAR DİKİŞİ SETTINGS : Presser foot - General Purpose Foot : Thread tension control - 5 НАСТРОЙКИ : Прижимная лапка – универсальная : Регулятор натяжения верхней нити – 5 AYARLAMALAR : Baskı... -
Page 54: Satin Stitch, Placement Of Patterns Sewing On A Button
PLACEMENT OF PATTERNS Center position ИЗМЕНЕНИЕ ШИРИНЫ САТИНОВОЙ СТРОЧКИ Центральное положение Orta pozisyon DESENLERİN YERLEŞTİRİLMESİ The satin stitch increases from the center needle position; making it possible to create center tapered stitch, as illustrated. И з м е н е н и е ш и р и н ы с т р о ч к и п р о и с х о д и т относительно... -
Page 55: Blindhem Stitch
BLINDHEM STITCH 100 stitch model : 04, 05, 07 ПОТАЙНАЯ ПОДРУБОЧНАЯ СТРОЧКА 80 stitch model : 04, 05, 07 60 stitch model : 04, 05, 07 GİZLİ DİKİŞ The blindhem stitch is primarily used for creating nearly invisible hems on curtains, trousers, skirts, etc. - Page 56 1. With matching thread finish the raw edge. On fine fabric turn u and press a small ½” or less hem. On medium to heavyweight fabrics overcast the fabric’s raw edge. 2. Now fold the fabric as illustrated with the wrong side up. 3.
-
Page 57: Decorative And Stretch Stitches
DECORATIVE AND STRETCH STITCHES ДЕКОРАТИВНЫЕ И ЭЛАСТИЧНЫЕ СТРОЧКИ DEKORATİF VE ESNEK DİKİŞLER Settings : Presser foot - General Purpose Foot : Thread tension control - 5 : Прижимная лапка – универсальная НАСТРОЙКИ : Регулятор натяжения верхней нити – 5 Ayarlamalar : Baskı... - Page 58 HONEYCOMB STITCH 100 stitch model : 80 stitch model : СОТОВАЯ СТРОЧКА 60 stitch model : PAL PETEĞİ DİKİŞİ The Honeycomb stitch is ideal for smocking and useful for overcasting and attaching elastic and stretch lace. 1. For smocking, first make several rows of gathers across the fabric that you wish to smock.
-
Page 59: Двойная Оверлочная Строчка
FEATHER STITCH 100 stitch model : 80 stitch model : СТРОЧКА «ЕЛОЧКА» 60 stitch model : CİVANKAŞI DİKİŞİ The pleasing appearance of this stitch enables it to be used for decorative topstitching or for attaching laces and trims. It is also ideal for quilting applications and edge-joining. -
Page 60: Строчка "Крест-Накрест
увеличения увеличит размер отверстий при использовании «иглы с крылышками». Kenarlarda ve eski moda dikişlerde kullanılan süslemeli bir dikiş. Entredeux dikişi, dikiş deseninde delikler açmak için çoğunlukla bir Kanatlı İğne ile (SINGER Marka 2040) yapılır. Faydalı İpucu: Kanatlı İğne kullanırken, tansiyonun + yönünde hafif ayarlanması deliğin büyüklüğünü... - Page 61 100 stitch model : PIN STITCH 18, 19 80 stitch model : 18, 19 ОБМЕТОЧНАЯ СТРОЧКА 60 stitch model : 18, 19 NERVÜR DİKİŞ The Pin stitch is a traditional stitch pattern used for picot-like edges and for applique work. Обметочная...
- Page 62 SLANT OVEREDGE STITCH 100 stitch model : 24, 25 80 stitch model : 24, 25 КОСАЯ ОВЕРЛОЧНАЯ СТРОЧКА 60 stitch model : 24, 25 MEYİLLİ SÜRFİLE DİKİŞİ Seams and overcasts in one operation to produce a narrow, supple seam, particularly suited to swimwear, sportswear, T-shirts, babywear in stretch nylon, jersey and cotton jersey.
-
Page 63: Соединительная Строчка (Мережка)
THORN STITCH 100 stitch model : 80 stitch model : СТРОЧКА «ВЕТОЧКА» 60 stitch model : YIRTIK DİKİŞİ It is a versatile stitch used for joining fabric pieces as well as for decorative machine stitching. Эта многофункциональная строчка используется для соединения тканей в стык или внахлест, а также... -
Page 64: More Decorative Stitches & Ideas For Decorative Machine Stitching
WIZARD STITCH 100 stitch model : 80 stitch model : ОТДЕЛОЧНАЯ ОВЕРЛОЧНАЯ СТРОЧКА 60 stitch model : SİHİRBAZ DİKİŞİ Used mainly for decorative machine stitching. Используется в основном для декоративной отделки. Genellikle dekoratif makine dikişi için kullanılır. MORE DECORATIVE STITCHES & IDEAS FOR DECORATIVE MACHINE STITCHING БОЛЬШЕ... -
Page 65: Buttonhole Making
BUTTONHOLE MAKING Tab A ВЫМЕТЫВАНИЕ ПЕТЛИ Выступ А Tab B Tırnak A Выступ В İLİK AÇMA Tırnak B AUTOMATIC BUTTONHOLE АВТОМАТИЧЕСКАЯ ПЕТЛЯ OTOMATIK ILIK AÇMA USING BUTTONHOLE FOOT ИСПОЛЬЗОВАНИЕ ЛАПКИ ДЛЯ ВЫМЕТЫВАНИЯ ПЕТЕЛЬ İLİK AÇMA AYAĞINI KULLANMA Your machine offers you two different widths of bartack, keyhole and round end buttonholes sewn by a system that measures the size of the button and calculates the size of buttonhole required. - Page 66 1. Select one of the buttonhole patterns. 2. Replace the presser foot with the buttonhole foot. (Refer to “Changing presser foot” on page 28.) 3. Insert the button into the buttonhole foot. (Refer to “Using buttonhole foot” above.) 4. Lower the buttonhole lever (C) so that it drops down vertically between the stoppers (A) and (B).
- Page 67 * Sewing will be completed automatically in the following order. * Петля будет выметана автоматически в следующей последовательности. * Dikiş aşağıdaki sıraya göre otomatik olarak tamamlanacaktır. Buttonhole foot alignment position Центровка лапки для выметывания петель İlik açma ayağı hizalama konumu Fabric marking Отметка...
-
Page 68: Caring For Your Machine Cleaning Hook Area And Shuttle Area
3. CARING FOR YOUR MACHINE 3. УХОД ЗА МАШИНОЙ 3. MAKİNENİN BAKIMI To ensure the best possible operation of your machine, it is necessary to keep the essential parts clean at all times. Always disconnect the machine from power supply by removing the plug from the socket-outlet. Для... -
Page 69: Чистка Транспортера И Челночной Зоны
CLEANING THE FEED DOGS AND SHUTTLE AREA ЧИСТКА ТРАНСПОРТЕРА И ЧЕЛНОЧНОЙ ЗОНЫ ÇAĞANOZ ALANININ VE MEKIK ALANININ TEMIZLENMESI Raise the needle to its highest position. 1.Remove the bobbin case from the shuttle. 2.Push aside the two shuttle keepers. 3.Remove the shuttle race cover and shuttle. Clean the feed dogs and shuttle area with the lint brush. - Page 70 Cleaning the sewing machine and footcontroller Очистка швейной машины и педали управления Dikiş makinesinin ve pedalın temizlenmesi After using, keep sewing machine and footcontroller clean, use dry rags to remove dust from the sewing machine and footcontroller. NOTE: Use dry rags to avoid electrical shock. После...
-
Page 71: Option Accessories Large Extension Table
4.OPTION ACCESSORIES 4.ДОПОЛНИТЕЛЬНЫЕ ПРИНАДЛЕЖНОСТИ 4.OPSİYONEL AKSESUARLAR LARGE EXTENSION TABLE БОЛЬШАЯ ПРИСТАВНАЯ ПЛАТФОРМА BÜYÜK YARDIMCI TABLA To place onto the machine, lift the supporting leg of the extension table, and slide the table into place while fitting the guide pins A, B, C and D into machine as illustrated. Для... -
Page 72: Performance Checklist
5. PERFORMANCE CHECKLIST GENERAL PROBLEMS Machine does not sew. * Power switch is turned off. - Turn on the switch. * Buttonhole lever is not raised when sewing stitch patterns. – Raise buttonhole lever. * Buttonhole lever is not lowered when sewing buttonhole. –... -
Page 73: Основные Проблемы И Способы Их Решения
5. ОСНОВНЫЕ ПРОБЛЕМЫ И СПОСОБЫ ИХ РЕШЕНИЯ ОБЩИЕ НЕИСПРАВНОСТИ Машина не шьет. * Сетевой выключатель находиться в положении «Выкл.». – Включите сетевой выключатель. * Рычаг регулятора автоматической петли не поднят при шитье строчек. – Поднимите рычаг регулятора автоматической петли. * Рычаг регулятора автоматической петли не опущен при выметывании петли. –... -
Page 74: Performans Kontrol Li̇stesi̇
5. PERFORMANS KONTROL LİSTESİ GENEL SORUNLAR Makine dikiş yapmıyor * Açma/kapatma düğmesi kapalıdır. – Açma/kapatma düğmesini açın. * Dikiş desenleri dikerken, ilik açma kolu yukarı kalkmıyor. – İlik açma kolunu kaldırın. * İlik dikerken ilik açma kolu tamamen indirilmiyor. – İlik açma kolunu indirin. * Masura sarıcı... -
Page 75: C5305/C5205 Only Roller Foot,Invisible Zipper Foot
6. C5305/C5205 ONLY 6. C5305/C5205 ТОЛЬКО 6. C5305/C5205 SADECE ROLLER FOOT РОЛИКОВАЯ ЛАПКА YUVARLAK AYAK When sewing leather, suede, plastic and velvet, fit the roller foot to aid the smooth flow of fabric. However, especially when sewing softer leather and suede, better results may be achieved by using the normal zigzag foot. -
Page 76: Молнии
Подготовка машины Лапка для потайной молнии позволяет в т а ч и в а т ь н е з а м е т н у ю м о л н и ю н а • Установите лапку для потайной молнии различной... -
Page 77: Button Sewing Foot
BUTTON SEWING FOOT ЛАПКА ДЛЯ ПРИШИВАНИЯ ПУГОВИЦЫ DÜĞME DIKME AYAĞI The Button Sewing Foot is designed to hold the button firmly in place when attaching it to a garment or project Machine Preparation • Lower or cover Feed Dogs • Foot: Attach screw-on Button Sewing Foot •... -
Page 78: Blind Stitch Foot
BLIND STITCH FOOT ЛАПКА ДЛЯ НЕВИДИМОЙ ПОДРУБКИ GIZLI DIKIŞ AYAĞI Elastic Blind stitch for soft, stretchable fabrics. Эластичная потайная строчка для тонких и эластичных тканей. Yumuşak, esneyebilir kumaşlar için esnek gizli dikiş. Regular blind stitch for normal woven fabrics. Обычная потайная строчка для стандартных... -
Page 79: Overcasting Foot
OVERCASTING FOOT ОВЕРЛОЧНАЯ ЛАПКА SÜRFILE DIKIŞ AYAĞI T h i s f o o t d e l i v e r s a c o n s i s t e n t a n d accurate overcasting stitch for a serged Machine Preparation effect using your sewing machine. - Page 80 NOT: Her üç modelin teknik özellikleri aynıdır.
- Page 81 Malın ayıplı olduğunun anlaşılması durumunda tüketici, 6502 sayılı Tüketicinin korunması Hakkında Kanunun 11 maddesinde yer alan; a-) Sözleşmeden dönme, b-) Satış bedelinden indirim isteme, c-) Ücretsiz onarılmasını isteme, ç-) Satılanın ayıpsız bir misli ile değiştirilmesini isteme, haklarından birini kullanabilir. Tüketici şikayet ve itirazlarını; yerleşim yerinin bulunduğu veya tüketici işleminin yapıldığı yerdeki Tüketici Hakem Heyetine veya Tüketici Mahkemesine başvurabilir.
- Page 82 SERVİS İSTASYONLARI İLE YEDEK PARÇA MALZEMELERİNİN TEMİN EDİLEBİLECEĞİ YERLER *Güncel servis listelerine www.singer.com.tr adresinden veya 444 99 09 numaralı danışma hattımızdan ulaşabilirsiniz. ALAN İL/İLÇE UNVAN ADRES KODU TELEFON Adana / Ceyhan 0322 6139816 Bilir Makina-Ümit Yaşar Bilir B.Kırım Mah.Yaltır Cad.No:66/A Adana / Seyhan Çelik Ticaret-Tunç...
- Page 83 SERVİS İSTASYONLARI İLE YEDEK PARÇA MALZEMELERİNİN TEMİN EDİLEBİLECEĞİ YERLER *Güncel servis listelerine www.singer.com.tr adresinden veya 444 99 09 numaralı danışma hattımızdan ulaşabilirsiniz. ALAN İL/İLÇE UNVAN ADRES KODU TELEFON Edirne / Merkez Can Makina ( Zeki Kaynarca ) Mithatpaşa Mah.Arifpaşa Cad.No:9/A...
- Page 84 SERVİS İSTASYONLARI İLE YEDEK PARÇA MALZEMELERİNİN TEMİN EDİLEBİLECEĞİ YERLER *Güncel servis listelerine www.singer.com.tr adresinden veya 444 99 09 numaralı danışma hattımızdan ulaşabilirsiniz. ALAN İL/İLÇE UNVAN ADRES KODU TELEFON Demir Teknik- Nurettin Demir 0262 3234111 Kocaeli / İzmit Karabaş Mah.İstiklal Cad.No:127/A...
- Page 85 SERVİS İSTASYONLARI İLE YEDEK PARÇA MALZEMELERİNİN TEMİN EDİLEBİLECEĞİ YERLER *Güncel servis listelerine www.singer.com.tr adresinden veya 444 99 09 numaralı danışma hattımızdan ulaşabilirsiniz. ALAN İL/İLÇE UNVAN ADRES KODU TELEFON Trabzon / Merkez 0462 3216870 Makina Ticaret-Ömer Yılmaz Cumhuriyet Mah.Nemlioğlu Cemal Sok.No:15 Uşak / Merkez...
- Page 86 Danışma Hattı : 0212 444 99 09 ÜRETİCİ FİRMA İTHALATÇI FİRMA SINGER SOURCING LTD. için SINGER DİKİŞ MAKİNALARI TİCARET A.Ş. CENTRUM İŞ MERKEZİ JAGUAR INTERNATIONAL CORP. 2-6-8 SATA HIGASHI-MATCHI, Aydınevler Sanayi Cad. No: 3 MORIGUCHI-SHI,OSAKA 34854 Küçükyalı / İSTANBUL...
- Page 88 ENGLISH / РУССКИЙ / TÜRKÇE 12 /19 19898...
Need help?
Do you have a question about the C5105 and is the answer not in the manual?
Questions and answers