Victaulic VE416FS Operating And Maintenance Instruction Manual
Hide thumbs
Also See for VE416FS:
- Operating and maintenance instruction manual (40 pages) ,
- Operating and maintenance instruction manual (195 pages)
Table of Contents
Advertisement
Quick Links
Operating
and Maintenance
Instructions Manual
VE416FS & VE416FSD
Failure to follow Instructions and warnings can result in serious injury.
• Before installing, operating, or servicing the VE416FS or VE416FSD Tool
read this Manual and all warning labels on the tool.
• Always wear safety glasses and foot protection.
If you need additional copies of the manual or have any questions about the
safe operation of this tool, contact Victaulic Tool Company, P.O. Box 31,
Easton, PA 18044-0031, 610-559-3300.
Advertisement
Table of Contents

Related Manuals for Victaulic VE416FS


Summary of Contents for Victaulic VE416FS
- Page 1 VE416FS & VE416FSD Failure to follow Instructions and warnings can result in serious injury. • Before installing, operating, or servicing the VE416FS or VE416FSD Tool read this Manual and all warning labels on the tool. • Always wear safety glasses and foot protection.
-
Page 2: Table Of Contents
® Registered Trademark of Victaulic Company of America © Copyright 1997 Victaulic Company of America Printed in U.S.A. -
Page 3: Operator Safety Instructions
Tool Rating and Roll Selection, pages 29 and 30. TOOL SET-UP 1. Ground the power drive or tool. Be sure the power drive, used with the VE416FS or the VE416FSD drive motor, is connected to an internally grounded electrical system. -
Page 4: Tool Maintenance
29 and 30. Use of the tools for other purposes or exceeding the pipe thickness maximums will over- load the tools, shorten tool life and may cause tool damage. Power Drive The VE416FS tool is designed for power operation by mounting directly onto a Victaulic VPD752 or a ® Ridgid 300 power drive, (45 rpm maximum chuck speed). -
Page 5: Extension Cord Requirements
VE416FS & VE416FSD EXTENSION CORD REQUIREMENTS When pre-wired outlets are not available and an extension cord must be used, it is important to use the proper cord size (e.g., conductor size American Wire gauge). Cord size selection is based upon tool rating (amps) and cord length (feet). -
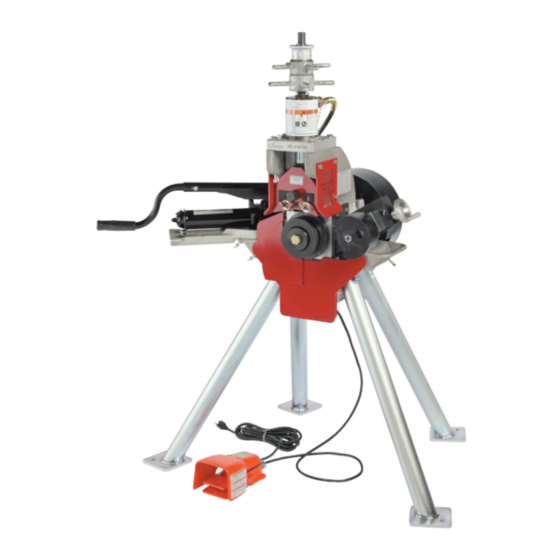
Page 6: Tool Nomenclature
Power Drive • Always wear safety glasses and foot protection. Stand If you have any questions about the safe operation of this tool, contact Victaulic Tool Company, P.O. Box 31, Easton, PA 18044-0031, 610-559-3300. 0396 Rev. B ➂ ALWAYS KEEP THIS PAD WITH THE TOOL. -
Page 7: Receiving Tool
VE416FS pallet should contain: Before grooving, the tool head and legs must A. One small box which contains: be mounted on a Victaulic VPD752 or a Ridgid 300 power drive. The tool and power drive 1. 2"-3 ¹⁄₂ " roll set assembly. - Page 8 A level and even surface for power drive, tool, pipe stand and footing. 3. Prepare the power drive unit to receive the VE416FS tool. Remove threading dies, cut off 5. Slide tool head/mounting stand assembly attachments, etc. from the power drive. Fully...
- Page 9 VE416FS & VE416FSD 8. Tighten the four (4) set screws as shown to 12. Loosen hex bolts to release lower legs (2) secure the tool on the support arms. and allow them to drop down to floor. Turn leg pads at bottom until they are resting flat on the 9.
- Page 10 On the Victaulic VPD752 and Ridgid 300, put- ting the switch in the reverse position will pro- duce clockwise rotation of the chuck, lower roll and pipe.
-
Page 11: Pre-Operation Adjustments
VE416FS & VE416FSD GROOVING ROLLS 3. Place tool on level ground or platform and Make sure the proper roll set is on the tool for secure to the platform or floor. The tool’s legs the pipe size and material to be grooved. They... -
Page 12: Groovable Pipe Lengths
VE416FS & VE416FSD GROOVABLE PIPE LENGTHS The VE416FS/FSD is capable of grooving short pipe lengths without the use of a pipe stand (see Table 1, on this page), or long pipe lengths Grooving rolls can crush or cut up to double randoms (approximately 40 ft.), fingers and hands. - Page 13 It may be nec- essary to use an angle less than ¹⁄₂°. Pipe exceed- Figure 1 shows the Victaulic adjustable pipe stand ing Maximum Allowable Flare, Column 8, Roll (VAPS 112). VAPS 112 is suitable for ³⁄₄" to 12"...
-
Page 14: Roll Guard Adjustment
VE416FS & VE416FSD ROLL GUARD ADJUSTMENT The VE416FS/FSD guards must be adjusted every time rolls are changed or pipe size or wall thickness is different from previous pipe grooved. Always turn off power before making any tool adjustments. Accidental start up of tool may result in serious injury. -
Page 15: Pipe Stabilizer Adjustment
VE416FS & VE416FSD 6. Close hand pump valve. 7. Pump upper roll down into firm contact 9. Loosen the wing nuts and adjust each with pipe. guard to conform to and lightly pinch the pad against the pipe. Tighten wing nuts to secure guards in position. -
Page 16: Groove Diameter Stop Adjustment
VE416FS & VE416FSD ADJUSTMENT PROCEDURE 1. Make sure proper roll set is on the tool for the pipe size requiring grooving. Rolls are marked with pipe size and part number. 5. Advance stabilizer inward with hand wheel until stabilizer wheel lightly contracts pipe as shown, then tighten locking handle. - Page 17 VE416FS & VE416FSD To achieve proper diameter: 1. Determine the size and thickness of pipe to be grooved. See pipe dimensions page 31 to determine proper schedule. 4. Using a piece of scrap pipe or short piece of pipe (refer to the Groovable Pipe Lengths Table...
-
Page 18: Grooving Operation
(Steps 6 and 7) until injury. groove diameter is within tolerance. 1. Plug the VE416FSD or power drive into an internally grounded electrical source. Make sure the VE416FSD or power drive is grounded. Consult power drive manufacturer's instruc- tions when using the VE416FS. - Page 19 • Always groove pipe in a clockwise direction only. 2. When using the VE416FS, set power drive • Never groove pipe shorter than what is switch to produce clockwise rotation of lower recommended.
- Page 20 VE416FS & VE416FSD 11. Depress and hold down foot switch. The pipe will begin to rotate clockwise. As the pipe rotates, begin grooving by slowly pumping the pump handle. NOTICE Do not pump too fast, but at a rate sufficient to 7.
-
Page 21: Roll Changing
VE416FS & VE416FSD UPPER ROLL 15. Open hydraulic release valve to release 1. Open hand pump release valve (turn knob pipe. Remove pipe from tool. counterclockwise) which will move slide to the full open position. NOTICE Groove diameter should be correct for the diame- ter and wall thickness of pipe for which it was set under Groove Diameter Stop Adjustment. -
Page 22: Roll Installation 4 - 16
VE416FS & VE416FSD LOWER ROLL ROLL INSTALLATION 4 - 16" Clean upper shaft, main shaft and lower roll bore of any dirt and/or scale before installation of rolls. Inspect the roller bearing inside upper roll for proper lubrication and condition. Make repairs as necessary. -
Page 23: Roll Installation 2 - 3¹⁄₂
VE416FS & VE416FSD 3. Place ³⁄₄" flat washer (Part No. N-W01-120- 2. Install upper roll retaining plate and bolt. 000) onto ³⁄₄" ✕ ³⁄₄" hex head cap screw (Part Align tab on plate with recess in the slide as No. N-S02-120-304). Install bolt and washer as shown. -
Page 24: Copper Roll Installation 2 - 6" And 8
Replacement parts, applicable only to these tools, should be ordered from Victaulic to assure proper operation of the tool. All special parts are FOB Easton, Pennsylvania, at the price in effect at the time of ordering... -
Page 25: Hydraulic Systems
VE416FS & VE416FSD VE416FSD ONLY LUBRICATION – MONTHLY 1. Lubricate drive gear as shown with a spray type heavy duty open gear lubricant (Lubri- plate Gear Shield Extra Heavy or equivalent). To thoroughly lubricate, plug tool into proper outlet and jog drive gear around to several loca- tions by depressing foot switch momentarily and then lubricating the gear at each position. - Page 26 VE416FS & VE416FSD AIR BLEEDING 3. Open release valve by turning counter- clockwise and allow air to escape. 4. Repeat steps 1-3 several times to bleed all the air from the system. 5. Check oil level and add oil if necessary.
-
Page 27: Parts Ordering Information
Order parts from the nearest Victaulic sales office. Consult the back page of this Instruction Also available is Victaulic Model 224. It has fea- Manual for the nearest Victaulic sales office. tures similar to Model 112. It is suitable for pipe sizes from 2 - 24". -
Page 28: Troubleshooting
Pipe will not stay in grooving Incorrect pipe positioning on See “Groovable Pipe Lengths”. rolls. long pipes. Power drive running See “Tool Setup” (VE416FS). counterclockwise (VE416FS). Pipe stops rotating during Rust or dirt has built up on lower Remove accumulation from grooving. -
Page 29: Tool Rating And Roll Selection
VE416FS & VE416FSD TOOL RATING AND ROLL SELECTION STANDARD AND “ES” ROLLS – COLOR CODED BLACK 0135-2A Nominal Wall Thickness Dimensions – Inches/ Nom. Steel Stainless Steel Aluminum PVC Plastic Standard “ES” Size Pipe Pipe Pipe Pipe Roll Roll Inches Min. - Page 30 † Drawn copper tubing – DWV, ASTM B306 - Type “M”, ASTM B88 – Type “L”, ASTM B88 – Type “K”, ASTM B88. Rolls are available for grooving British Standard, Australian Standard and DIN Standard copper tube, contact Victaulic for details.
-
Page 31: Dimensions
VE416FS & VE416FSD DIMENSIONS SEAMLESS AND WELDED STEEL PIPE 0135-5A Nominal Pipe Nominal Wall Thickness – Inches/ Size O.D. Sch. Sch. Inches Inches Sch. 5S Sch. 10 Sch. 20 Sch. 30 Sch. 40 STD. Sch. 80 2.375 0.065 0.109 —... -
Page 32: Roll Groove Specifications
VE416FS & VE416FSD ROLL GROOVE SPECIFICATIONS STEEL PIPE AND ALL MATERIALS GROOVED WITH STANDARD AND “RX” ROLLS Exaggerated for Clarity 0135-6A Dimensions – Inches/ millimeters Pipe Outside Dia. Groove Dia. C Nom. Grv. Nom. Max. Gasket Groove Pipe Depth Min. Allow. - Page 33 All loose paint, scale, dirt, chips, grease and rust must be removed. It continues to be Victaulic’s first recommendation that pipe be square cut. When using beveled ®...
-
Page 34: Steel Pipe And All Materials Grooved With "Es" Rolls
VE416FS & VE416FSD ROLL GROOVE SPECIFICATIONS STEEL PIPE AND ALL MATERIALS GROOVED WITH “ES” ROLLS Exaggerated for Clarity 0886-6A Dimensions – Inches/ Pipe Outside Dia. O.D. Gasket Seat Groove Width Groove Dia. Nom. Min. Grv. Allow. Max. Nom. Depth Wall Allow. - Page 35 VE416FS & VE416FSD ROLL GROOVE SPECIFICATIONS DRAWN COPPER TUBING GROOVED WITH COPPER ROLLS Exaggerated for Clarity 25.06-1A Act. O.D. – Inches/ Dimensions – Inches/ millimeters Gasket Groove Groove Nom. Seat Width Dia. Groove Min. Max. Size “A” “B” “C” Depth Allow.
- Page 36 ® Victaulic Factory Representative and Distributor Stocks Worldwide Victaulic reserves the right to change product specifications, designs and standard equipment without notice and without obligation. ® Registered Trademark of Victaulic © Copyright 1997 Victaulic Printed in U.S.A. TM-VE416FS/FSD 0135 Rev.
Need help?
Do you have a question about the VE416FS and is the answer not in the manual?
Questions and answers