
Subscribe to Our Youtube Channel
Related Manuals for Hobart Welders H200L4-15


Summary of Contents for Hobart Welders H200L4-15
- Page 1 OM-242 637-A 2009−08 Processes MIG (GMAW) Welding Flux Cored (FCAW) Welding Description Semi-Automatic Air-Cooled MIG (GTAW) Welding Gun H200L4−15 Gun File: MIG (GMAW)
- Page 2 Protect Your Investment! Hobart Welders manufactures a full line of welders and welding related equipment. For information on other quality Hobart products, contact your local Hobart distributor to receive the latest full line catalog or individual specification sheets.
-
Page 3: Table Of Contents
TABLE OF CONTENTS SECTION 1 −SAFETY PRECAUTIONS FOR GMAW WELDING GUNS − READ BEFORE USING ..1-1. Symbol Usage ............... 1-2. -
Page 5: Section 1 −Safety Precautions For Gmaw Welding Guns − Read Before Using
SECTION 1 −SAFETY PRECAUTIONS FOR GMAW WELDING GUNS − READ BEFORE USING SR7 (MIG) 2009−08 Protect yourself and others from injury — read and follow these precautions. 1-1. Symbol Usage DANGER! − Indicates a hazardous situation which, if Indicates special instructions. not avoided, will result in death or serious injury. -
Page 6: Emf Information
1-3. EMF Information Electric current flowing through any conductor causes localized electric 4. Keep head and trunk as far away from the equipment in the and magnetic fields (EMF). Welding current creates an EMF field welding circuit as possible. around the welding circuit and welding equipment. EMF fields may inter- fere with some medical implants, e.g. -
Page 7: Section 2 − Installation
Air-Cooled Welding Gun For GMAW And FCAW Welding Note: Using gasless flux cored wire reduces gun duty cycle. H200L4-15 Feeds .023 To .045 in (0.6 To 1.1 mm) Hard Or Flux Cored Wires Duty Cycle Rating: 60%: 200 A With CO... -
Page 8: Installing Gun
2-3. Installing Gun Gun Securing Knob Gun End Loosen knob. Insert gun end until it bottoms against drive assembly. Tighten knob. Gun Trigger Plug Insert into receptacle, and tighten threaded collar. Friction Terminals Some applications will require cutting off trigger plug and installing 0.250 female friction terminals onto end of leads. -
Page 9: Section 4 − Maintenance & Troubleshooting
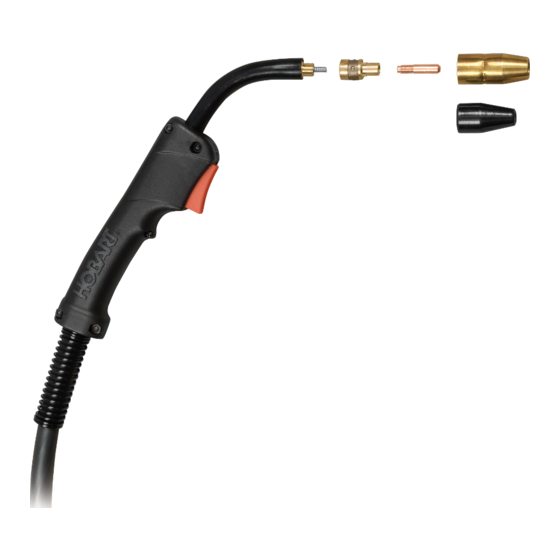
SECTION 4 − MAINTENANCE & TROUBLESHOOTING 4-1. Removing Nozzle, Contact Tip, And Adapter, Changing Liner, And Cleaning Gun Casing Turn off welding power source/wire feeder. Nozzle Contact Tip Tip Adapter Head Tube Wire size stamped on tip − check and match wire size. Cut off wire and 8 mm disconnect gun... -
Page 10: Replacing Switch And/Or Head Tube
4-2. Replacing Switch And/Or Head Tube Turn Off welding power source /wire feeder and disconnect gun. Remove handle halves. Remove screws (5) and nuts (4). Remove switch housing. Install new Remove screw on switch and connect leads (polarity is opposite side. important). -
Page 11: Routine Maintenance
4-3. Routine Maintenance Turn Off welding power source and disconnect gun before maintaining. Each Spool Of Wire Clean Blow Out Nozzle And Check Casing Contact Tip 3 Months Replace Cracked Control Parts Cord Hose 4-4. Troubleshooting Trouble Remedy Wire does not feed; wire is not ener- Check contact tip. -
Page 12: Section 5 − Parts List
SECTION 5 − PARTS LIST 242 630-A Figure 5-1. H200L4−15 Gun Item Part Description Quantity 237 374 Figure 5-1. H200L4−15 Gun ....200 258 NOZZLE, slip type .500 orf flush . - Page 13 Item Part Description Quantity 237 374 Figure 5-1. H200L4−15 Gun ....169 729 ADAPTER, nozzle w/retaining ring ....... . .
- Page 14 Notes Ref. AWS/ANSI D1.1 WELD JOINT TYPES GROOVE FILLET WELD POSITION: FLAT BUTT T−JOINT HORIZONTAL BUTT T−JOINT VERTICAL BUTT T−JOINT OVERHEAD BUTT T−JOINT Ref. 804 248-A − 10 −...
- Page 15 Effective January 1, 2009 5/3/1 WARRANTY applies to all Hobart welding equipment, plasma cutters and spot welders with a Warranty Questions? serial number preface of LK or newer. Call This limited warranty supersedes all previous Hobart warranties and is exclusive with 1-800-332-3281 no other guarantees or warranties expressed or implied.
- Page 16 Owner’s Record Please complete and retain with your personal records. Protect Your Investment! Model Name Serial/Style Number Purchase Date (Date which equipment was delivered to original customer.) Distributor Address City Register your product at: HobartWelders.com State Resources Available Always provide Model Name and Serial/Style Number. To locate a Distributor, Contact your Distributor for: retail or service location:...
Need help?
Do you have a question about the H200L4-15 and is the answer not in the manual?
Questions and answers