Table of Contents
Advertisement
Quick Links
EQUATORIAL MOUNT
(Made in Italy)
USER MANUAL
Version 2.0 November 2019
All the pictures and contents included here are propriety of
AVALON INSTRUMENTS
.
They cannot be reproduced, published, copied or transmitted in any way, including the internet, without the
written permission of
AVALON INSTRUMENTS
.
Advertisement
Table of Contents

Subscribe to Our Youtube Channel
Related Manuals for Avalon Instruments Linear Fast Reverse


Summary of Contents for Avalon Instruments Linear Fast Reverse
- Page 1 (Made in Italy) USER MANUAL Version 2.0 November 2019 All the pictures and contents included here are propriety of AVALON INSTRUMENTS They cannot be reproduced, published, copied or transmitted in any way, including the internet, without the written permission of AVALON INSTRUMENTS...
-
Page 2: Safety Recommendations And Warnings
SAFETY RECOMMENDATIONS AND WARNINGS Read carefully the manual before installing and using the mount. Use the power cable supplied with the mount or a 12V- 3A stabilized power supply as suggested in the manual. Connect the power cable correctly and securely to the power socket. ... - Page 3 All Rights reserved...
-
Page 4: Table Of Contents
Table of Contents SAFETY RECOMMENDATIONS AND WARNINGS........2 Table of Contents....................3 Technical Specifications..................4 Forewords......................5 1. Packing Content.....................6 2 Mount Description..................7 3. LineAR initial Setup..................8 3.1 Latitude Range Setting............................8 3.2 Installing the LineAR on the Tripod........................ 10 3.3 Bar and Counterweight............................12 3.4 Installing the Optical Tube.......................... -
Page 5: Technical Specifications
Technical Specifications Type of mount German Equatorial Head weight 12 kg (27.5 lb) without counterweight and bar Maximum load 20 kg (44 lb) for photographic use, 25 kg (55 lb) for visual Motion System Four-step reducer via pulley-tooth belt system on ball bearing, with no play on both the axes. -
Page 6: Forewords
Forewords This manual describes the Avalon LineAR mount, the procedures for its mounting and tuning on the tripod and for the installation of a telescope. Additional Information on the LineAR mount and on the StarGO control system, containing also the procedures for the use with third-party software and in particular with the ASCOM driver, are reported in the StarGO manual which is part of the mount supply. -
Page 7: Packing Content
Packing Content Open the box to take all the content out. Extract all the components from the small cardboard box and from the mount bag side pocket putting them on a clean, flat surface. Component List • Mount Head with StarGO GoTO control •... -
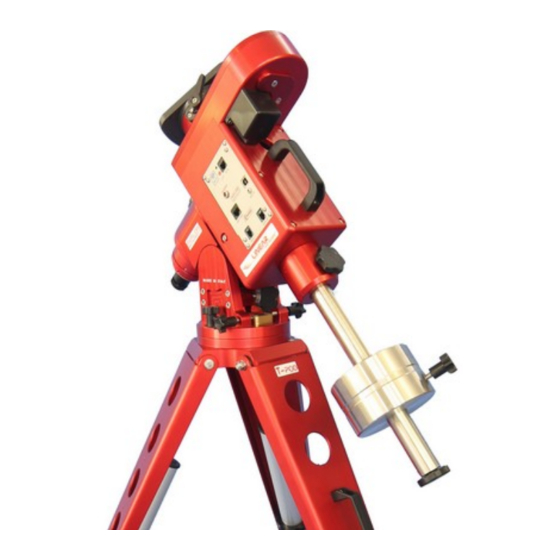
Page 8: Mount Description
Mount Description The Linear Fast Reverse is an innovative mount that accomplishes the movements of right ascension and declination by means of pulleys and tooth belts in the place of the classic worms and gears. This choice has allowed to obtain several advantages such as a really steady motion without play (no backlash) and sudden peaks, factors of paramount relevance for long guided exposures and during high magnification visual observations. -
Page 9: Linear Initial Setup
The same operations will be carried out in the case the mount is transferred in a site with a different value of latitude. It is strongly recommended that the LineAR mount is used with the Avalon Instruments T-pod tripode which has been designed to guarantee maximum performance. If a different kind of tripode is used, it must have dimensions and characteristics compatible with the mount weight and with the astronomical load to be installed. - Page 10 2) Unscrew the 4 screws of the side bracket 1) Unscrew the 2 screws under the base 4) Unscrew the brass item 3) Remove the bracket 6) Remount the side bracket and 5) Screw the brass item in position 1 for tight all screws latitudes from 15°...
-
Page 11: Installing The Linear On The Tripod
7) For latitudes from 45° to 70° insert the hex 8) For latitudes from 45° to 70° insert the hex head M8 screw in the polar scope side as in the head M8 screw in the polar scope side as in the picture picture Installing the LineAR on the Tripod... - Page 12 The following are the steps necessary to install the LineAR mount on a T-Pod tripod: Rotate the mount zimuth knobs of a few turns to make enough space for the insertion of the tripod brass contrast block. Put the mount on the tripod plate, so that the mount bottom plate will fit perfectly with it and the brass contrast block is in between the two azimuth screws.
-
Page 13: Bar And Counterweight
Bar and Counterweight NOTE: Installing the telescope without counterweigh, even with the AR and Dec latches well tight is unsafe. There is the risk of a sudden rotation of the telescope around the axis leading to hit the tripod legs with consequential damages. The counterweight shaft has a special groove to allow a quick setup and a safe usage. - Page 14 Unlatch the DEC axis and rotate it until the dovetail plate is in horizontal position, then re-block the latches on both axis. Open the dovetail clamp by rotating its own knob. Firmly take the OTA, insert its male dovetail plate in the mount dovetail saddle, putting the side closer to the ground first.
-
Page 15: Telescope Balancing
Telescope balancing To guarantee a precise mount tracking it is necessary to correctly balance the telescope in both the rotation axes. To perform this operation is needed to move manually and freely the telescope in RA and DEC. As anticipated, the LineAR is provided of latches in both axes. To freely move the telescope, the latches need to be released by rotating the related levers in the counter clockwise direction. - Page 16 1. Loosen the RA axis latch and position the telescope horizontally on one of the sides of the mount 2. Tighten RA latch to keep the telescope in position. 3. Loosen the DEC axis latch and rotate the telescope to make the tube parallel to the ground.
- Page 17 LineAR Mount Stationing The LineAR is an equatorial mount and therefore it is necessary to make its polar axis parallel with the Earth rotation axis. In this chapter the operations to trim the latitude and the azimuth and to perform the mount alignment to the celestial pole using the standard polar scope (or the optional alternative) will be described.
- Page 18 Azimuth Regulation The azimuth regulation is performed in a similar manner, using both hands to turn the other two adjustment knobs in opposite directions simultaneously. When a knob is rotated in one direction the other is rotated in the opposite direction. Turn them so that the screws attached to the knobs press against the brass adjustment post and move the mount to the right or left by a small amount.
-
Page 19: Linear Polar Alignment
(with Octans, Big Dipper and Cassiopeia) and the new one (with the only Octans constellation). For an accurate polar alignment with Avalon Instruments mounts it doesn’t matter for the constellation position. The reference point it will be the small circle that represent the Polaris orbit. - Page 20 Polarscope view with classical reticle Skywatcher polarscope view with new reticle Currently the most common method to get the exact position of Polaris is using one of several available computer programs or, better, mobile device applications. These programs provide the position of Polaris both visually and in the hourly format as described in section 5.3.3.
-
Page 21: Polar Alignment With A Losmandy Polar Scope
1. Slightly loosen the knob that keeps the mount fixed to the tripod base to allow its Azimuth rotation, while still keeping it safely on the tripod. 2. Slightly loosen the black knurled side knobs to allow the Latitude (altitude) movement. 3. -
Page 22: External Programs For Polaris Finding
to polar scope can also be used. As a final check, verify that the constellations Ursa Major and Cassiopeia engraved in the reticle are in the same orientation as those two asterisms appear in the sky. 5. Continue turning the Azimuth adjustment knobs as directed earlier, as well as the toothed altitude adjustment wheel and rotating the polar scope until all three stars, Polaris, e-UMi and OV Cep, are exactly in the centers of their corresponding gaps in the reticle. - Page 23 The “Polar Finder” is a similar application available for Android smartphones and tablets of different brands. This app and others that can be downloaded are able to accurately reproduce the reticle of the LineAR’s polar-scope as well as the reticle of the optional Losmandy polar- scope.
- Page 24 Polar Finder Preferences Classical Reticle Layout New Reticle Layout Losmandy Reticle Layout The “Polar Finder” app also takes the observation site’s geographical coordinates from the Android device’s internal GPS if available. If the device has no internal GPS the geographical coordinates of the site must be manually entered.
-
Page 25: More Modern And Precise Approaches To Polar Alignment
This adapter is provided as an optional one among the several accessories for the mount. The Avalon Instruments has also developed a special software that, among several others functions, has a tool to perform a precise polar alignment using the “plate solving”...
Need help?
Do you have a question about the Linear Fast Reverse and is the answer not in the manual?
Questions and answers