Table of Contents
Advertisement
Quick Links
OPERATING INSTRUCTIONS
for the vinyl cutters
Secabo T60 II, T120 II and T160 II
Congratulations on the purchase of your Secabo vinyl cutter!
Please carefully read the operating manual to easily integrate your unit into your production
environment.
Any type of reproduction of this operating manual requires the written permission of Secabo
GmbH. Changes and errors in the technical data and the product characteristics are reserved.
The Secabo GmbH is not liable for any direct or indirect damages occurring as a result of the use
of this product.
Version 1.0 (30.06.2016)
Secabo GmbH | Hochstatt 68 | 85283 Wolnzach | Germany | mail@secabo.com | www.secabo.com
1
Advertisement
Table of Contents

Subscribe to Our Youtube Channel
Related Manuals for Secabo T60 II

Summary of Contents for Secabo T60 II
- Page 1 OPERATING INSTRUCTIONS for the vinyl cutters Secabo T60 II, T120 II and T160 II Congratulations on the purchase of your Secabo vinyl cutter! Please carefully read the operating manual to easily integrate your unit into your production environment. Any type of reproduction of this operating manual requires the written permission of Secabo GmbH. Changes and errors in the technical data and the product characteristics are reserved. The Secabo GmbH is not liable for any direct or indirect damages occurring as a result of the use of this product. Version 1.0 (30.06.2016) ...
-
Page 2: Safety Measures
● Do not remove the connection cable to the computer while plotting is in progress. ● Relieve the pressure on the pressure rollers when not in use by moving the pressure lever up. ● Do not reach into the unit when it is connected to electricity supply. ● Never open the casing and do not make any modifications to the unit yourself. ● Ensure that neither liquids nor metal objects are put inside the vinyl cutter. ● Ensure that the wall socket used is grounded and protected with a ground fault switch. ● Ensure that the connected voltage (230V) does not deviate by more than ±10%. Otherwise install a voltage stabilizer. ● Pull the power plug if the unit will not be in use for a longer period of time. ● Never reach into the unit in the vicinity of the blade holder during the cutting operation! ● Discontinue any printing jobs in progress before readjusting the blade holder! ● Always ensure that the vinyl cutter is out of reach of children during operation and never leave the unit or individual parts of it switched on without supervision. ● Do not touch the tip of the sliding blade to avoid injury. ● Always place the unit on a stable base to prevent it from falling down. ● Do not operate the unit during thunderstorms; it can be damaged or destroyed by lightning. Secabo GmbH | Hochstatt 68 | 85283 Wolnzach | Germany | mail@secabo.com | www.secabo.com 2 ... -
Page 3: Items Included
Article Quantity Vinyl Cutter 1 Power cable 1 USB c onnection cable 1 Blade holder 1 Pen holder 1 30° Drag knife 1 Pen head 1 Certificate of DrawCut PRO 1 license Stand with roll mount and 1 catchup basket Secabo GmbH | Hochstatt 68 | 85283 Wolnzach | Germany | mail@secabo.com | www.secabo.com 3 ... - Page 4 Assembly of the floor stand Your Secabo vinyl cutter's floor stand is easy to assemble using the supplied parts. Simply follow these steps: Step 1 and 2: Step 3 and 4: Done! Secabo GmbH | Hochstatt 68 | 85283 Wolnzach | Germany | mail@secabo.com | www.secabo.com 4 ...
- Page 5 The following additional steps are required for the T160 II: Secabo GmbH | Hochstatt 68 | 85283 Wolnzach | Germany | mail@secabo.com | www.secabo.com 5 ...
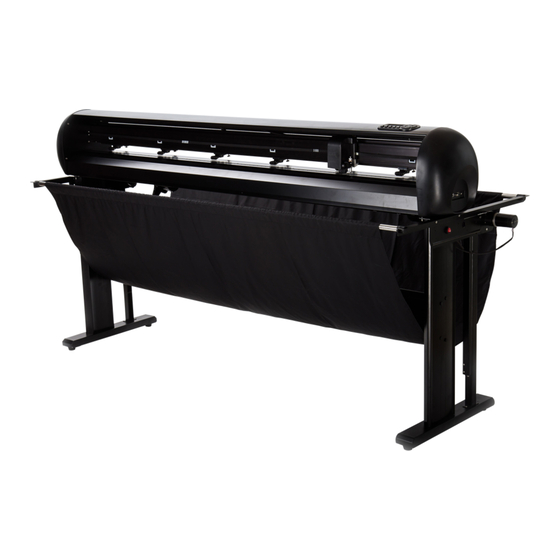
- Page 6 Device parts and their function a) Cutting head with laser diode and LAPOS Q sensor b) Cutting head with laser diode and LAPOS Q sensor c) Blade holder d) Pressure lever for all pressure rollers (w/out Fig.) e) USB interface f) Roll mount g) Pressure rollers h) Stand with catchup basket Power supply and power switch (w/out Fig.) Secabo GmbH | Hochstatt 68 | 85283 Wolnzach | Germany | mail@secabo.com | www.secabo.com 6 ...
-
Page 7: Control Panel
Control panel Initial operation of machine and software Caution! Please note that the smooth installation and complete configuration requires DrawCut PRO to be installed first. Installation DrawCut PRO Your Secabo vinyl cutter is delivered with the cutting software DrawCut PRO. This software must be activated over the Internet. You do not necessarily need internet access on the computer, on which DrawCut will be installed. The activation can also be done on another computer. In order to control your vinyl cutter via your computer, install the software as described below: ● Disable the Windows Firewall and your antivirus software for the time of installation. ● Download the current version of DrawCut PRO at http://www.drawcut.com/#downloads and follow the installation wizard. ● Find your 26digit DrawCut serial number on the printout that was delivered with your vinyl cutter. Enter it when you are prompted to do so. ● Now you can use DrawCut PRO. Installation of your Secabo vinyl cutter in DrawCut Please keep in mind that your Secabo vinyl cutter can only be operated under Windows XP, Windows Vista, Windows 7, Windows 8, Windows 8.1 and Windows 10. Operation with an older version of Windows is not possible. ● First, make sure that your PC is connected to the Internet. Secabo GmbH | Hochstatt 68 | 85283 Wolnzach | Germany | mail@secabo.com | www.secabo.com ... - Page 8 ● Connect the vinyl cutter to your computer using the supplied USB cable. ● Switch on the device. ● Your Secabo vinyl cutter will now be detected. Windows will search for the appropriate drivers and automatically install them. This can take some time. After that, the device is ready for operation. ● Start DrawCut. ● First, open the "Vinyl Spooler" in Drawcut. ● Now click on the "Connections" tab. ● Next, add your vinyl cutter by pressing the "Add" button (a Secabo S60 II is used in the example), select your model and click "Install". Secabo GmbH | Hochstatt 68 | 85283 Wolnzach | Germany | mail@secabo.com | www.secabo.com 8 ...
- Page 9 ● Click on the button labeled "Automatic detection" and follow the instructions in the installation wizard. Confirm the message regarding successful installation by simply clicking on button labeled "Done". Now you can control your Secabo vinyl cutter using DrawCut. Secabo GmbH | Hochstatt 68 | 85283 Wolnzach | Germany | mail@secabo.com | www.secabo.com 9 ...
-
Page 10: Initial Operation Of The Device
● Take the supplied cutting blade and place it in the blade holder in such a way, that the sharp side extends at the front. ● Now set the cutting depth by turning the screw at the upper end of the blade holder. ● Initially, the depth is correctly set if you can carefully move your fingertip across the blade and feel only a light scratching. Since the depth adjustment for the blade depends on the material, it may be necessary to adjust it later. ● Secure the blade setting by tightening the gold lock nut. ● Press the pin on the rear end of the blade holder to remove and replace the blade at any time. Caution risk of injury! The various material thicknesses require different blade settings or even special blades; it may therefore be necessary to repeat the adjustment described above. Inserting the blade holder ● First, sufficiently loosen the clamping screw for the blade holder on the cutting head. ● Next, press down the blade holder from above into the hole on the right side until there is contact and pull the lock nut tight. In doing so, please ensure that the blade holder is also secured correctly from above by means of the fixture provided for this purpose. a) Clamp Secabo GmbH | Hochstatt 68 | 85283 Wolnzach | Germany | mail@secabo.com | www.secabo.com 10 ... -
Page 11: Inserting The Film
Cutting test ● Execute the cutting test by clicking the „Test“ button. The vinyl cutter will cut a triangle with a rectangular border into the inserted film/vinyl at the currently saved zero point. Afterwards, the vinyl cutter will move the film up by 20cm, so that you can easily check the test cut. ● You can check the adjustment of the blade holder as well as the contact pressure with this cutting test. The inserted material should be cut cleanly and straight during the cutting test; the carrier material should not be damaged. ● After reviewing the test cut, press "OK" to move the film back to the zero point. ● If the carrier material has been cut through, either the contact pressure is set too high or the blade or blade holder are set incorrectly. Change these settings and perform the cutting test again. ● Also readjust if the vinyl was cut imprecisely or to an insufficient depth. Secabo GmbH | Hochstatt 68 | 85283 Wolnzach | Germany | mail@secabo.com | www.secabo.com 11 ... -
Page 12: Settings And Operation
● The menu "Send to cutting plotter" appears, click on "Cut" in the lower right section of the window. ● Now, the "Vinyl Spooler" opens and displays a preview of the cut job on the right side. Now click on "Cut" and confirm the question with "Yes". ● Start the cutting process! ● The plot can be stopped with the "pause" button at any time, for example allowing you to adjust knife settings while still in the cut job. ● You can use the "OK" button to continue to run the cut job. Settings and operation Moving the cutting head Pressing the arrow keys lets you move the cutting head left or right, as well as transport the film forwards or backwards. The corresponding X and Y coordinates are shown on the display. Setting the zero point To set the correct starting point for cutting, move the cutting head and film using the arrow keys, so that the knife is located in the front right corner of the film. Now confirm this zero point by pressing "OK". Secabo GmbH | Hochstatt 68 | 85283 Wolnzach | Germany | mail@secabo.com | www.secabo.com 12 ... -
Page 13: Other Settings
Adjust speed and contact pressure You can make the following changes by pressing the corresponding buttons: The "+" function is located at the upper end of the button, while the "" function is at the lower end. Increase and reduce speed Increase and reduce speed The cutting speed and contact pressure cannot be changed while a plotting job is in progress . Other settings The configuration menu is opened by pressing and holding the "Set" button for 5 seconds. Use the up and down arrow keys to cycle through the menu options. Left and right arrow keys allow you to adjust the relevant values. Secabo GmbH | Hochstatt 68 | 85283 Wolnzach | Germany | mail@secabo.com | www.secabo.com 13 ... - Page 14 ● Baud rate configurable to 38400, 57600, or 115200, depending on the value configured for the interface on the computer only when connecting via serial port. ● XP and YP in the second and third menu point, you can calibrate the vinyl cutter correctly. Correction may be required here due to wear to the mechanical parts. The X and Y scaling of the data can be changed by changing the XP and YP values. If, for example, an object for which a length of 100cm was entered on the computer is cut on the vinyl cutter to a length of only 98cm, it is necessary to correct the corresponding scaling value on the plotter. Otherwise, these values should not be changed. ● Tool Offset X and Y in the fourth and fifth menu point, you can adjust the offset between the LAPOS Q sensor and he focal point of the knife holder on the hardware side. However, since the values are determined by the DrawCut PRO software during a simple calibration procedure described below in detail, it is not recommended to change the factory settings in this menu point. ● Sensitivity this menu allows for adjusting the sensitivity of the LAPOS Q sensor to be adapted to different types of media should there be any problems when reading the marks. In principle, a lower value is better suited for shiny media and a higher value for matte media. Only change in case of problems with reading marks. ● Fan setting – here you can adjust the speed of ventilator for the vacuum by choosing one of three settings or turning it off. ● Reset settings here you can restore the vinyl cutter's factory settings. To do so, the right arrow key must be held for 3 seconds. ● Firmware here you can view the firmware version installed on the cutter. Secabo GmbH | Hochstatt 68 | 85283 Wolnzach | Germany | mail@secabo.com | www.secabo.com 14 ...
- Page 15 Contour cut with LAPOS Q LAPOS Q is a system for automatic positioning of printed media in your T60 II, T120 to II and T160 II vinyl cutter, allowing you to cut printed elements with absolute contour accuracy, and without misalignment or distortion, by using any desired number of crop marks. The use of LAPOS Q with DrawCut Pro is explained in the following steps. Calibration Before the first use of LAPOS Q, the vinyl cutter requires an initial calibration to determine the correct laser offset. ● The first step is to open the "Vinyl Spooler". ● Now click on "Lapos Q Controller" Secabo GmbH | Hochstatt 68 | 85283 Wolnzach | Germany | mail@secabo.com | www.secabo.com 15 ...
- Page 16 ● Next, click on "Cutter" and then click "Auto Calibrate Laser Offset" from the dropdown menu that appears. ● Insert a blank sheet of paper into vinyl cutter, as requested by DrawCut Pro. Also, the cutter head must be equipped with the plot pen included in the scope of delivery. Roughly position the plot pen in the middle of the paper and set the zero point on the device. Once you've completed these steps, please confirm by clicking the "Yes" button. ● The plotter will immediately start the calibration. After a brief orientation, you must initiate the process by clicking "Yes" once more. Secabo GmbH | Hochstatt 68 | 85283 Wolnzach | Germany | mail@secabo.com | www.secabo.com 16 ...
- Page 17 ● The plotter will now automatically perform the calibration and report the correct laser offset for your device, which you need to confirm by clicking on "OK". The first contour cut with LAPOS Q Once the calibration is complete, you can proceed with the actual contour cut. ● You may for example begin by creating a logo with the text tool or importing any vector graphics. ● Open the Contour Cut Wizard from the DrawCut PRO header. Secabo GmbH | Hochstatt 68 | 85283 Wolnzach | Germany | mail@secabo.com | www.secabo.com 17 ...
- Page 18 ● Create an outline using the desired parameters under "Create a cutting contour". Confirm it by clicking "Accept". ● Now open the Contour Cut Wizard. Make sure that "LAPOS Q" is selected. Now you can print or save the graphics you've created. Ensure that the printer is configured to print it using the actual size and doesn't scale it. ● In the next step, the saved cut job must be added. To do this, simply click "Add Cut Job". DrawCut PRO will now automatically assign a job ID, which is stored in the software and can be called at any time, either by reading the bar code or by manually loading the job ID. Secabo GmbH | Hochstatt 68 | 85283 Wolnzach | Germany | mail@secabo.com | www.secabo.com 18 ...
- Page 19 ● Open the "Lapos Q controller" in the Vinyl Spooler. Secabo GmbH | Hochstatt 68 | 85283 Wolnzach | Germany | mail@secabo.com | www.secabo.com 19 ...
- Page 20 ● Place your printout in the vinyl cutter as seen in the screenshot below. Top or bottom first doesn't matter, because the software will detect the direction the printout was insert when reading the bar code. Position the vinyl cutter's laser analogous to the red dot in the screenshot below and set it as origin. Then simply start the contour cut by clicking on "Start" Using the automatic media detection ● First, open the Vinyl Spooler. ● Switch to the "Cut Options" tab and click on "Poll Media". Secabo GmbH | Hochstatt 68 | 85283 Wolnzach | Germany | mail@secabo.com | www.secabo.com 20 ...
- Page 21 ● Prior to first use, a onetime measurement of the vinyl cutter's maximum media width must be performed. To do this, you must click on "Recalibrate" and then click on "OK" to start the process. This process may take several minutes. ● Now place the film in the vinyl cutter and set the zero point at the desired location. Confirm your zero point by clicking the button "right". Next, click "Detect". The plotter will now search for the left edge of the film. Secabo GmbH | Hochstatt 68 | 85283 Wolnzach | Germany | mail@secabo.com | www.secabo.com 21 ...
- Page 22 ● The film's actual width will be shown in the window and can be further finetuned using the arrow keys, if necessary. Once you're done, confirm the media width by clicking on "Apply". The respective edge can be reached in the rapid traverse mode by pressing "Left" and "Right". ● The measured width will now be saved in the Vinyl Spooler as media width. Secabo GmbH | Hochstatt 68 | 85283 Wolnzach | Germany | mail@secabo.com | www.secabo.com 22 ...
-
Page 23: Drag Knifes
Drag knifes Drag knives are sensitive, sharp and dangerous precision tools. ● Keep the blade out of the reach of children! ● To avoid personal injury, caution must be taken in handling the blades. Handle the drag knives carefully and always store them with the protection cap when not in use. Should the tip of a blade come hit hard materials such as glass or stone, it can cause tiny fractures of the tip of the blade, making the blade unusable. Please consider the following instructions to prevent unnecessary wear and tear of your drag knives and to achieve a long durability of these products instead ● In any case, avoid cuts into the carrier material of the foil. The deeper you cut into the used material, the higher will be the wear and tear of the blade. ● Adjust the cutting depth of the blade so that the material is merely cut cleanly. If the blade protrudes any further, it reduces the durability of the blade and good cutting results can no longer be guaranteed. ● For thicker materials, use knives specially suited for it (e.g. flock knife for flock). ● Frayed edges after cutting the foil indicate a blunt drag knife. Replace worn blades immediately! Secabo GmbH | Hochstatt 68 | 85283 Wolnzach | Germany | mail@secabo.com | www.secabo.com 23 ... -
Page 24: Technical Data
Max. media width 720mm 1350mm Max. cutting width 630mm 1260mm Connections USB Display backlit, graphic LCD screen Max. speed 960mm/s Max. media thickness 1mm Contact pressure 50g750g Mechanical resolution 0,01254mm Repetition accuracy < +/0,01mm Power supply AC 90V 240V / 50Hz 60Hz Environment +5°C +35°C / 30% 70% relative humidity Weight without packaging 15kg 30kg Weight with packaging 25kg 41kg Dimensions (W x H x D) 920 x 260 x 260mm 1600 x 260 x 260mm Secabo GmbH | Hochstatt 68 | 85283 Wolnzach | Germany | mail@secabo.com | www.secabo.com 24 ... - Page 25 Max. media width 1750mm Max. cutting width 1600mm Connections USB Display backlit, graphic LCD screen Max. speed 960mm/s Max. media thickness 1mm Contact pressure 50g750g Mechanical resolution 0,01254mm Repetition accuracy < +/0,01mm Power supply AC 90V 240V / 50Hz 60Hz Environment +5°C +35°C / 30% 70% relative humidity Weight without packaging 50kg Weight with packaging 60kg Dimensions (W x H x D) 1920 x 260 x 260mm Secabo GmbH | Hochstatt 68 | 85283 Wolnzach | Germany | mail@secabo.com | www.secabo.com 25 ...
- Page 26 Declaration of conformity Statement of conformity We hereby declare under our sole responsibility that the product referred to in "technical data" complies with the provisions of the following directives and standards: We herewith declare under sole responsibility that the under „9. technical data“ mentioned product meet the provisions of the following EC Directives and Harmonized Standards: EC directives / EC directives: 2006/95/EC Low Voltage Directive 2006/95/EC Low Voltage Directive 98/37/EC Directive on machinery (2006/42/EC from 29/12/2009) 98/37/EC Directive on machinery (from 20091229: 2006/42/EC) Standard / Standard: EN 602041:2006 Technical documents at / Technical documents at: Secabo GmbH, Hochstatt 68, 85283 Wolnzach, Germany Dipl. Ing. Fabian Franke Dipl. Ing.(FH) Bernhard Schmidt Secabo GmbH | Hochstatt 68 | 85283 Wolnzach | Germany | mail@secabo.com | www.secabo.com 26 ...
Need help?
Do you have a question about the T60 II and is the answer not in the manual?
Questions and answers