Advertisement
Quick Links
TREND MICRO
TM
InterScan
Gateway Security Appliance
™
Trend Micro InterScan Gateway Security Appliances (IGSA) deliver the most
complete, all-in-one defense from viruses, spyware, spam and other threats at the
Internet gateway. The leading gateway antivirus vendor, Trend Micro, provides
these easy-to-deploy, worry-free appliances to block malware, stop inappropriate
content or email, and filter harmful URLs.
Introduction
This QuickStart card overviews the process of installing, configuring and registering
your new IGSA. Use this card as guide to the Getting Started Guide (GSG).
Questions?
The GSG can answer most of your questions. (Included in print and on CD).
Please visit our extensive online resource library for answer to FAQs.
Go to
www.trendmicro.com/support/
Support Contact Information
Email for Support : support@support.trendmicro.com
US Phone number : 1 (888) 608-1009
Note:
For all other regions, please refer to the reverse side of this card.
1
1
Opening and Inspecting Your IGSA Packaging Contents
Please verify that your InterScan Gateway Security Appliance carton has
the following contents:
TM
InterScan
Gateway
Security Appliance M-Series
Console Cable (DB9)
Rack Accessories
Rubber Feet
2
2
Selecting the Deployment Method for Your IGSA
There are two methods of deploying your new IGSA into your network;
Full Transparent and Proxy mode. We recommend Full Transparent mode if
your firewall policies are user-based. If you have questions regarding the
best deployment method for your network, please refer to the Getting
Started Guide.
Shown below is a simple example of where your IGSA may be deployed
into your network using Full Transparent mode.
Internet
Router
Firewall
3
3
Mounting Your IGSA With the Rack Kit
• Attach side rails to appliance
• Install slide sets to rack
• Mount Appliance into rack
For further instructions, please refer to the Getting Started Guide on how to mount
the InterScan Gateway Security Appliance in a 4 Post rack.
4
4
Cabling Your IGSA
Note:
When you disconnect your cables, you will no longer have network
connectivity.
• Connect the included Ethernet cable to the INT port of your IGSA and the other
end to the router/switch on your internal (protected) network
• Connect the cable from your firewall to IGSA's EXT port
• When power is supplied to the IGSA, the fans will begin working
• Connect the Power Cord to your IGSA and to a grounded electrical outlet
• Power on your IGSA
Note:
To power off your IGSA, you must depress the Power switch for 5 seconds.
For further instructions, please refer to the Getting Started Guide on how to cable
the InterScan Gateway Security Appliance.
Power Cord
Ethernet Cable
(RJ-45)
Solutions CD and
Document Set
Router,
IGSA
switch,
or hub.
Quick Start Card
Quick Start Card
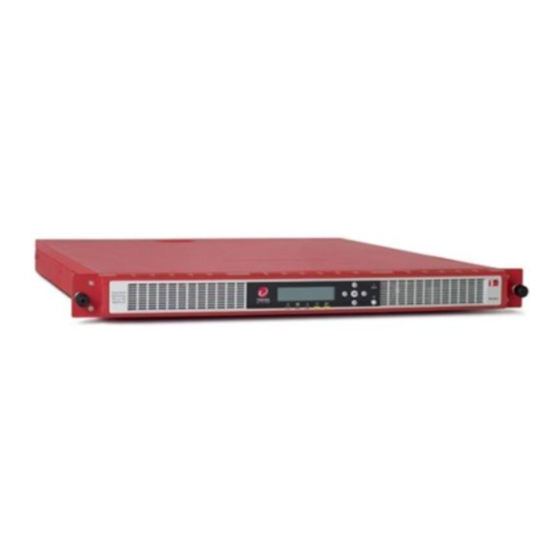
InterScan Gateway Security Appliance Hardware Overview
Refer to the Getting Started Guide sections "IGSA Front Panel page 1-5"
and "IGSA Back Panel page 1-8" for a full list on button functions and LED
readouts.
InterScan Gateway Security Appliance front panel
The following image describes each front panel element:
Sun screw
InterScan Gateway Security Appliance back panel
The following image describes each back panel element:
AC Power Receptacle
Power Switch
InterScan Gateway Security Appliance LCD console
There are five buttons on the LCM Control Panel:
• Up arrow – cycles forward through the alphanumeric characters displayed
on the LCD
• Down arrow – cycles backward through the alphanumeric characters
displayed on the LCD
• Left arrow – moves the focus or cursor to the left
• Right arrow – moves the focus or cursor to the right
• Enter (center arrow) – confirms selection or input
You have two methods of assigning an IP address to your IGSA:
Dynamically with DHCP or Static.
5
5
Obtaining an IP Address for Your IGSA
IGSA allows you to accept a DHCP address on the network or program a static IP
Clients
address for the appliance. DHCP is the default for the appliance. The LCD screen
on the IGSA will show its IP Address.
You may record your settings in the Configuration Reference table below.
If you are using static IP addressing in your network, refer to the Getting Started
Guide section "Gather Device Network IP Information" page 3-6
Note:
If you are deploying IGSA on a network with multiple segments, you need
to set up the static routes. To set up static routes, log on to the Web
console, and then click Administration > IP Address Settings > Static
Routes.
Configuration Reference Network Settings
For your records, write down the following:
IP Address:
Subnet Mask:
Default Gateway:
Primary DNS:
Secondary DNS:
Domain Suffix:
LCD Module
Removable Bezel
Serial Connection
LAN Ports
USB Ports
LCD
Reset Button
192.168.1.1
LED Indicators
Control Panel
UID Button
Sun screw
Advertisement

Subscribe to Our Youtube Channel
Related Manuals for Trend Micro InterScan


Summary of Contents for Trend Micro InterScan
- Page 1 Quick Start Card Quick Start Card ™ Trend Micro InterScan Gateway Security Appliances (IGSA) deliver the most complete, all-in-one defense from viruses, spyware, spam and other threats at the Internet gateway. The leading gateway antivirus vendor, Trend Micro, provides InterScan Gateway Security Appliance Hardware Overview these easy-to-deploy, worry-free appliances to block malware, stop inappropriate Refer to the Getting Started Guide sections “IGSA Front Panel page 1-5”...
- Page 2 Try the following to test that the appliance is functioning. 2. Perform one of the following: • If you are an existing Trend Micro customer, log on using your logon ID and Web access - Can you access http://www.trendmicro.com? password FTP - Can you access ftp.trendmicro.com?
Need help?
Do you have a question about the InterScan and is the answer not in the manual?
Questions and answers