Acer F900 Service Manual
Acer cell phone user manual
Hide thumbs
Also See for F900:
- User manual (104 pages) ,
- Quick manual (20 pages) ,
- User manual (60 pages)

Related Manuals for Acer F900


Summary of Contents for Acer F900
-
Page 1: Service Guide
F900 Smartphone Service Guide Service guide files and updates are available on the ACER/CSD web; for more information, please refer to http://csd.acer.com.tw PRINTED IN TAIWAN... -
Page 2: Revision History
Revision History Please refer to the table below for the updates made on the F900 smartphone service guide. Date Chapter Updates... - Page 3 Copyright Copyright © 2009 by Acer Incorporated. All rights reserved. No part of this publication may be reproduced, transmitted, transcribed, stored in a retrieval system, or translated into any language or computer language, in any form or by any means, electronic, mechanical, magnetic, optical, chemical, manual or otherwise, without the prior written permission of Acer Incorporated.
- Page 4 Conventions The following conventions are used in this manual: SCREEN MESSAGES NOTE WARNING CAUTION IMPORTANT Denotes actual messages that appear on screen. Gives bits and pieces of additional information related to the current topic. Alerts you to any damage that might result from doing or not doing specific actions.
- Page 5 DIFFERENT part number code to those given in the FRU list of this printed Service Guide. You MUST use the list provided by your regional Acer office to order FRU parts for repair and service of customer machines.
-
Page 7: Table Of Contents
Your Acer Smartphone tour ........ - Page 8 F900 Smartphone Exploded Diagram ........2...
-
Page 9: System Specifications
System Specifications Features Below is a brief summary of the smartphone’s many features: Operating System • Windows Mobile® 6.1 Professional for Pocket PC Phone Edition Processor • Samsung SC3 6410, 533 MHz with one DRAM Memory • 256 MB Flash ROM, 128 MB SDRAM Display •... -
Page 10: Light Sensor
Camera • Built-in 3 mega pixels auto-focus CMOS camera with flashlight, up to 2048 x 1536 resolution • VGA resolution fixed-focus CMOS camera for video telephony usage Light sensor • Sensing the brightness of environment to adjust panel luminance TV-out •... - Page 11 MSN® Messenger / Microsoft® Transcriber / Windows Media® Player 10 • Picture / Notes / Internet Explorer Mobile / ActiveSync / Calculator / Game (Solitaire, Bubble Breaker) • Microsoft Reader* (* depends on region) Acer Exclusive Applications • User interface: • Acer Shell v2.0 •...
-
Page 12: System Block Diagram
System Block Diagram Touch Lens UART 3 GPS (HOST) 48MHz 12MHz 27MHz UART_3 SDIO 0 Micro SD Slot SDIO_0 FM Audio CPU_BT RX/TX SDIO2 SDIO_2 WiFi nTV_DET TV Signal Ext Mic Vcore PWR_EN_SYS 2.85V 3.3V Charger HS_L / R BATT LOW Ext Download RX / TX Gas-gauge CONN... -
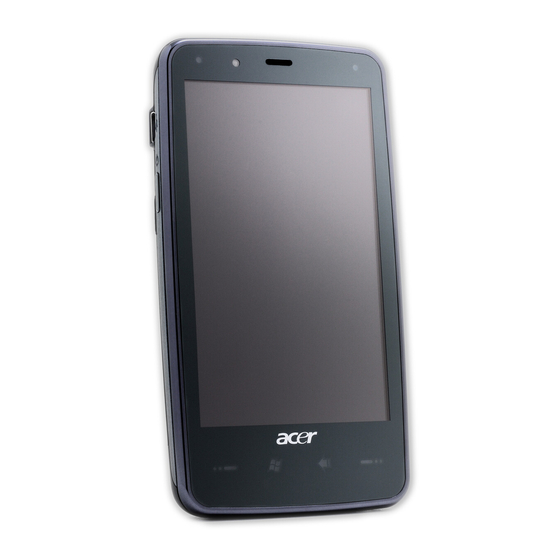
Page 13: Your Acer Smartphone Tour
Your Acer Smartphone tour After examining your smartphone features, let us show you around your new smartphone. Views Item Mini USB connector Power button Bluetooth/WLAN/ GPS indicator Light sensor Phone speaker Charge indicator Touchscreen Talk/send button End button Windows button... -
Page 14: Hardware Specifications And Configurations
Item Action key Volume down Micro SD card slot Reset pinhole Camera button Flash Camera Battery cover Speaker Hardware Specifications and Configurations Processor Item CPU type Samsung SC3 6410 533 MHz CPU package 424-pins FBGA Core Logic ARM1176JZF-S Features • •... - Page 15 System Memory Item Memory controller Memory size TFT 3.8” Item Vendor/model name Screen Diagonal (mm) Active Area (mm) Display resolution (pixels) Pixel Pitch (mm) Typical White Luminance (cd/m also called Brightness Supported Colors Contrast Ratio Response Time (Optical Rise Time/Fall Time) msec Typical Power Consumption (watt) Weight...
- Page 16 Bluetooth Item Type Interface Profiles FM Radio Item Frequency Channel Search Audio Mute RDS Supported Antenna Battery Item Vendor & model name Battery Type Rating Maximum Charging Voltage Pack capacity Battery Life Talk time Standby Pocket PC usage GPS usage Bluetooth 2.0, class 2 + EDR UART Generic, Serial, FTP, A2DP, Headset, Hands Free...
-
Page 17: Software Upgrades
Software Upgrades System Requirements • Microsoft® Windows XP or above • Latest version of EUU (End-user Upgrade Utility / EUU_xxx.exe) or Bin files for x960 • Latest version of ActiveSync v4.5 or above • Tool: USB Cable NOTE: E-ten releases both EUU and Bin file for an authorized Service Center. Distributors and local service agent only receive EUU software. -
Page 18: Using The Euu (For Distributor Or Service Center)
Using the EUU (For distributor or service center) Execute ActiveSync. Connect with PC. Execute EUU_xxx.exe The Welcome screen displays. Click Next. When EUU is installed, the Completed screen displays. Click Finish. The End User Update utility starts and the following screen displays. - Page 19 Follow the on screen instructions. When the ActiveSync connection is established, click Next.
- Page 20 The following screen displays. When the device enters Download mode (as described on screen) click Next. NOTE: If the device does not enter Download mode, contact the service center. The following screen displays. Click Update to begin receiving data. NOTE: If the Update button is disabled, disconnect and reconnect the USB cable between the device and host computer.
- Page 21 A progress screen displays. The update is complete when the following screen displays. 12. Click Finish to complete the process.
-
Page 23: Machine Disassembly And Replacement
Machine Disassembly and Replacement This chapter contains step-by-step procedures on how to disassemble and reassemble the smartphone for maintenance and troubleshooting. IMPORTANT:The use of metal tools during disassembly may damage the casing. Use plastic tools where possible. IMPORTANT:Cover the work area with a clean, dry, lint-free cloth before placing the smartphone face down. Disassembly Requirements To disassemble the smartphone, you need the following tools: •... -
Page 24: External Module Disassembly Process
External Module Disassembly Process External Modules Disassembly Flowchart NOTE: Items enclosed with broken lines (— - - —) are optional and may not be present. Turn off system power Disconnect USB and all other cables from system Remove Remove Stylus Back Cover Remove Battery... -
Page 25: Removing The Stylus
Removing the Stylus Grasp the Stylus as shown and pull to remove it from the smartphone. Continue to pull the Stylus until it is completely removed from the smartphone. Chapter 3... -
Page 26: Removing The Mini-Sd Card
Removing the Mini-SD Card NOTE: The Mini SD Card is an optional item and may not be present. Insert a finger nail (or plastic pry) into the casing and open the Mini SD door as shown. Rotate the Mini SD door away from the card slot as shown. Press the Mini SD card into the slot and release. - Page 27 Remove the card from the slot and replace the Mini SD door. Chapter 3...
-
Page 28: Removing The Back Cover
Removing the Back Cover IMPORTANT:Cover the work area with a clean, dry, lint-free cloth before placing the smartphone face down. Press the two cover securing latches inward as shown. Rotate the Back Cover away from the smartphone to remove it. Chapter 3... -
Page 29: Removing The Battery
Removing the Battery IMPORTANT:The Battery is locked in place; do not force the Battery out of the battery bay before open in the locking mechanism. See “Removing the Back Cover” on page 6. Slide the Battery lock in the direction of the arrow to release the Battery. Insert a thumb into the Battery cutout as shown and lift the Battery out of the battery bay. -
Page 30: Removing The Sim Card
Removing the SIM Card NOTE: The SIM Card is an optional item and may not be present. See “Removing the Battery” on page 7. Slide the SIM Card out of the SIM slot as shown. Lift the SIM Card clear of the smartphone as shown. Chapter 3... -
Page 31: Main Unit Disassembly Process
Main Unit Disassembly Process Main Unit Disassembly Flowchart Vibration Module Screw List Step Upper Cover M1.6*5 M1.6*1.5 Mainboard M1.6*2 M1.6*3.5 M1.6*5 Chapter 3 Remove External Modules before proceeding Remove Upper Cover Remove LCD Panel Remove Mainboard Remove Remove Receiver Module Screw Quantity Remove... - Page 32 Step Screw Quantity Part No. SIM Board M1.6*1.5 Chapter 3...
-
Page 33: Removing The Upper Cover
Removing the Upper Cover See “Removing the Battery” on page 7. Remove the two rubber screw caps from the Lower Cover using tweezers. IMPORTANT:Thin tine metal tweezers can be used to remove the screw covers. Take care not to scratch the Lower Cover during removal. - Page 34 Remove the two screws located on the sides of the Lower Cover. Step Upper Cover M1.6*1.5 IMPORTANT:Do not force the covers apart to avoid damaging the plastic securing clips. IMPORTANT:Use a plastic pry less than or equal to 0.96 mm thickness. Metal tools may damage the covers. Starting at the top-right edge of the smartphone, pry apart the covers.
- Page 35 Work down the right side of the cover as shown, prying the covers apart. Repeat the process down the left side, gradually prying apart the covers. Chapter 3...
- Page 36 Apply lateral pressure as indicated by the arrow (1) and pry apart the bottom right edge of the Upper Cover (2). 10. Work along the bottom edge prying the covers apart as shown. IMPORTANT:Do not remove the Upper Cover completely; the TouchPad FFC is still connected at this stage. 11.
- Page 37 12. Using plastic tweezers, lift the FFC connector to disconnect the Upper Cover from the Mainboard. 13. Remove the Upper Cover from the Lower Cover and place it on a clean, dry, lint-free cloth. 14. The Lower and Upper Covers appear as shown below when separated. IMPORTANT:Ensure that no dust, dirt, or finger prints come in to contact with the exposed LCD Panel or Front Cover;...
-
Page 38: Removing The Lcd Module
Removing the LCD Module IMPORTANT:Ensure that no dust, dirt, or finger prints come in to contact with the exposed LCD Panel or Front Cover; Foreign particles and grease will affect LCD output performance. See “Removing the Upper Cover” on page 11. IMPORTANT:The LCD Panel is not secured to the Lower Cover. - Page 39 Chapter 3...
-
Page 40: Removing The Mainboard
Removing the Mainboard See “Removing the LCD Module” on page 16. Turn the smartphone over. Remove the two screws securing the Mainboard to the Lower Cover. Step Mainboard M1.6*2 Turn the smartphone over. Peel back the barcode to expose the securing screw. Screw Quantity Screw Type... - Page 41 Remove the four screws securing the Mainboard to the Lower Cover. Step Mainboard M1.6*3.5 (red callout) Mainboard M1.6*5 (green callout) Remove the rubber protector from the Microphone as shown. Remove the two spacer pads from the Mainboard as shown below Chapter 3 Screw Quantity...
- Page 42 Grasp the Lower Cover as shown (1). Lift and rotate the Mainboard out of the Lower Cover (2) to clear the I/O ports (green callout). Chapter 3...
-
Page 43: Removing The Vibration Module
Removing the Vibration Module See “Removing the Mainboard” on page 18. Using the tweezers, grasp the Vibration Module and lift it clear of the Lower Cover. Ensure that the rubber insulation lifts free along with the Vibration Module. Chapter 3... -
Page 44: Removing The Receiver Module
Removing the Receiver Module See “Removing the Mainboard” on page 18. Locate the removal tab as shown. Press the removal tab toward the outside of the Lower Cover. The Receiver Module top edge lifts out of the Lower Cover. Lift the Receiver clear of the Lower Cover. Chapter 3... -
Page 45: Removing The Sim Board
Removing the SIM Board See “Removing the Mainboard” on page 18. Remove the two screws securing the SIM Board to the Mainboard. Step SIM Board M1.6*1.5 IMPORTANT:Do not remove the SIM Board completely; the SIM FFC is still connected at this stage. Lift the SIM Board away from the Mainboard as shown. - Page 46 Disconnect the FFC from the SIM Board. Chapter 3...
-
Page 47: Removing The Camera Shielding
Removing the Camera Shielding See “Removing the SIM Board” on page 23. Insert thin tine tweezers either side of the Shielding securing clip and gently pry the Shielding away from the Mainboard. NOTE: When removing the Shielding, it may be necessary to loosen the securing clip on the opposite side of the module to release it from the Mainboard Lift the Shielding clear of the Mainboard to expose the Camera Module. -
Page 48: Removing The Camera Module
Removing the Camera Module See “Removing the Camera Shielding” on page 25. IMPORTANT:Do not disconnect the Camera Module by lifting the lens directly. Use tweezers to disconnect the interface to avoid damaging the camera FFC. Remove the adhesive tape securing the Camera FFC in place. Using the tweezers, pry up the FFC connector to disconnect the FFC. -
Page 49: Removing The Middle Cover
Removing the Middle Cover See “Removing the Camera Module” on page 26. Locate the four clips securing the Middle Cover to the Mainboard. Release clip A by pushing it away from the Mainboard as shown. Release clip B by pushing it away from the Mainboard as shown. Chapter 3... -
Page 50: Replacing Internal Module Components
Release clip C by pushing it away from the Mainboard as shown. Lift the Mainboard away from the Middle Cover as shown, and slide the Mainboard clear of the clip D. Replacing Internal Module Components Replacing the Middle Cover Four clips secure the Middle Cover to the Main Board as shown below. Insert the main board into the Middle cover so the clips (denoted by circles) and the pins (denoted by arrows) are aligned. - Page 51 Insert clip A and the nearby pin by pushing it into from the Mainboard as shown. Chapter 3...
- Page 52 Insert clip B and the nearby pin by pushing it into the Mainboard as shown. Insert clip C and the nearby pin by pushing it into the Mainboard as shown. Take care the pin is properly mounted as it is hidden under the USB port after connection. Insert clip D and the nearby pin by pushing it into the Mainboard as shown.
-
Page 53: Replacing The Camera Module
Replacing the Camera Module Push the FFC cable through the slot in the side of the Middle Cover camera well. Slide the camera into the camera well in the middle cover. Connect the FFC as shown. Reapply the adhesive tape to secure the Camera FFC in place. Chapter 3... -
Page 54: Replacing The Camera Shielding
Replacing the Camera Shielding Slide the camera shield over the camera well on the middle board. Push the tabs down to be sure that the securing clips on the camera well are inserted into the shielding. Replacing the SIM Board Connect the FFC to the SIM Board. - Page 55 Connect the SIM Board FFC from the Mainboard. Lift the SIM Board away from the Mainboard as shown. Insert the two screws to secure the SIM Board to the Mainboard. Step SIM Board M1.6*1.5 Chapter 3 Screw Quantity Screw Type...
-
Page 56: Replacing The Receiver Module
Replacing the Receiver Module Insert the receiver module into the Lower Cover and ensure the clips snap into place. Replacing the Vibration Module Grasping the Vibration Module firmly from both sides, insert the Vibration Module into the vibration module well in the Lower Cover. Press the vibration module into place until the edges are flush with the well. -
Page 57: Replacing The Mainboard
Replacing the Mainboard Insert the Mainboard into the Lower Cover as shown. The I/O port and green tab on the main board should be inserted fully into the main board, then drop the side with the SD card reader into place. make sure that all screw holes align. - Page 58 Replace the four screws to secure the Mainboard to the Lower Cover. Step Mainboard M1.6*3.5 (red callout) Mainboard M1.6*5 (green callout) Turn the smartphone over. Insert the two screws to secure the Mainboard to the Lower Cover. Step Mainboard M1.6*2 Screw Quantity Screw...
-
Page 59: Replacing The Lcd Module
Replacing the LCD Module Reapply the adhesive to the LCD FFC Cable as shown. Reconnect the LCD FFC to the main board as shown. Reapply the adhesive LCD gasket. Chapter 3... -
Page 60: Replacing The Upper Cover
Insert the LCD Panel into the middle cover. Replacing the Upper Cover Connect the screen FFC to the Mainboard. Align the cover tabs and slide the tabs into the slots in the lower cover assembly. Chapter 3... - Page 61 Press the bottom of the covers together, starting with one side and moving to the other. Using a pinching motion, press the edges of the covers together, working from the base of the unit to the top. Attach one side at a time. Pinch the top edge together.
-
Page 62: Replacing Internal Module Components
Insert the two screws located on the sides of the Lower Cover. Step Upper Cover M1.6*1.5 Insert the two screws into the back of the unit. Step Upper Cover M1.6*5 Insert the two rubber screw caps into the Lower Cover. Replacing Internal Module Components Replacing the SIM Card Slide the SIM Card into the SIM slot as shown. -
Page 63: Replacing The Battery
Replacing the Battery Insert the Battery into the battery bay. Slide the Battery lock in the direction of the arrow to lock the Battery in place. Replacing the Back Cover Insert the bottom of the Back Cover into the smartphone. Chapter 3... -
Page 64: Replacing The Mini-Sd Card
Push the back cover into place. Replacing the Mini-SD Card Insert the card into the slot until it clicks into place. Chapter 3... -
Page 65: Replacing The Stylus
Rotate the Mini SD door towards the card slot as shown. Push the door into the case to secure it in place. Replacing the Stylus Push the stylus into the stylus holder in the base of the smartphone as shown. Chapter 3... - Page 66 Chapter 3...
-
Page 67: Diagnostics And Troubleshooting
Diagnostics and Troubleshooting Using DebugSwitcher Function Testing RUN IN and Discharge Tests NOTE: • Wear anti-static gloves. Insert the battery, battery cover and charger in to the handset and power on. Tap LED and wait for the keypad LED to light. Tap OK to test. Tap BurnIn Test for Run in testing. -
Page 68: Fm Receiver, Audio And Gps1 Tests
FM Receiver, Audio and GPS1 Tests NOTE: • Take care not to damage the casing when putting the handset on the test fixture. Plug in the FM Receiver test cable into the handset USB port and press FM Rx test. If the test shows Pass, the handset passed. -
Page 69: Camera Test
Camera Test NOTE: • Wear anti-static gloves. • Take care not to damage the casing when putting the device on the test fixture. • Make sure that the handset camera can auto-focus. Tap CMR to begin testing. Hold the handset at 3m to test focus functionality. Check for color shifts, blurring, and distortion. -
Page 70: Function Testing 1
Function Testing 1 NOTE: • Wear anti-static gloves. Tap Seq Test to begin testing functions. The LCD Test starts. Tap the screen to cycle through white, black, red, green, and blue backgrounds. • Check that the white screen displays no black dots. •... - Page 71 12. Tap the screen to test the Vibration function. 13. Tap ON and OFF to test the funtionality. Ensure that the vibration is not too strong or too weak, and noise-less. 14. Tap OK if the test is passed. Chapter 4...
-
Page 72: Function Testing 2
Function Testing 2 NOTE: • Wear anti-static gloves. • When testing the touch panel pen, draw from corner to corner and side to side. Do not start in the centre of the screen. Tap the screen to test the various key/button functions. Tap the keys shown in the image to test the funtionality. -
Page 73: G Sensor And Light Sensor Tests
G Sensor and Light Sensor Tests NOTE: • Wear anti-static gloves. • Take care not to damage the casing when putting the device on the test fixture. • Ensure the Light Sensor Test Fixture timer is reset to 0 (zero) before use. •... -
Page 74: Tv-Out And Gps2 Test
TV-out and GPS2 Test NOTE: • Wear anti-static gloves. Assembly the battery then power on. Press the TV Out tab to test TV-Out function. Make sure that the speaker generates Left, Right, and Centre channel output. Check if the monitor displays TV-output handset signal. -
Page 75: Using The Windows Mobile Test System
Using the Windows Mobile Test System Testing Item Phone Live Test Test phone dial and receive function: 1. Device over device to testing 2. Use wired Headset to answer call 3. Use Bluetooth headset to answer call USB connection Synchronize PDA with PC Camera with Snap shot a photo then delete it •... - Page 76 Chapter 4...
-
Page 77: Serial Number Definition
Serial Number Definition The following information describes the serial number details available on the Acer product sticker. To view the serial number, remove the Back Cover and Battery (see “Disassembly Process” on page 1) as shown below: The following describes the information on the product sticker: Acer 22 Barcode Follows Code 128 standard—refer to http://www.adams1.com/pub/russadam/128code.html... - Page 78 Acer SNID YWWddddddMM Code 3 digit numeric year and week code (as above) dddddd 6 digit unique number derived from Acer 22 Code SN (SSSSS) Transfer Rule: S dddddd = S For example: Manufacturer code (as above) Description * 16...
-
Page 79: Fru (Field Replaceable Unit) List
DIFFERENT part number code from those given in the FRU list of this printed Service Guide. You MUST use the local FRU list provided by your regional Acer office to order FRU parts for repair and service of customer machines. -
Page 80: F900 Smartphone Exploded Diagram
F900 Smartphone Exploded Diagram Item Touchscreen Description 60.H420S.004 Part Number Chapter 6... - Page 81 Item LCD Module Mainboard Vibration Module Receiver Back Cover Battery Cover Front Cover Middle Cover Camera Camera Shield Battery Chapter 6 Description 6M.H420S.001 MB.H4200.001 60.H420S.001 60.H420S.002 60.H420S.005 60.H420S.010 60.H420S.004 60.H420S.007 QM.03M02.001 60.H420S.008 BT.0010T.003 Part Number...
-
Page 82: F900 Smartphone Fru List
F900 Smartphone FRU List ACCESSORY BOARD MISCELLANEOUS CABLE CASE/COVER/BRACKET ASSEMBLY USB CABLE STYLUS.F900 STYLUS WITH BAG PACKING.F900 LEATHER POUCH.F900 PU POUCH.F900 ADAPTER AC ADAPTER EU-PLUG AC ADAPTER UK-PLUG AC ADAPTER US-PLUG AC ADAPTER AU-PLUG HEADSET.F900 BATTERY.F900 DUMMY BATTERY.F900 M/B F900 SIM BOARD.F900... - Page 83 SHIELD COVER FOR 3M CAMERA HOLDER_3311_BLACK_RUBBER?SILICON RU BBER_N/A_MICPHONE CAP_PMP_43001420 LCM+FPC.F900 MYLAR FOR CAMERA B TO B CONN GASKET FOR EMP COVER REGULATION LABEL_ F900 (FOR TW & HK ONLY) REGULATION LABEL_WWE. F900 (FOR GLOBE) WARRANTY STICKER WATERING DETECTION LABEL.X960 / M900/...
- Page 84 OPTICAL DEVICE Screws CAMERA.F900 MACHINE SCREW_FLAT_CROSS(JCIS)_1.6M M_1.5MM_BLACK_STEEL_PLATING ZINC_HNS _NYLOK.44001480 MACHINE SCREW_FLAT_TORX_1.6MM_5MM_ BLACK_STEEL_PLATING ZINC_HNS_T5.NYLO K.44001510 MACHINE SCREW_FLAT_CROSS(JCIS)_1.6M M_2MM_BLACK_STEEL_PLATING NICKEL_HN S_NYLOK.44001490 MACHINE SCREW_FLAT_TORX_1.6MM_3.5MM _SILVER_STEEL_PLATING NICKEL_HNS_NYL Acer P/N QM.03M02.001 86.H420S.001 86.H420S.002 86.H420S.003 86.H420S.004 Chapter 6...
-
Page 85: Online Support Information
This section describes online technical support services available to help you repair your Acer device. If you are a distributor, dealer, ASP or TPM, please refer your technical queries to your local Acer branch office. Acer Branch Offices and Regional Business Units may access our website. However some information sources will require a user i.d. - Page 86 Appendix A...
-
Page 87: Index
Back Cover Removing Replacing Battery Removing Replacing Camera Module Removing Replacing Camera Shielding Removing Replacing Display External Module Disassembly Flowchart Features FRU (Field Replaceable Unit) List LCD Module Removing Replacing Main Unit Disassembly Flowchart Mainboard Removing Replacing Middle Cover Removing Replacing Mini-SD Card Removing...