Table of Contents
Advertisement
Quick Links
P/N:110401109799X
UT331+/UT332+
Digital Temperature Humidity Meters
Overview
UT330+ series temperature humidity meters (hereafter referred to as "Meters")
adopts high precision sensor and super-low power consumption microprocessor
in its design, featuring high accuracy, manual and auto storage, USB data transfer,
Usb Power Supply, backlight alarm, real-time display, low power consumption, etc.
These Meters can be used in factories, laboratories, research institutes, food and
health, environmental protection and other fields.
Unpacking Inspection
Operating Manual --------------------------------- 1 piece
Battery ----------------------------------------------- 4 pieces
USB Data Cable ----------------------------------- 1 piece
Safety Information
Warning
A warning identifies conditions and actions that pose hazards to the user . To avoid
electrical shock or personal injury , follow these guidelines:
Inspect the case before using Meters. Do not use Meters if it appears damaged.
Look for cracks or missing plastic. Pay particular attention to the insulation
around the connectors.
Replace the batteries as soon as the battery indicator "
Do not use Meters if it operates abnormally. Protection may be impaired. When
in doubt, have Meters serviced.
Do not operate Meters around explosive gas, vapor, or dust.
When servicing Meters, use only specified replacement parts.
Do not use Meters with any part of the case or cover removed.
Do not clean the sensor with water. Turn to close the protective sensor cover
when not in use. To avoid damage to the device, please use with care.
Never charge the battery.
Use the approved alkaline battery (AAA 1.5V) only.
Pay attention to "+" and "-" marks when installing the batteries.
Close the sensor cover and remove the batteries if Meters is not used for a long
time.
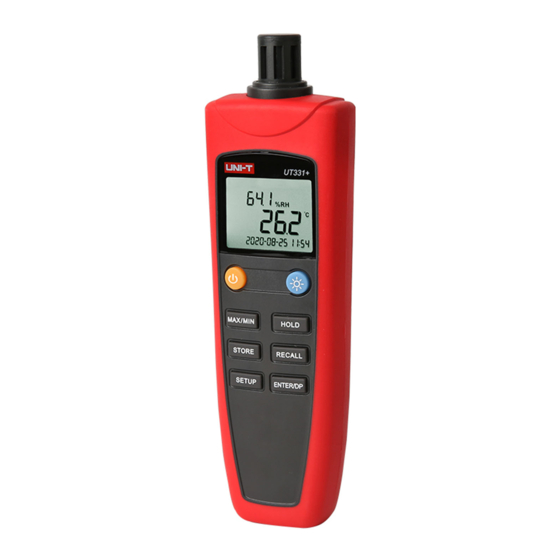
Meter Description
Meter Structure (See Figure 1)
Description
No.
Protective cover of sensor
1
(turn to open or close)
2
Display screen
3
Power on/off
Press to display Max/Min value among
4
current readings. Long press to exit the
function (also used as
button).
5
Press to save data. Refer to "Store and
Recall Data" for details
To set Meters. It is used together with
6
buttons. See "Setting Meters" for details.
Short press to turn on/off the backlight,
7
long press to turn on/off alarm function.
Press to freeze the displayed readings, press again to exit the function.
8
(also used as
button)
Press to view data, it is used together with
9
Recall Data" for details.
Dew-point temperature and wet bulb temperature selection key
10
(also used as confirm button).
Display Screen
" appears.
Figure 1
buttons. See "Store and
Figure 2
Description
No.
HI: Upper limit. LO: Lower limit
1
Dew-point temperature
2
Wet-bulb temperature
3
Storage group number
4
Maximum value
5
Minimum value
6
Humidity display zone
7
8
Data hold
Humidity unit
9
Setting Meters
SETUP Options
Short press SETUP button to enter into setting mode, first enter into unit setting
page, and then press recyclable to switch the setting state until the setting is storage
and exit. On any setting page, the setting mode will exit and be back to measuring
page if no any button is pressed for 15 seconds. The cycle sequence:
Measuring state→Temperature unit setup →Time interval setup→Temperature &
Humidity Upper Limit Alarm Setup→Temperature & Humidity Lower Limit Alarm
Setup→Sleep time setup→System time setup→Temperature & Humidity Offset setup
→ Measuring state.
Performing the Setups
1. Setting Temperature Unit
Short press SETUP to access temperature unit setup mode, press
(MAX/MIN) to select ℃ or ℉ unit.
2. Setting Time Unit
Short press SETUP to switch to time interval mode, "int" shows on LCD. Press
to change the interval for automatic data storage. Long press
/decrease the time quickly. The interval can be set up to 59:59 and down to 00:00
(auto data storage disabled at 00:00).
3. Upper-limit temperature & humidity setting
Short press SETUP for 3 times to access upper limit setup mode, "HI" shows on
LCD, short press ENTER/DP to switch upper-limit temperature & humidity,
upper-limit dew-point temperature, upper-limit wet-bulb temperature, press
to
change the value.
4. Lower-limit temperature & humidity setting
Short press SETUP for 4 times to switch to lower limit setup mode, "LO" shows
on LCD, short press ENTER/DP to switch following setups: lower-limit temperature
& humidity, lower-limit dew-point temperature, lower-limit wet-bulb temperature,
press
to change the value.
5. Sleep Mode Setting
Short press SETUP for 5 times to switch to sleep setting mode, "SLP" icon shows,
press
to set up sleep time (5~60mins), long press
quickly. When the set time is <5mins, "OFF" icon shows and sleep
the time
function is
disabled.
6. System Time Setting
Short press SETUP for 6 times to switch to system time setting mode, short
press ENTER/DR to switch Year/Month/Day/Hour/Minute, press
value, long press
to increase/decrease the time quickly. Only when the minute
setting is completed and short press ENTER/DP again can the system time is
stored.
7. Setting Temperature & Humidity Offset
Short press SETUP for 7 times to switch to temperature & humidity offset setting
mode, "t-o" shows on LCD, short press ENTER/DP to switch temperature offset
setting (t-o), humidity offset setting (h-o), dew-point temperature offset setting
(d-o), wet bulb temperature of f set setting (b-o), press
that within -6~6.
Using Meters
Turn on/off Meters
1. Long press yellow button to turn on Meters.
2. With Meters already turned on, long pressing yellow button again will turn off
Meters.
3. After the sleep time is set, Meters will auto turn of f if no button is active within
the set time.
4. To ensure an accurate result, the user is recommended to wait for a while before
taking the readings if the measured humidity & temperature change dramatically.
Data Hold
1. Press HOLD button to freeze the reading, "HOLD" appears on LCD.
2. Press HOLD again to quit the function.
Description
No.
Auto power off
10
Low battery/USB power supply
11
12
Alarm
Humidity icon
13
Temperature icon
14
15
Celsius unit
Temperature display zone
16
Fahrenheit unit
17
Time display zone
18
(HOLD)/
to increase
to increase/decrease
to the time
to change of f set value
Advertisement
Table of Contents

Related Manuals for UNI-T UT330+ Series


Summary of Contents for UNI-T UT330+ Series
- Page 1 Auto power off Overview Dew-point temperature Low battery/USB power supply UT330+ series temperature humidity meters (hereafter referred to as “Meters”) adopts high precision sensor and super-low power consumption microprocessor Wet-bulb temperature Alarm in its design, featuring high accuracy, manual and auto storage, USB data transfer, USB power supply, backlight alarm, real-time display, low power consumption, etc.
- Page 2 Turn on/off Backlight Technical Index Short press backlight button to turn on the backlight, press again to turn it off. Long press backlight button to activate alarm, the alarm icon appears, long Function UT 331+ UT 332+ press backlight button again to inactivate alarm, the alarm icon disappears. Measurement Measurement Measurement...
Need help?
Do you have a question about the UT330+ Series and is the answer not in the manual?
Questions and answers