ADAPT SOLUTIONS XL-SEAT Installation Manual
Ford f150 super cab 2009-2014 passenger
Hide thumbs
Also See for XL-SEAT:
- Installation manual (20 pages) ,
- Installation manual (18 pages) ,
- Installation manual (16 pages)
Advertisement
Quick Links
Advertisement

Subscribe to Our Youtube Channel
Related Manuals for ADAPT SOLUTIONS XL-SEAT


Summary of Contents for ADAPT SOLUTIONS XL-SEAT
- Page 1 XL-SEAT INSTALLATION MANUAL XLS-F150S09R FORD F150 SUPER CAB 2009-2014 PASSENGER...
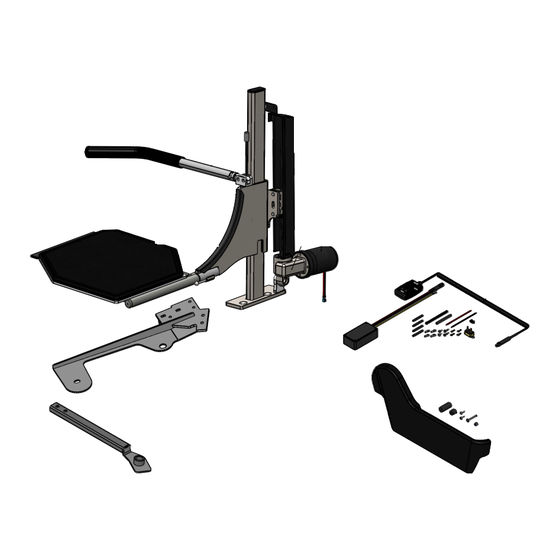
- Page 2 COVB-01 Motor cover XLS700-AL Electrical Kit XLS-F150S09RB-05 Replacement Molding -Right- Black XLS-F150S09R-00 Installation Kit -Right- SCALE 1:6 PART NUMBER XLS-F150S09R DESCRIPTION SCALE 1:8 Kit XL-Seat Ford F-150 Super Cab 2009 - 2014 -Right- 1 of 7 |tech@adaptsolutions.ca|866.641.0419|418.889.9838 fax ADAPT SOLUTIONS...
- Page 3 Black Ribbed Insert Cap for Rect. Tubing 1" × 1-1/2" 14-20 ga XLS810-01 Ring Shock Motor SCALE 1:7 PART NUMBER XLS-F150S09R SCALE 1:6 DESCRIPTION Kit XL-Seat Ford F-150 Super Cab 2009 - 2014 -Right- 2 of 7 |tech@adaptsolutions.ca|866.641.0419|418.889.9838 fax ADAPT SOLUTIONS...
- Page 4 Spring Pin Ø1/4'' x 1-3/8'' Lg. PRD 332-159P Socket Head Cap Screw Zinc Plated 3/8-16 x 1/2 SCALE 1:5 SCALE 1:4 PART NUMBER XLS-F150S09R DESCRIPTION Kit XL-Seat Ford F-150 Super Cab 2009 - 2014 -Right- 3 of 7 |tech@adaptsolutions.ca|866.641.0419|418.889.9838 fax ADAPT SOLUTIONS...
- Page 5 XLS500-07R 07 Pillar XL-SEAT PRD 338-230P Flat Socket Cap Screw Zinc Plated 7/16-14 x 3/4 SCALE 1:4 SCALE 1:3 PART NUMBER XLS-F150S09R DESCRIPTION Kit XL-Seat Ford F-150 Super Cab 2009 - 2014 -Right- 4 of 7 |tech@adaptsolutions.ca|866.641.0419|418.889.9838 fax ADAPT SOLUTIONS...
- Page 6 CP RC-1015-1 Black Ribbed Insert Cap for Rect. Tubing 1" × 1-1/2" 14-20 ga SCALE 1:4 PART NUMBER XLS-F150S09R DESCRIPTION Kit XL-Seat Ford F-150 Super Cab 2009 - 2014 -Right- 5 of 7 5 de 7 |tech@adaptsolutions.ca|866.641.0419|418.889.9838 fax ADAPT SOLUTIONS...
- Page 7 Ring Shock Motor PRD 339-168P Socket Shoulder Screw Zinc 1/2 x 1 1/4 x 3/8-16 THD SCALE 1:4 SCALE 1:3 PART NUMBER XLS-F150S09R DESCRIPTION Kit XL-Seat Ford F-150 Super Cab 2009 - 2014 -Right- 6 of 7 |tech@adaptsolutions.ca|866.641.0419|418.889.9838 fax ADAPT SOLUTIONS...
- Page 8 Hex self-tapping screw #10 x 3/4'' Lg. PRD 339-139P Socket Shoulder Screw Zinc 3/8 x 3/4 x 5/16-18 THD SCALE 1:6 PART NUMBER XLS-F150S09R DESCRIPTION Kit XL-Seat Ford F-150 Super Cab 2009 - 2014 -Right- 7 of 7 |tech@adaptsolutions.ca|866.641.0419|418.889.9838 fax ADAPT SOLUTIONS...
- Page 9 Re-install the OEM lumbar crank handle. Install the replacement recline handle. NOTE: You will need to bend down the seat materiel bracket as shown in the pictures. XL-SEAT 2009-2014 FORD F150 SUPER CAB PASSENGER p. 2...
- Page 10 5- Attach the adaptor XLSF150S09R-02 to the floor adaptor using two (2) 1/2-13 UNC × 1 1/2”Lg bolts. NOTE: Do not forget to insert the adaptor U-XLSF150S09R-02D in the end of the tubing. This will prevent the tubing from crushing when you tighten the bolts. XL-SEAT 2009-2014 FORD F150 SUPER CAB PASSENGER p. 3...
- Page 11 6- Secure the other end over the inside seat leg using the M12-1.75X60mm bolt provided. 7- Tighten all the bolts. 8- Place the XL-SEAT pillar onto the floor adaptor. Secure the XL-SEAT pillar in place using three (3) 7/16-14 UNC × 3/4”Lg flat head bolts. XL-SEAT 2009-2014 FORD F150 SUPER CAB PASSENGER...
- Page 12 9- Slide the XL-SEAT onto the pillar and secure the motor to the pillar base using a 1/2” × 2 3/4”Lg shoulder bolt. NOTE: Insert shim U-XLSF150S09R-03 between the motor and the mounting bracket. 10- Install the electrical wiring for the XL-SEAT. Follow the instructions found in the XL-SEAT.
-
Page 13: Final Inspection
Make sure that XL-SEAT works well with and without a passenger. Make sure the door closes properly. (Note: It is normal for the XL-SEAT to touch the door panel trim.) Make sure the safety guards are fastened in place. - Page 14 “Velcro”. WARNING: Place the hand held control in a safe place so that the door does not risk cutting off the wire. XL-SEAT 2009-2014 FORD F150 SUPER CAB PASSENGER p. 7...
- Page 15 RED = 12V POWER SUPPLY BLACK = GROUNDED TO THE CHASSIS GREY WIRE TO THE PENDANT TWO YELLOW WIRES RED = 12V POWER SUPPLY TO THE XL-SEAT BLACK = GROUNDED TO THE ACTUATOR CHASSIS XL-SEAT 2009-2014 FORD F150 SUPER CAB PASSENGER p. 8...
-
Page 16: Warning Decals
WARNING DECALS After completing the installation of the XL-SEAT, please take time to install the warning decals. NOTE: The surface must be clean, dry and at ambient temperature for the sticker to stick to the surface. Start by locating a position to install the decals. -
Page 17: Troubleshooting
Make sure that all the wires are properly connected. Burnt out electronic module. Contact Adapt Solutions for replacement module. Burnt out actuator. Replace actuator. Power Loss. The XL-SEAT motor is not getting adequate electrical power because of a loose connection. Check the XL-SEAT connections for tightness and corrosion (especially the ground connection). -
Page 18: Year Limited Warranty
The only remedy for a defect in one of Adapt Solutions products shall be the repair or the replacement, at the discretion of Adapt Solutions, of the defective part or component. If repair or replacement is not commercially practical or cannot be timely made, Adapt Solutions may decide to refund the purchase price of the equipment (XL-SEAT) instead of repairing or replacing the original equipment.
Need help?
Do you have a question about the XL-SEAT and is the answer not in the manual?
Questions and answers