Table of Contents
Advertisement
EL/GL Series - Mach 3
ML700 User Guide
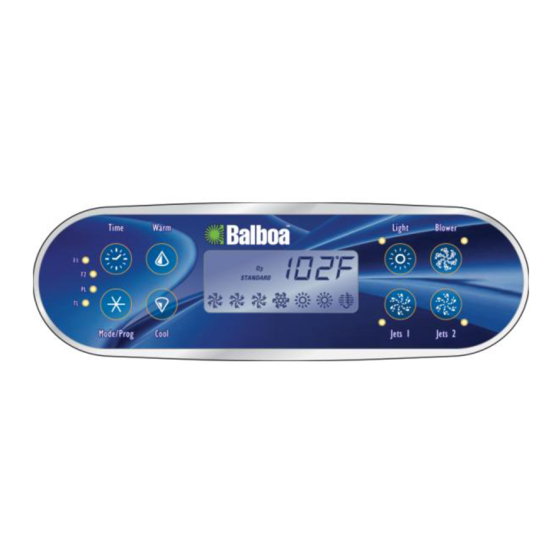
Time
F1
F2
PL
TL
Mode/Prog
Time
F1
F2
PL
TL
Mode/Prog
Note regarding EL and GL systems: Mach 3 EL and GL systems function
identically, but conform to different International requirements. This
user guide will refer to EL systems for the sake of simplicity, but the
information given applies to both EL and GL products.
900854
Warm
Cool
Warm
Cool
Light
Blower
Jets 1
Jets 2
Light
Jets 1
Jets 2
Advertisement
Table of Contents

Related Manuals for Balboa ML700


Summary of Contents for Balboa ML700
- Page 1 EL/GL Series - Mach 3 ML700 User Guide Time Warm Light Blower Mode/Prog Cool Jets 1 Jets 2 Time Warm Light Mode/Prog Cool Jets 1 Jets 2 Note regarding EL and GL systems: Mach 3 EL and GL systems function identically, but conform to different International requirements.
-
Page 3: Table Of Contents
EL/GL SERIES (Mach 3) CONTROL WITH ML700 PANEL The ML700 panel can be used with the EL8000, EL5000, The pump responsible for heating and filtration (pump 1 EL2000 and EL1000 systems. This user guide lists all low on non-circ systems, or the circ pump on circ features that are available. -
Page 4: Time
Setting the Time Time Once the spa has been properly connected the first time (every power When time hasn’t been programmed, the “ ” icon up on the EL1000 and some EL2000 systems), notice the “ ” icon appearing on the screen. flashes. -
Page 5: Jets 2
vary from system to system. To program, press “Warm” Jets 2 (optional on some systems) or “Cool,” then “Jets 1.” Press “Warm” or “Cool” to select the filter duration. Press “Jets 1” to select the number Press the “Jets 2” button once to turn pump 2 on or of filter cycles. -
Page 6: Light
Locking the Set Temperature Light Press “Warm” or “Cool” then “Time,” “Jets 1,” and Some systems are equipped with both a spa light and a “Warm” within 3 seconds to activate the lock. The fiber optic light; however, only one can be accessed by this TL “... -
Page 7: Displaying Information About Your Spa
Displaying Information About Your Spa – Dolphin II Address When set to “ ”, no addressing is used. Use this There are several pieces of information about your setting for a Dolphin I, or for a Dolphin II which is spa that can be called up from the panel, but are only set for no address (which is the Dolphin II factory needed in special cases. -
Page 8: Diagnostic Messages
Diagnostic Messages Message Meaning Action Required No message on display. The control panel will be disabled until power returns. Power has been cut off to the spa. Time of day will be preserved for 30 days with a battery back-up on EL8000 and EL5000 systems. EL1000 and some EL2000 systems reset the time of day on each power-up. - Page 9 Diagnostic Messages (continued) Message Meaning Action Required Temperature unknown. After the pump has been running for 1 minute, the temperature will be displayed. Temperature not current in Economy or In Economy or Sleep mode, the pump may be off for Sleep mode.
-
Page 10: Periodic Reminder Messages
Periodic Reminder Messages (Press the “Mode” button to reset a displayed reminder.*) Message ** Frequency *** Action Required Every 7 days Test and adjust pH chemical levels per manufacturer’s instructions. Every 7 days Test and adjust sanitizer chemical levels per manufacturer’s instructions. Every 30 days Remove, clean, and reinstall filter per manufacturer’s instructions. -
Page 11: Optional Auxiliary Panels
Optional Auxiliary Panels Note: Below is a partial list of optional auxiliary panels and their basic functions. Please contact your local dealer for a complete list of options that will work with your spa. Jets 1 Jets 1 Jets 1 Jets 1 Jets 2 Blower... -
Page 12: Basic Installation Guidelines
Warning! Qualified technician required for service and installation. Basic Installation and Configuration Guidelines for Mach 3 CSA Compliance/Conformité EL-Series Spa Controllers. Caution: • Test the ground fault circuit interrupter before each use of Use minimum 6AWG copper conductors only. the spa. Torque field connections between 21 and 23 in lbs.
Need help?
Do you have a question about the ML700 and is the answer not in the manual?
Questions and answers
How to drain my hot tub
To drain a Balboa ML700 hot tub, activate Standby Mode by pressing a specific button combination on the user panel. The pump will run during Standby Mode to assist in draining. Press “Jets 1” to turn off the pump once the water has drained, or power off the spa.
This answer is automatically generated
My display says HOt none of the buttons work