Table of Contents
Advertisement
Quick Links
This appliance has been retired.
Service parts pages within have been removed.
For replacement parts, please refer to the individual service parts
list located on the brand websites.
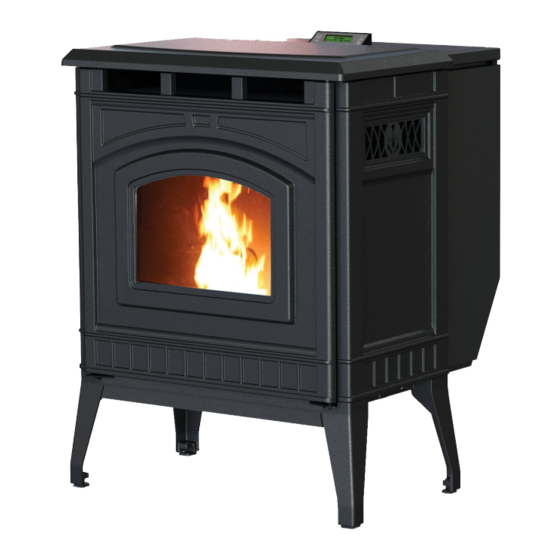
PHC90 Cast Iron Pellet Stove
WARNING!
Please read this entire manual before installation and use of this pellet fuel-burning room heater, and save for future refer-
ence. Failure to follow these instructions could result in property damage, bodily injury or even death. Contact local building or
fire officials about restrictions and installation inspection requirements in your area.
Note:
To obtain a French translation of this manual, please contact your dealer or visit www.ghpgroupinc.com. Pour obtenir
une traduction francaise de ce manuel, s'il vous plait contracter votre revendeur ou visitez www.ghpgroupinc.com
Advertisement
Table of Contents

Subscribe to Our Youtube Channel
Related Manuals for pleasant hearth PHC90


Summary of Contents for pleasant hearth PHC90
- Page 1 For replacement parts, please refer to the individual service parts list located on the brand websites. PHC90 Cast Iron Pellet Stove WARNING! Please read this entire manual before installation and use of this pellet fuel-burning room heater, and save for future refer- ence.
- Page 2 Get to Know Your Stove Digital Control Vacuum Switch Vacuum Switch Snap Disc Ambient Probe Exhaust Blower Exhaust Outside Air Connection Connection Exhaust Probe Drop Tube Optional External Baffles (3) Thermonstat Connection Firepot Convection Blower Igniter (Behind Firepot) Safety First! Safety Alert Key: It is important to pay attention to alerts you will see throughout this manual to ensure your safety.
-
Page 3: Table Of Contents
Table of Contents Getting Started ........... 4 • Pallet removal • What’s included • What you’ll need Installing Your Stove ......... 6 • Getting ready • Placing your Stove • Venting your Stove Using Your Stove ........13 • Starting your Stove •... -
Page 4: Getting Started
Getting Started Pallet Removal There are bolts holding your stove in place on the pallet. To remove your stove from the pallet: Using a 7/16” wrench, Using a 3/8” wrench, remove all four bolts remove each bolt by attaching the shipping reaching under your bracket to pallet. -
Page 5: What You'll Need
Getting Started What You’ll Need Tools & Supplies • High temperature silicone • Tape measure • Stud finder (500°F+) • Framing square • Utility knife • Level • Reciprocating saw • Pliers • Phillips screwdriver • Electric drill & bits •... -
Page 6: Installing Your Stove
Installing Your Stove Getting Ready Pro Tip We highly recommend your stove and pellet vent pipe be installed by a professional installer. Your retailer can make recommendations for you. Installation MUST comply with local, regional, state and national codes and regulations. Consult insurance carrier, local building inspector, fire officials or authorities having jurisdic- tion over restrictions, installation inspection and permits. - Page 7 Installing Your Stove Getting Ready (Continued) Pellet Venting Adding bends in the exhaust path restricts air flow, reduces performance and provides a collection point for ash deposits requiring more frequent cleaning. CAUTION • Do not connect to any air distribution duct or system •...
- Page 8 Installing Your Stove Vent Termination Clearances Clearances 12” Clearance above grade, veranda porch, deck or balcony (Including vegetation and mulch) 12” with outside air kit Clearance beside or below any windows or doors that open 48” no outside air kit 12”* Clearance above any window or door that opens Vertical clearance to ventilated soffit located above the terminal within a horizontal distance of 2 feet from...
-
Page 9: Placing Your Stove
Installing Your Stove Placing Your Stove Stove must be installed on a non-combustible floor. If needed, place floor protection (such as a hearth pad) beneath the stove. Move stove from pallet onto your non-combustible surface. Do not operate the stove while it sits on the pallet. Notice: Be careful to protect the bottom of the stove and floor surfaces when moving the stove. -
Page 10: Venting Your Stove
Installing Your Stove Venting Your Stove CAUTION! Take appropriate precautions to locate utilities within the wall and avoid contact. Mark and cut wall for venting penetration on exterior wall (if needed). Install wall thimble (sold separately) per manufacturer requirements. Install venting. Use silicone to create an effective vapor barrier at the location where the chimney or other component penetrates to the exterior of the structure. - Page 11 Installing Your Stove Venting Your Stove WARNING! Fire Risk. The maximum horizontal venting allowed with no vertical • Only LISTED venting venting attached is 48 inches including one 90° elbow components may be or two 45° elbows. Addition of any horizontal venting used •...
- Page 12 Installing Your Stove • Install pellet venting through wall and connect vent/ pipe to stove • Some venting manufacturers offer pellet stove adapters for their venting for easier installation • Seal all pipe joints using high-temp silicone (500°+) • Secure exhaust venting system to the Stove with at least 3 screws or rivets per the pipe manufacturer’s instructions.
-
Page 13: Using Your Stove
Using Your Stove Fuel Tips Fuel Material and Fuel Storage Pellet fuel quality can greatly fluctuate. We recommend that you buy fuel in multi-ton lots whenever possible. However, we do recommend trying various brands before purchasing multi-ton lots to ensure your satisfaction. Store fuel in dry location not within clearances to combustibles of your stove. -
Page 14: Starting Your Stove
Using Your Stove Starting your stove the first time What to Expect Combustion blower will turn on Igniter will turn on Pellets will drop, smoke may occur in firebox but will evacuate, and flame will appear in firepot. Convection blower will automatically turn on after the stove heats up. - Page 15 Using Your Stove Important: Allow up to 20 minutes for your stove to start. Confirm firepot is properly positioned FRONT Confirm three baffles inside firebox are secure, placing the side baffles before the center Add some pellets to hopper and fully close lid WARNING! Shock hazard.
-
Page 16: Comfort Settings
Using Your Stove Starting your stove from an empty hopper Prime your stove: 1) From “OFF” press PRIME 2) Press and hold until display reads DOWN BUTTON “FEEDING.” The feed motor will run about 2 minutes. START UP 11:59 ROOM:68 SET: HI Once feeding stops press power button. -
Page 17: Turning Your Stove Off
Using Your Stove If your stove tries to start but fails on the initial burn, it will display MISSED IGNITION. 1. Turn your stove to off, remove and clean the firepot MISSED IGN 2. Confirm firepot is properly positioned PWR TO RESET 3. -
Page 18: Maintaining Your Stove
Maintaining Your Stove Cleaning & Maintenance Important: Regular cleaning helps to assure optimal performance of your stove. Please refer to page 29 to log your maintenance and cleaning. What You’ll Need Cleaning tool Phillips head Safety glasses screwdriver Gloves Ceramic glass cleaner & Flue cleaning non-abrasive cloth brush... -
Page 19: Where, When And How
Maintaining Your Stove Where, When and How Disposal of Ashes Ashes should be placed in a metal container with a tight fitting lid. The closed container of ashes should be placed on a non-combustible surface or on the ground, well away from all combustible materials, pending final disposal. - Page 20 Maintaining Your Stove Pro Tip The type of fuel you are burning will dictate how often you have to clean your firepot. If the fuel you are burning has a high dirt or ash content, it may be necessary to clean the firepot more than once a day.
- Page 21 Maintaining Your Stove Electrical Components • Identify and remove any debris • Verify all connections are secure ANNUALLY AS NEEDED Exhaust Blower • Remove right side panel to access and remove exhaust blower • Vacuum any debris from the fan blades and blower housing Zone 3 - Venting ANNUALLY...
-
Page 22: Troubleshooting
Troubleshooting Power Related Pro Tip In the event of a power outage: Check passages to assure they are clear of ash and • If using a generator, We recommends a steady obstructions. Poor airflow state generator for best stove performance. leads to poor performance of your stove. -
Page 23: Blockage Related
Troubleshooting Blockage Related Black soot on outside of house • Confirm exhaust path is clean and clear (Zone 3) - Adjust air/fuel ratio using trim adjustment dial Zone Zone (See page 17 for trim adjustment instructions) Zone Zone Zone Zone •... - Page 24 Troubleshooting Blockage Related Fire starts but goes out • Confirm firebox is clean and clear (Zone 1) - Ensure firepot holes are clear Zone Zone • Inspect stove body (Zone 2) Zone Zone Zone Zone - Confirm exhaust probe is connected - Inspect and clean the exhaust outlet •...
- Page 25 Troubleshooting Following correction of any alarm, press power button to clear the alarm, wait 10 seconds and turn the stove back ON. Alarm Possible Cause Corrective Action Fuel Feed Alarm No fuel is delivered to the firepot to sustain flame Fill the hopper, inspect the feed tube for jams, Errror Number 1 Hopper empty (most likely)
- Page 26 Troubleshooting Still having trouble? Access additional resources at: www.ghpgroupinc.com Warranty If replacement parts are needed, please note warranty coverage begins on the date of purchase. Retain your original receipt as proof of purchase. The warranty period for covered components is as follows: Warranty Period Components Covered (Parts only,...
-
Page 27: Support
Support Please review the “Maintaining Your Stove” and “Troubleshooting” sections in this manual. Visit ghpgroupinc.com to access: • Order replacement parts • Manuals and more To contact a Consumer Care Specialist, email us at: customerservice@ghpgroupinc.com or call (877) 447- 4768. customerservice@ghpgroupinc.com 7093-601B •... -
Page 28: Listings And Certifications
Listings and Certifications Stove Certification Series PHC90 Laboratory OMNI-Test Laboratories, Inc. Report No. 0061PS093S Type Solid Fuel Room Heater/Pellet Fuel Burning Type O-T L Tested and Portland Listed by Oregon USA Standard ASTM E1509-12 and ULC S627-00, Room Heater Pellet Fuel Burning type and (UM) 84-HUD, Mobile OMNI-Test Laboratories, Inc. -
Page 29: Glass Specification
1.11 grams/hr This manual describes the installation and operation of the Brand Pleasnt *BTU Input 11,055 - 47,378 / hr Hearth, Model PHC90 wood heater. *BTU Output 8,456 - 39,482 / hr This heater meets the 2015 U.S. Efficiency HHV 82.3%... - Page 30 Do not use ammonia based cleaners. A suit- 2. The new GHP Group product must be installed and operated at all times able cleaner is available at your nearest Pleasant Hearth dealer. DO NOT in accordance with the installation and operation instructions supplied CLEAN GLASS WHILE HOT AND DO NOT USE ABRASIVE CLEANERS.
-
Page 31: Reference Materials
Reference Materials customerservice@ghpgroupinc.com 7093-601B • 2/5/18... - Page 32 Reference Materials 7093-601B • 2/5/18 (877) 447- 4768...
- Page 33 Reference Materials customerservice@ghpgroupinc.com 7093-601B • 2/5/18...
-
Page 34: Maintenance Log
Reference Materials We recommend that you record the following information for your heating Stove: Date purchased/installed: _________________________________________________ (Attach proof of purchase) Serial Number:__________________________________________________________ (located on back of your stove) Store purchased from: ____________________________________________________ Store Location: _________________________________________________________ Maintenance Log: ______________________________________________________________________ ______________________________________________________________________ ______________________________________________________________________ ______________________________________________________________________ ______________________________________________________________________... - Page 35 Reference Materials Maintenance Log: ______________________________________________________________________ ______________________________________________________________________ ______________________________________________________________________ ______________________________________________________________________ ______________________________________________________________________ ______________________________________________________________________ ______________________________________________________________________ ______________________________________________________________________ ______________________________________________________________________ ______________________________________________________________________ ______________________________________________________________________ ______________________________________________________________________ ______________________________________________________________________ ______________________________________________________________________ ______________________________________________________________________ ______________________________________________________________________ ______________________________________________________________________ ______________________________________________________________________ ______________________________________________________________________ ______________________________________________________________________ ______________________________________________________________________ customerservice@ghpgroupinc.com 7093-601B • 2/5/18...
- Page 36 6440 W. Howard St. Niles, IL 60714 877-447-4768 Please contact the GHP Group with any questions or concerns. www.ghpgroupinc.com For Customer Service 1-877-447-4768 Prior to calling, please have the model, serial number, and sales receipt of the unit you are calling about. This information can be found at the rear of the unit.
Need help?
Do you have a question about the PHC90 and is the answer not in the manual?
Questions and answers