Table of Contents
Advertisement
OPERATOR'S MANUAL
20V LI-ION CORDLESS DRILL
Thank you for buying a WORKPRO product. Your cordless drill has been engineered and manufactured to
WORKPRO's high standard for dependability, ease of operation, and operator safety. When properly cared for, it
will give you years of rugged, trouble-free performance.
WARNING: To reduce the risk of injury, the user must read and understand the operator's manual before
using this product.
SAVE THIS MANUAL FOR FUTURE REFERENCE
W004532A
Advertisement
Table of Contents

Related Manuals for WorkPro W004532A

Summary of Contents for WorkPro W004532A
- Page 1 OPERATOR'S MANUAL 20V LI-ION CORDLESS DRILL Thank you for buying a WORKPRO product. Your cordless drill has been engineered and manufactured to WORKPRO’s high standard for dependability, ease of operation, and operator safety. When properly cared for, it will give you years of rugged, trouble-free performance.
-
Page 2: Table Of Contents
TABLE OF CONTENTS ------------------------------------------------------------------------------------------ Introduction ------------------------------------------------------------------------------------------------ Caution -------------------------------------------------------------------------------- General safety rules --------------------------------------------------------------------- Additional Safety Instructions -------------------------------------------------- Additional safety instructions for the charger -------------- Additional safety instructions related to the battery pack and battery safety ------------------------------------------------------------------------ When to charge the battery -------------------------------------------------------------------------------------------- Unpacking ----------------------------------------------------------------------------------------------... -
Page 3: Caution
Cautions and Warnings. Your Workpro power tool has many features that will make your job faster and easier. Safety, performance, and dependability have given top priority in the development of this tool, making it easy to maintain and operate. -
Page 4: Additional Safety Instructions
GENERAL SAFETY RULES binding of moving parts, breakage of parts and any Recharge only with the charger specified by the other condition that may affect the power tool’s manufacturer. A charger that is suitable for one type operation. If damaged, have the power tool repaired of battery pack may create a risk of fire when used before use. -
Page 5: Additional Safety Instructions For The Charger
• The battery can be charged or operated at Do not plug anything other than your Workpro tool temperatures between 40°F and 104°F. into the charger, as other objects may touch danger- ous voltage points or short out parts, which could result in fire or electric shock. -
Page 6: Additional Safety Instructions Related To The Battery Pack And Battery Safety
THE BATTERY PACK AND BATTERY SAFETY Use only the WORKPRO batteries supplied with the Do not dispose of the battery in a fire or put the WORKPRO Tool or WORKPRO-approved replacements. battery into a microwave oven, conventional oven, dryer, or high-pressure container. -
Page 7: Unpacking
UNPACKING Unpack all parts and lay them on a flat, stable surface. Ensure that you have all the accessories and tools needed for assembly and operation. This also includes suitable Remove all packing materials and shipping devices, if personal protective equipment. -
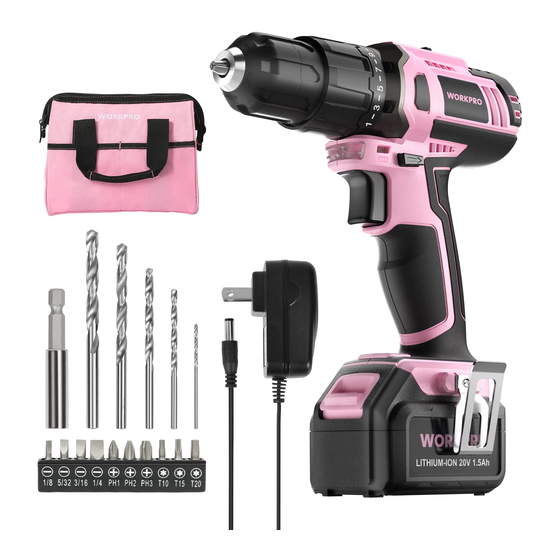
Page 8: Your Product
YOUR PRODUCT 1/8 5/32 3/16 1/4 PH1 PH2 PH3 T10 T15 T20 1. 10mm keyless chuck 6. Battery pack 11. 6pc drill bits 2. Torque adjustment ring 7. Battery pack release button 12. Extension bit holder 3. Two-speed gear control 8. -
Page 9: Specifications
SPECIFICATIONS Charger 120V ~ 60Hz Batteries 1.5Ah Charging Time 3-5H Drill No Load Speed 0-400/0-1500/min-1 Torque Settings 21+1 Torque 23 N.M. Drill Chuck Capacity 3/8"(10mm) keyless Max Drilling Capacity Steel / Wood 8mm / 22mm Weight 0.95Kg(2.09lbs) Battery 0.34Kg(0.75lbs) Charger WJ-Y112150350W OPERATING INSTRUCTIONS FOR DRILL DRIVER B) TO REMOVE OR INSTALL BATTERY PACK... -
Page 10: Operation
OPERATION ON / OFF SWITCH (SEE B) Depress the On/Off switch (8) to start and release it to stop your drill. The on/off switch is fitted with a brake function which stops your chuck immediately when you quickly release the switch.It is also a variable speed switch that delivers higher speed and torque with increased trigger pressure. -
Page 11: Chuck Adjustment (See E)
OPERATION CHUCK ADJUSTMENT (SEE E) AUTOMATIC SPINDLE LOCK (SEE G) To open the chuck jaws rotate the front section of the The automatic spindle lock allows you to use it as a chuck. Insert the drill bit between the chuck jaws and regular screwdriver. -
Page 12: Tool Protection System
OPERATION Overheated: Under the condition above, if the tool TOOL PROTECTION SYSTEM does not start, the Battery are overheated. In this The tool will automatically stop during operation if the situation, let the Tool and Battery cool before pulling tool and/or battery are placed under one of the the Trigger Switch again.
Need help?
Do you have a question about the W004532A and is the answer not in the manual?
Questions and answers
Can this battery be charged
Yes, the WorkPro W004532A battery can be charged, but only with the specific WorkPro charger designed for it. Using any other charger is not recommended and may be dangerous.
This answer is automatically generated
How do I remove the drill bit
To remove the drill bit from the WorkPro W004532A, rotate the front chuck section in the opposite direction to loosen the jaws. Once loosened, you can pull the drill bit out.
This answer is automatically generated