Advertisement
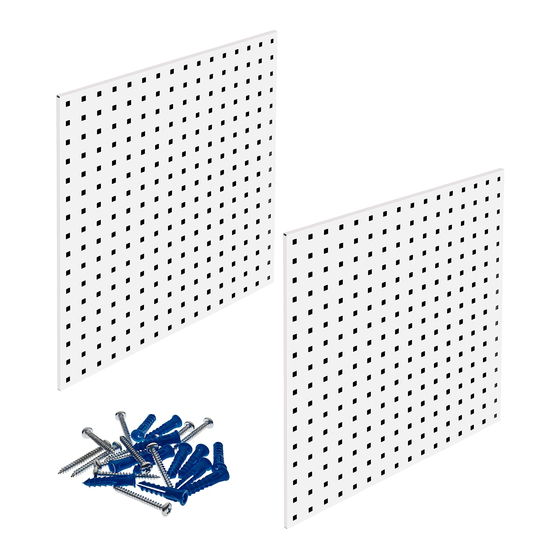
LB1-Kit, BKit, TKit - (2) 24" x 24" x 9/16" LocBoard®Pegboards, 46 Hooks
Read all instructions completely before installing. Should you have any questions about your
installation, please call Customer Service at 440-248-5480
Review Carton Contents:
2 Pcs. LocBoard Pegboard 24" x 24" x 9/16" (BKit= Blue, TKit=Tan, Kit=White)
46 Pcs. Assortment of LocHook® Pegboard Hooks
1 Pk.
Wall Mounting Hardware Packet
•
Boards can be positioned side by side or in separate location in vertical or horizontal mounting
positions.
•
Pegboards fasten directly to concrete, solid wood and hollow wall structures without the use of
furring strips.
•
If installing to bare studs you will need to install wood headers before completing installation.
LocBoard™ Installation:
Tools needed for Installation (not supplied with kit)
Level, marker, 7/32" standard or masonry drill bit, 7/64" drill bit for wood studs, #2 Phillips head
screwdriver, power drill.
For drywall, hollow concrete wall installation: Use (12 each) plastic drywall anchors and #8
Phillips head wood screws (SUPPLIED WITH THIS SYSTEM). If installing to bare studs you will
need to install wood headers before completing installation using wood screws only. NOTE:
Always install one board at a time.
1. (IMPORTANT!) Select wall location for your LocBoards and the desired vertical or horizontal
mounting pattern you wish to mount in. When selecting a location for mounting always make
sure that mounting locations do not fall in line with, are adjacent to or interfere with any
internal or external electrical wiring, wall mounted or built-in electrical appliances, heaters, gas
lines, ductwork or plumbing inside of wall, or are located on the opposite side of any wall
surface from where you are mounting. If you are unsure, please consult a professional before
proceeding with installation.
2. (Using Images on Back) There are four screw holes on the back of your LocBoard that are
accessible through the square holes on the front.
3. Place one LocBoard flat against wall surface, while using a level to make sure your board is
straight and squared. Mark the centers of all 6 screw holes onto your wall surface. Note:
Installation for first board should be completed before marking mounting holes for the second
board.
4. Pre-drill holes for #8 wall anchors marked in Step 3 using 7/32" standard or masonry drill bit
depending on wall surface. If you hit a wood stud stop drilling and using a 7/64" drill bit create a
pilot hole for the wood screw, Note: avoid over-drilling holes. (Plastic wall anchors should fit
snug.)
5. Insert plastic wall anchors in each hole drilled in Step 4 except where you drilled 7/64" pilot hole
for wood stud.
30700 D Carter Street ∙ Solon, OH 44139 ∙ (P) 440.248.5480 ∙
Installation & Assembly Instructions
Please contact Customer Service with any questions at:
For a full line of products visit
support@tritonproducts.com
www.tritonproducts.com
1
Advertisement
Table of Contents

Related Manuals for Triton LB1-Kit


Summary of Contents for Triton LB1-Kit
- Page 1 Installation & Assembly Instructions LB1-Kit, BKit, TKit - (2) 24” x 24” x 9/16” LocBoard®Pegboards, 46 Hooks Read all instructions completely before installing. Should you have any questions about your installation, please call Customer Service at 440-248-5480 Review Carton Contents: 2 Pcs.
- Page 2 Panels must be securely fastened to sound wall structures to support heavy loads. Mounting Instructions for LB1-Kit, BKit, and TKit Please contact Customer Service with any questions at: 30700 D Carter Street ∙ Solon, OH 44139 ∙ (P) 440.248.5480 ∙...
- Page 3 (at our option) when the consumer provides the original proof of purchase along with a full description of the defect, to: Triton Global Products 30700 -D Carter Street Solon OH 44139 All of our steel products have been engineered to last a lifetime.
Need help?
Do you have a question about the LB1-Kit and is the answer not in the manual?
Questions and answers