
Subscribe to Our Youtube Channel
Related Manuals for Vanco Evolution EVMX44VW


Summary of Contents for Vanco Evolution EVMX44VW
- Page 1 4K 4x4 Seamless AUDIO AND VIDE O M A T R I X with Video Wall 4K 4x4 Seamless Audio and Video Matrix with Video Wall Part Number: EVMX44VW www.vanco1.com • 800.626.6445...
- Page 2 DEAR CUSTOMER Thank you for purchasing this product. For optimum performance and safety, please read these instructions carefully before connecting, operating or adjusting this product. Please keep this manual for future reference. This product is 100% inspected and tested in the United States to verify HDMI performance parameters.
-
Page 3: Package Contents
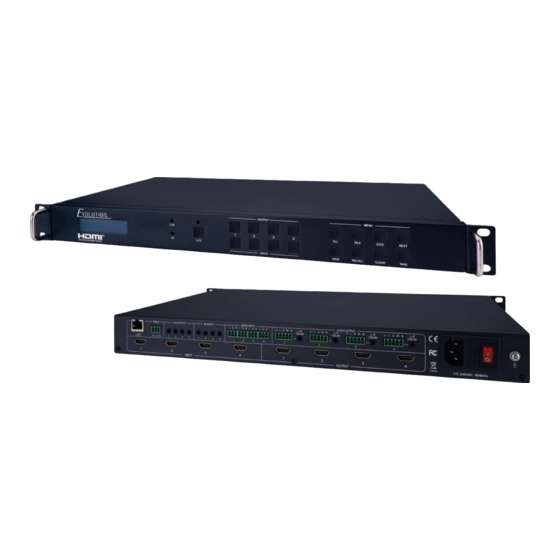
FEATURES INTRODUCTION The Evolution by Vanco EVMX44VW 4K 4x4 Matrix Switcher with Video Wall capability, allows 4 HDMI sources to be distributed up to 4 displays with full switching flexibility. The EVMX44VW features the ability of passing 4K@60Hz resolution and 4:4:4 Chroma Subsampling. Capable of 4 display video wall configurations, with ability for 180 degree screen rotation, as well as bezel adjustments. -
Page 4: Specifications
SPECIFICATIONS HDMI Compliance ............HDMI 2.0 HDCP Compliance ............HDCP 2.2 Video Bandwidth ............18 Gbps Video Resolution ............Up to 4K@60Hz, 4:4:4 Chroma Subsampling Color Space .............. RGB, YCbCr 4:4:4/4:2:2 HDMI Amplitude ............T.M.D.S +/- 0.4Vpp Differntial Impedance..........100±15ohm ESD Protection ............ -
Page 5: Panel Descriptions
PANEL DESCRIPTIONS Front Panel 11 12 13 14 LCD Panel: Displays current status COM: Illuminates when matrix switcher is powered on IR: IR Sensor to control the unit via included IR remote LOCK: Locks/Unlocks front panel buttons (hold for 3 seconds to activate) OUTPUT: Outputs 1-4 for output display selection INPUT: Inputs 1-4 for input source selection ALL: Set all outputs to the same input by pressing ALL+ INPUT # + TAKE... - Page 6 RESOLUTION Set the output scaler resolution based on the below table Number Output Resolution Setting Number Output Resolution Setting 3840x2160p 60Hz 1440x1050 60Hz 3840x2160p 50Hz 1366x768 60Hz 3840x2160p 30Hz 1360x768 60Hz 3840x2160p 25Hz 1280x1024 60Hz 1920x1200 60Hz 1280x768 60Hz 1920x1080p 60Hz 1280x720p 60Hz 1920x1080p 50Hz 1280x720p 50Hz...
- Page 7 PANEL DESCRIPTIONS LAN: Connect to a local network such as a router or ethernet switch to give the matrix unit connectivity, this will give the ability to control the matrix unit via IP with any device on the network such as a computer, tablet, or mobile phone RS232: Connect the included RS-232 cable to a computer or 3rd party control system for integration IR OUT - 1-4: Connect the included IR Transmitters (TXs) to each port, the number on the IR output...
-
Page 8: Connect And Operate
CONNECT AND OPERATE Source Source IR Emitter Amplifier IR Receiver HDMI HDMI IR Receiver HDTV HDTV Connect your sources such as a Blu-Ray Player, game console, A/V Receiver, Cable or Satellite Receiver, etc. to either the HDMI inputs on the unit. Insert and extract cables carefully with the power switched off. - Page 9 IR CONTROL The EVMX44VW allows for IR pass-through to control the connected sources at the display locations. The IR signals are routed, so the sources are only controllable at a display location if the source is switched to that output. IR Emitters: Connect the IR Emitters (Blasters/TXs) to the “IR OUT”...
-
Page 10: Audio Matrix
AUDIO MATRIX In addition to an HDMI video distribution system, the EVMX44VW also includes a built-in audio matrix, where audio sources can be connected and be sent up to four individual zones. The 4 sets of Audio output (LR and Toslink) channels can be independent of video and switched by the User Interface via TCP/IP. - Page 11 EVMX44VW SOFTWARE Before running the software which can be downloaded on the product page on www.vanco1.com, the password is needed to log in. Default password of Administrator (access to all features): 111111 Default password of User (access to all features, except OSD function): 000000 Connect with PC Tool Select UART (with RS-232 cable) or Network to connect 800.626.6445...
- Page 12 Matrix Switch Page To switch one input port to all output ports, use the All set dropdown menu. For example, to switch input 1 to all outputs: Recall mode: Recall a preset of inputs/outputs (maximum of 8 presets) Save mode: Save the current input/output mapping to create a preset Note: Save/Recall button here works the same with front panel save/recall control, and also the same with Save/Load function on video wall page System reset: Resets the matrix to factory settings...
- Page 13 Advanced Switch Page The Advanced Switch page will repeatedly send a batch of matrix selection commands at the interval specified in the Send cmd periodly at text. Select one or more outputs Select one input Use the arrow button “-->” to assign that input to the selected output or outputs After completing all required selections, click the “Start”...
- Page 14 Signal Setting Page Audio Select: there are two options for input Audio Select a) Auto: If the input source is HDMI signal, system will get the embedded audio; if the input source is DVI signal, the system will get the corresponding analog audio b) External: System will get the corresponding analog audio Output Type: there are four options for output type: 1.
- Page 15 FineTune Page Choose the display by selecting the Output number corresponding to the display Then click the “Read” button. Adjust Brightness, Contrast, Saturation, and/or Sharpness as desired. If the video image looks incorrect after adjustments, reset to default settings by clicking on the “Reset button”...
- Page 16 Video Wall Page The EVMX44VW can be utilized to setup a 2x2 (4 display) video wall with any source connected, and furthermore can display multiple sources on the 2x2 video wall display. Use the Video Wall Setting controls to change how the displays are arranged on the Video Wall page: a.
- Page 17 Video Wall Page The following example shows a more video wall set-up of two video walls with two 2x1 configurations: Video Wall Context Menu Right clicking on any of the screen icons will display the following context menu: 800.626.6445...
- Page 18 Screen Splicing This option connects the selected screens into a video wall configuration Cancel Splicing Return the Video Wall configuration to normal outputs Screen x - Cancel Splicing 3840x2160p 30Hz Input Select Use the sub-menu to select the input to display on the video wall or the secondary input image shown in the above example Output Select This option is only available for any screen that is not assigned to a video wall...
- Page 19 Bezel Setting The Bezel Setting section allows the entry of values to compensate for the display bezel thickness. These values may be entered either as pixels (Type A) or as mm (Type B). Type A Bezel Settings The image size will be adjusted to allow for the number of pixels entered in each of the entry boxes. Click the “Set”...
- Page 20 CEC Control Page If Auto Power On is enabled, every time when the product is turned on, it will turn on all the sources and displays which are connected to it. The product supports CEC function, including Power on/off, Volume+/-, Mute/Unmute. Control via Web The built-in Web GUI interface provides basic control of the matrix switcher and access to the network settings.
- Page 21 The IP Config tab is used to change the IP settings of the matrix switcher. Enter any necessary changes and click “Save” to program the switcher to the new settings or click “Cancel” to reject the changes. 800.626.6445...
-
Page 22: Limited Warranty
If repairs are needed during the warranty period the purchaser will be required to provide a sales receipt/sales invoice or other acceptable proof of purchase to the seller of this equipment. The seller will then contact Vanco regarding warranty repair or replacement. -
Page 23: Technical Support
TECHNICAL SUPPORT In case of problems, please contact Vanco Technical Support by dialing 1-800-626-6445. You can also email technical support issues to techsupport@vanco1.com. When calling, please have the Model Number, Serial Number (affixed to the bottom of the unit) and Invoice available for reference during the call. - Page 24 ® Vanco International 506 Kingsland Drive Batavia, Illinois 60510 call: 800.626.6445 fax: 630.879.9189 visit: www.vanco1.com...
Need help?
Do you have a question about the Evolution EVMX44VW and is the answer not in the manual?
Questions and answers