
Related Manuals for Proline PLZI697


Summary of Contents for Proline PLZI697
- Page 1 Range Hoods For model numbers: PLZI697 / PLZW697 / PLZIGL1 / PLZIGL2 / PLZIGL5 / PLZIGL6 / PLZIGL7 / PLZIGL9 / PLZIGS1 / PLZIGS2 / PLZIKE2 / PLZWKB / PLZWKF / PLZWKL2 / PLZWKE / PLZW544 user manual...
- Page 2 1-877-901-5530 (Toll Free) Hours: Monday-Friday 7am-5pm Mountain Standard Time Thank you for buying PROLINE! We are dedicated to delivering you quality hoods at amazingly low prices. We are confident you’ll enjoy your new PRO- LINE hood for many years to come.
-
Page 3: Table Of Contents
Table of Contents Saftey Notice Diagrams Wall Hood . Control Panel . Filters Venting . Installation 8-15 Preparation Wall Hood . . 9-11 Island Hood .12-13 Undercabinet or Insert . .14-15 Care & Cleaning 16-17 Troubleshooting Purchase Information 19-21 Warranty Returns . - Page 4 Use common sense and caution when installing, maintaining or operating this or any other appliance. Always contact the PROLINE Customer Support Team (1-877-901-5530) with any prob- lems or situations that you do not understand.
-
Page 5: Saftey Notice
IMPORTANT SAFETY NOTICE warning If you receive a damaged product, immediately contact PROLINE Customer Support. Do not ♦ install or use a damaged hood. Do not install, repair or replace any part of the range hood unless specifically recommend- ♦... -
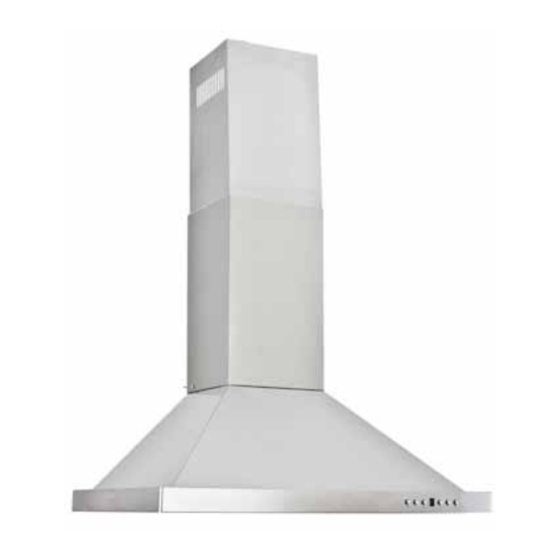
Page 6: Diagrams
PROLINE ranGe HooDs Wall or Island Hood A - HOOD - directs heat and smoke into the hood’s internal blower system. The blower forces heat and smoke from cooking into the chimney. B - CHIMNEY - vents air from cooking to the outside of the home. -
Page 7: Control Panel
User manUal | Control Panel Power: Powers ON/OFF the range hood and activate power-off delay timer. To adjust the power-off timer: Turn on the hood at any speed ♦ Press the Power-Off Delay button to enter timer mode ♦ a “3” will flash in the display ♦... - Page 8 PROLINE ranGe HooDs grease filters baffle filter The baffle filter is equipped with a spring loaded handle. To remove from the hood, pull back toward the wall and down. The baffle filter can also be opened for easy cleaning. To open unscrew the cylin- drical handle and separate the layers to clean..
- Page 9 User manUal | ductless filters charcoal filter We recommend venting your hood directly outdoors if at all possible. If you do not have the option to vent your hood outside, charcoal filters are a convenient alternative. These filters clean impurities and odors from the air as it recirculates through your home.
-
Page 10: Venting
PROLINE ranGe HooDs venting options horizontal wall venting Option 1 Option 2 vertical roof venting... - Page 11 User manUal | venting requirements height & venting requirements For best operation, we recommend you: allow 28-36” between the top of your ♦ cooking surface and the bottom of hood vent vertically through the roof if ♦ possible vent through a side wall if you can- ♦...
-
Page 12: Installation
♦ 2. Test plug in and test controls, lights, fan ♦ inspect for any damage during shipping ♦ you must report any damage to Proline within 7 days for a refund ♦ tools you’ll need: power drill ♦ screwdrivers ♦... -
Page 13: Wall Hood
User manUal | wall hood installation Plan where the ductwork will be located. Install proper-sized duct work, and roof or wall cap, depending on where you will be venting your hood. Recommended and most com- mon installations are shown in the venting diagrams above. Adjust your measurements to accomodate heights of ceilings, cabinets, or rangetops. - Page 14 10 | PROLINE ranGe HooDs wall hood installation step 2 Install ceiling bracket Place the chimney bracket against the ceiling ♦ Find the center point of the bracket and mark ♦ Line the bracket center point with the center ♦...
- Page 15 User manUal | 11 wall hood installation step 4 Install chimney Take off protective laminate coating ♦ Place the chimney on top of range hood base ♦ Make sure the chimney is facing the correct ♦ direction (the vertical vent should be on the top) Secure the lower portion of the chimney to the ♦...
- Page 16 12 | PROLINE ranGe HooDs island hood installation step 1 Mark ceiling find and mark the center point directly above your ♦ cooktop place the ceiling bracket on the ceiling around ♦ the center point. (Make sure it is square with your cooktop).
-
Page 17: Island Hood
User manUal | 13 island hood installation step 4 Install Chimney slide inner chimney sleeve over support brackets, ♦ covering the ceiling bracket screw into place at the top of ceiling bracket ♦ slide outer chimney sleeve to the bottom portion ♦... -
Page 18: Undercabinet Or Insert
14 | PROLINE ranGe HooDs hood insert installation step 1 Mark the leveling point of the hood. Position two mounting screws on the wall leaving 1/8” space between the wall and your hood. If you are installing under a cabinet, the hood should be flush with the front of the cabinet. - Page 19 User manUal | 15 hood insert installation step 4 Align hood-mounting bracket to the screws on the wall and hook hood into place. Additional mount- ing fasteners may be used to further secure your hood. step 5 Use 6” or 8” round steel pipe to connect the exhaust on the hood to the ductwork above.
-
Page 20: Care & Cleaning
All PROLINE hoods come with either an aluminum mesh or stainless steel baffle filter. Both types of filters are dishwasher safe for easy cleaning. If handwashing your filter,... - Page 21 User manUal | 17 17 | PROLINE ranGe HooDs Care & Cleaning replacing the light bulb Make sure the range hood is unplugged or turn OFF breaker ♦ Place a flat-head screwdriver between light cover and housing to remove cover ♦...
-
Page 22: Troubleshooting
18 | troubleshooting NOTHING WORKS (Control Panel not lit, Blower not working) Solution 1: Turn on power at circuit breaker panel or fuse box. Check for tripped breaker or blown fuse. Solution 2: Make sure hood main power switch is on. LIGHTS NOT TURNING ON Solution 1: see “nothing works”... -
Page 23: Purchase Information
User manUal | 19 Warranty All PROLINE range hoods come with a Two Year Warranty on Parts, and a One Year Warranty on Labor. Who is Covered: Only the original purchaser for residential products purchased in the continental United States (limited warranty in Canada, Hawaii, and Alaska). -
Page 24: Returns
Damaged Returns 1. You must report damage directly to PROLINE within 7 days to receive a full refund. 2. Send a photo showing the damage. We need this before we can approve your damage claim. - Page 25 Exchanges exchanges 1. You must request an exchange directly to PROLINE within 14 days. 2. Notify us of your reason for the exchange. Provide a photo if your hood is damaged. 3. We will help arrange for returned shipping of your hood.
- Page 26 Range Hoods PROLINE 1750 S 500 W Salt Lake City, UT 84115 • 1-877-901-5530 • www.prolinerangehoods.com...
Need help?
Do you have a question about the PLZI697 and is the answer not in the manual?
Questions and answers