Sony SU-PW1 Instructions (primary manual) Instructions Manual
Speakers/stands: wall-mount bracket
Hide thumbs
Also See for SU-PW1 Instructions (primary manual):
- Instructions manual (184 pages) ,
- Product view (1 page) ,
- Supplementary manual (2 pages)
Advertisement
Available languages
Available languages
Quick Links
Download this manual
See also:
Instruction Manual
Advertisement

Related Manuals for Sony SU-PW1 Instructions (primary manual)


Summary of Contents for Sony SU-PW1 Instructions (primary manual)
- Page 1 For Customers and Sony Dealers Wall-Mount Bracket Instructions Manuel d’instructions Manual de instrucciones SU-PW1 © 2002 Sony Corporation 4-092-246-12 (1) in North and Central America...
- Page 2 We are not liable for any damage or injury caused by mishandling or improper installation. After installation, please hand this installation manual to the customers. This Wall-Mount Bracket is designed by Sony for use with the specified product. Do not use this bracket with equipment other than the following product.
- Page 3 For Customers WARNING If the following precautions are not observed, there is a possibility of either death or serious injury through a fire, an electric shock or an explosion. Be sure to subcontract the installation to qualified contractors and keep small children away during the installation.
- Page 4 Do not block the ventilating holes on the Display Unit. If you block the ventilating holes on the Display Unit by covering the top of the Display Unit with a cloth or the like, the Display Unit may become overheated and this may cause a fire. Do not apply any load other than the Display Unit on the Wall-Mount Bracket.
- Page 5 CAUTION If the following precautions are not observed, there is a possibility of injury or property damage. Do not install the Wall-Mount Bracket on wall surfaces where the corners or the sides of Display Unit would protrude away from the wall surface. Do not install the Wall-Mount Bracket on wall surfaces such as a pillar, where the corners or the sides of Display Unit would protrude away from the wall surface.
-
Page 6: Install The Wall-Mount Bracket
Install the Wall-Mount Bracket WARNING To Customers Sufficient expertise is required for installing this product. Be sure to subcontract the installation to Sony dealers or contractors and pay adequate attention to safety during the installation. To Sony Dealers The following instructions are for Sony Dealers only. Be sure to read safety precautions described above and pay adequate attention to safety during the installation, maintenance and checking of this product. - Page 7 Be sure to install the Display Unit on a wall that is both perpendicular and flat. If you fail to do so, the Display Unit may fall and cause injury. After proper installation of the Display Unit, secure the cables properly. If people or objects get tangled in the cables, this may result in injury.
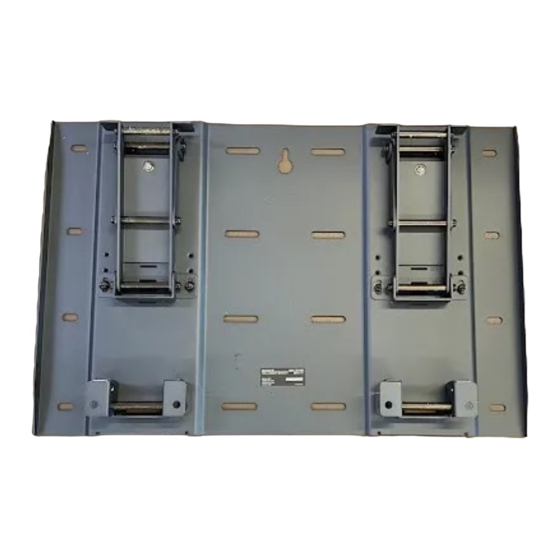
- Page 8 Step 2: Decide on the installation location Unit: mm (inches) ⁄ Step 3: Install the Plate Unit on the wall Screw hole to be used for Align the unit so that temporarily attaching the it is exactly level. bracket. Plate Unit (US) Be sure to keep the distance between the Plate Unit and the...
- Page 9 KE-42XBR900/KE-50XBR900 Fix the Plate Unit to the wall using eight or more M8 or the equivalent screws (not supplied). 1Be sure to tighten the screws securely so that they will not come loose. 2Firmly tighten the screw screwed in temporarily in Procedure 1.
- Page 10 (US) Adjust the angle of the arms. 1Take out the screws from the right and left sides of the arm base. Then choose the notch corresponding to the desired angle (0, 5, 10, 15 or 20 degrees) and fit the arm base to it. 2Firmly secure each arm base using the screws taken out in Procedure 1.
-
Page 11: Step 4: Install The Display Unit
Step 4: Install the Display Unit WARNING Be sure to complete the installation before connecting the Power Cord to the wall outlet. If you allow the Power Cord to be pinched under or between pieces of equipment, this may result in a short circuit or an electric shock. If you stumble over the Power Cord or the Display Interface Cable, the stand may topple over, and this may result in injury. - Page 12 (US) Connect the Power Cord and the Display Cable supplied with the Display Unit to the Display Unit. Connect the Power Cord and the Display Cable to the connectors on the rear side of the Display Unit. See the instruction manual of the Flat Panel Color Television (KE-42XBR900/KE-50XBR900) for more details on connecting the Power Cord and the Display Cable.
- Page 13 Install the Display Unit on the Plate Unit. 1Hold the Display Unit and bring it close to the Plate Unit so as to align the lower hooks of the Mounting Hook Units with the lowest support shafts near the bottom of the Plate Unit. 2Hitch the upper and lower hooks of the two Mounting Hook Units onto the four support shafts of the Plate Unit all at the same time as shown in...
-
Page 14: Removing The Display Unit
Removing the Display Unit (US) For Sony Dealers Unplug the Power Cord from the wall outlet. Loosen the securing screws on the right and left until they will not turn any more. Be sure that two or more persons hold the Display Unit and slide it upward to remove the Display Unit. -
Page 15: Specifications
Specifications Unit: mm (inches) Weight: 8.0 kg (17 lb 10 oz) Design and specifications are subject to change without notice. 600 (23 Angle ⁄ KE-42XBR900 Angle 0° ⁄ 5° ⁄ 10° ⁄ 15° ⁄ 20° ⁄ KE-50XBR900 Angle 0° ⁄ 5°... -
Page 16: Limited Warranty
1. This warranty is expressly limited to the replacement of Sony Wall-Mount Bracket parts and components. 2. For a period of 30 days from the date of purchase, Sony will supply parts that are determined to be defective or missing, at no charge, to the original purchaser. - Page 18 à une mauvaise utilisation ou à une installation incorrecte. Une fois l’installation effectuée, remettez ce manuel d’installation aux clients. Ce support de fixation mural est conçu par Sony pour être utilisé avec le produit spécifié. N’utilisez pas ce support avec un autre appareil que le produit suivant.
- Page 19 A l’attention des clients AVERTISSEMENT Le non-respect des précautions suivantes peut entraîner la mort ou des blessures graves en cas d’incendie, d’électrocution ou d’explosion. Confiez l’installation à des professionnels qualifiés et tenez les enfants à l’écart pendant la durée de l’installation. Si des personnes autres que des professionnels qualifiés installent le support de fixation mural, les accidents suivants peuvent se produire : •...
- Page 20 Ne bloquez pas les orifices de ventilation de l’écran. Si vous bloquez les orifices de ventilation de l’écran en couvrant la partie supérieure de l’écran avec un tissu ou autre, l’écran peut surchauffer et ceci risque de provoquer un incendie. N’appliquez aucune charge autre que l’écran sur le support de fixation mural.
- Page 21 ATTENTION Le non-respect des précautions suivantes risque de provoquer des blessures ou des dommages matériels. N’installez pas le support de fixation mural sur des surfaces murales où les coins ou les côtés de l’écran dépasseraient. N’installez pas le support de fixation mural sur des surfaces murales, telles qu’un pilier où...
- Page 22 Installation du support de fixation mural AVERTISSEMENT A l’attention des clients Une certaine expérience est requise pour installer ce produit. Confiez l’installation à des revendeurs Sony ou à des professionnels et portez une attention particulière à la sécurité au cours de l’installation.
- Page 23 Veillez à installer l’écran sur un mur qui soit à la fois perpendiculaire au sol et plat. Dans le cas contraire, l’écran risque de tomber et de vous blesser. Après une installation correcte de l’écran, fixez les câbles correctement. Si des personnes ou des objets se prennent dans les câbles, ceci risque de provoquer des blessures. Prenez garde de ne pas vous blesser aux mains ou aux doigts pendant l’installation.
- Page 24 Etape 2: Choix de l’emplacement d’installation Unité: mm (pouces) ⁄ Etape 3: Installation de la plaque de fixation sur le mur Percez le trou à utiliser Alignez l’appareil de pour fixer temporairement sorte qu’il soit le support. parfaitement de niveau. Plaque de fixation (FR) Veillez à...
- Page 25 KE-42XBR900/KE-50XBR900 Fixez la plaque de fixation au mur à l’aide d’au moins huit vis M8 ou équivalentes minimum (non fournies). 1Veillez à serrer les vis correctement de sorte qu’elles ne se desserrent pas. 2Serrez fermement les vis fixées temporairement au cours de la Procédure 1.
- Page 26 (FR) Ajustez l’angle des bras. 1Retirez les vis des parties droite et gauche de la base des bras. Choisissez ensuite l’encoche correspondant à l’angle de votre choix (0, 5, 10, 15 ou 20 degrés) et installez-y la base du bras. 2Fixez solidement chaque base de bras à...
- Page 27 Etape 4: Installation de l’écran AVERTISSEMENT L’installation doit être terminée avant de procéder au raccordement du cordon d’alimentation à la prise secteur. Si le cordon d’alimentation se trouve coincé sous ou entre des pièces de l’équipement, ceci peut provoquer un court-circuit ou un risque d’électrocution.
- Page 28 (FR) Raccordez à l’écran le cordon d’alimentation et le câble d’écran fourni avec l’ècran sur celui-ci. Raccordez le cordon d’alimentation et le câble de l’écran aux connecteurs situés à l’arrière de l’écran. Conseil Pour plus de détails sur le raccordement du cordon d’alimentation et du câble d’écran, reportez-vous au mode d’emploi du téléviseur couleur à...
- Page 29 Installez l’écran sur la plaque de fixation. 1Maintenez l’écran et rapprochez-le de la plaque de façon à aligner les crochets inférieurs du crochet de fixation sur les tiges inférieures situées dans la partie basse de la plaque de fixation. 2Accrochez les crochets de fixation inférieurs et supérieurs aux quatre tiges de support de la plaque de fixation de façon simultanée comme indiqué...
- Page 30 Dépose de l’écran (FR) A l’attention des revendeurs Sony Débranchez le cordon d’alimentation de la prise secteur. Desserrez les vis de fixation de droite et de gauche jusqu’à ce qu’elles ne tournent plus. Veillez à ce que deux personnes minimum tiennent l’écran et le soulèvent pour le déposer.
-
Page 31: Spécifications
Spécifications Unité: mm (pouces) Poids: 8,0 kg (17 livres 10 onces) La conception et les spécifications sont sujettes à modifications sans préavis. 600 (23 Degré ⁄ KE-42XBR900 Degré 0° ⁄ 5° ⁄ 10° ⁄ 15° ⁄ 20° ⁄ KE-50XBR900 Degré 0°... -
Page 32: Limited Warranty
1. This warranty is expressly limited to the replacement of Sony Wall-Mount Bracket parts and components. 2. For a period of 30 days from the date of purchase, Sony will supply parts that are determined to be defective or missing, at no charge, to the original purchaser. - Page 34 Gracias por adquirir este producto. Para los clientes Para la instalación de este producto se precisan conocimientos y experiencia suficientes. Asegúrese de contratar la instalación a un distribuidor o contratista de Sony y de prestar especial atención a la seguridad durante la instalación. ADVERTENCIA Si no se respetan las precauciones de seguridad y se utiliza el producto de forma incorrecta, existe el riesgo de que se produzcan lesiones graves o un incendio.
- Page 35 Para clientes ADVERTENCIA Si no se respetan las precauciones siguientes, se pueden producir incendios, descargas eléctricas o explosiones que podrían provocar heridas graves o fatales. Asegúrese de contratar la instalación a contratistas cualificados y procure que los niños pequeños se mantengan alejados del lugar donde se realiza la instalación.
- Page 36 No obstruya los orificios de ventilación del monitor. Si cubre la parte superior del monitor con un paño o similar y obstruye los orificios de ventilación del mismo, éste puede sobrecalentarse y provocar un incendio. No aplique ningún peso que no sea el del propio monitor al soporte de montaje mural.
- Page 37 PRECAUCIÓN Si no se respetan las instrucciones siguientes, existe el riesgo de que se produzcan daños personales o materiales. No instale el soporte de montaje mural en superficies de paredes en las que puedan sobresalir las esquinas o los lados del monitor. No instale el soporte de montaje mural en superficies de paredes como, por ejemplo, una columna, en las que puedan sobresalir las esquinas o los lados del monitor.
- Page 38 ADVERTENCIA Para los clientes Para la instalación de este producto se precisan conocimientos y experiencia suficientes. Asegúrese de contratar la instalación a un distribuidor o contratista de Sony y de prestar especial atención a la seguridad durante la instalación. Para distribuidores Sony Las instrucciones siguientes van destinadas únicamente a distribuidores Sony.
- Page 39 Procure instalar el monitor en una pared perpendicular y plana. De lo contrario, el monitor podría caerse y provocar daños personales. Una vez instalado correctamente el monitor, sujete los cables adecuadamente. Si alguna persona u objeto queda enredado con los cables, podrían provocarse daños o lesiones. Tenga cuidado de no dañarse las manos o los dedos durante la instalación.
- Page 40 Paso 2: Decidir la ubicación de instalación Unidad: mm (pulgadas) ⁄ Paso 3: Instalar la placa en la pared Orificio para tornillo que Alinee la unidad para debe utilizarse para fijar que quede totalmente provisionalmente el soporte. centrada. Placa (ES) Asegúrese de mantener la distancia apropiada entre la placa y el techo o las partes salientes de la pared tal y...
- Page 41 KE-42XBR900/KE-50XBR900 Fije la placa en la pared con la ayuda de ocho o más tornillos M8 o equivalentes (no suministrados). 1Apriete firmemente los tornillos para que no se aflojen. 2Apriete firmemente el tornillo utilizado provisionalmente en el procedimiento 1. ADVERTENCIA •...
- Page 42 (ES) Ajuste el ángulo de las abrazaderas. 1Retire los tornillos de los lados izquierdo y derecho de la base de la abrazadera. A continuación, elija la muesca que corresponda al ángulo deseado (0, 5, 10, 15 ó 20 grados) y haga coincidir la base de la abrazadera en ella.
- Page 43 Paso 4: Instalar el monitor ADVERTENCIA Antes de conectar el cable de alimentación a la toma de corriente, compruebe que la instalación ha finalizado. Si el cable de alimentación queda atrapado debajo de un componente o entre dos o más componentes, podría producirse un cortocircuito o una descarga eléctrica.
- Page 44 (ES) Conecte el cable de alimentación y el cable del monitor suministrado con el mismo al monitor. Conecte el cable de alimentación y el cable del monitor a los conectores de la parte posterior del monitor. Sugerencia Consulte el manual de instrucciones del televisor a color de pantalla plana (KE-42XBR900/KE-50XBR900) para obtener más información sobre cómo conectar el cable de alimentación y el del monitor.
- Page 45 Instale el monitor en la placa. 1Aguante el monitor y acérquelo a la placa para poder alinear los ganchos inferiores de los ganchos de montaje con los ejes de soporte inferiores próximos a la base de la placa. 2Una a la vez los ganchos superiores e inferiores de los dos ganchos de montaje con los cuatro ejes de la placa tal y como se muestra en el diagrama de la izquierda.
- Page 46 Cómo retirar el monitor (ES) Para distribuidores Sony Desenchufe el cable de alimentación de la toma de pared. Afloje los tornillos de fijación de la derecha y de la izquierda hasta que dejen de girar. Procure que dos o más personas sujeten el monitor y deslícelo hacia...
-
Page 47: Especificaciones
Especificaciones Unidad: mm (pulgadas) Peso: 8,0 kg (17 libras 10 onzas) El diseño y las especificaciones están sujetos a cambios sin previo aviso. 600 (23 Grados ⁄ KE-42XBR900 Grados 0° ⁄ 5° ⁄ 10° ⁄ 15° ⁄ 20° ⁄ KE-50XBR900 Grados 0°... - Page 48 1. This warranty is expressly limited to the replacement of Sony Wall-Mount Bracket parts and components. 2. For a period of 30 days from the date of purchase, Sony will supply parts that are determined to be defective or missing, at no charge, to the original purchaser.
- Page 52 Printed on 100% recycled paper using VOC (Volatile Organic Compound)-free vegetable oil based ink. Printed in Japan...