Advertisement
Quick Links
Ensure that the instructions have been fully read and understood before oper-
ating the assembly machine. Only properly trained and authorised personnel
may operate the assembly machine. The instruction leaflet must be
accessible at all times.
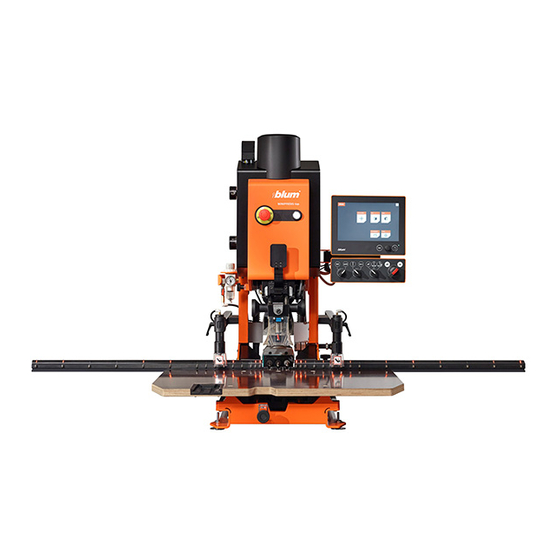
MINIPRESS top
Safety instructions, set-up instructions and
instruction leaflet
www.blum.com
Advertisement

Subscribe to Our Youtube Channel
Related Manuals for BLUM MINIPRESS top


Summary of Contents for BLUM MINIPRESS top
- Page 1 Ensure that the instructions have been fully read and understood before oper- ating the assembly machine. Only properly trained and authorised personnel may operate the assembly machine. The instruction leaflet must be accessible at all times. MINIPRESS top Safety instructions, set-up instructions and instruction leaflet www.blum.com...
-
Page 3: Table Of Contents
Contents MINIPRESS top Safety Contents Intended use Risk levels Safety information Warning signs Reference diagrams Explanation of operating and control elements Start-up Setup Drilling and insertion Horizontal drilling* Maintenance Troubleshooting Additional information CE declaration Technical data * The horizontal drilling function is not available with type M70E2000. -
Page 4: Safety
■ It should only be installed in dry, enclosed rooms. ■ The assembly machine is only intended for stationary operation. ■ Only original Blum tools may be used. ■ No liability can be accepted for any other use. ■ Work piece size:... -
Page 5: Risk Levels
Safety MINIPRESS top Areas of responsibly The operator ■ must ensure that only fully-trained personnel, who have read and understood the instruction leaflet, especially the chapter on safety, operate and service the assembly machine. ■ is responsible for the safety-related condition of the assembly machine. - Page 6 ■ Always set the main switch to the "OFF" POS. after finishing work. Repair and maintenance ■ If there are any questions, please contact the BLUM Customer Service Department. ■ Only an electrician may make the connection to the electrical grid.
-
Page 7: Warning Signs
Safety MINIPRESS top Warning signs Before connecting the assembly machine The assembly machine is not suitable for to the power supply, you must ensure operation in an open environment. that you have understood ALL the safety instructions, warning signs and the instruc- tion leaflet. - Page 8 Safety MINIPRESS top Position of warning signs and danger zones Work area...
- Page 9 Safety MINIPRESS top Position rating plates Rating plate: MINIPRESS top [A] Device type: drilling and insertion machine MINIPRESS top M70E2000 M70E2000 Ref. No.: NB00042-3 2021W02 Drill- and insertion machine 364 lbs / 165 kg Julius Blum GmbH Industriestrasse 1 6973 Hoechst...
-
Page 10: Reference Diagrams
Reference diagrams MINIPRESS top Cable chain Depth adjustment knob for horizontal drilling Stepper motor Drilling head holder EASYSTICK computer Work table Operator panel Vertical extraction system Horizontal drilling head Drilling head locking lever Height adjustment knob for horizontal drilling Start button... - Page 11 Reference diagrams MINIPRESS top Return stroke limitation Air pressure regulator Compressed air shut-off valve Speed controller for creep speed Material thickness adjustment knob Residue material thickness adjustment knob Horizontal extraction system...
- Page 12 Reference diagrams MINIPRESS top Valve block Vertical extraction system Y hose extraction system Funnel extraction system Ruler attachment...
- Page 13 Reference diagrams MINIPRESS top USB stick EASYSTICK computer USB port Operator panel Power switch Work mode selector switch Escape button *Drilling mode selector switch Rotary/push button Hold down clamp selector switch Home button Main switch * The horizontal drilling function is not available with type M70E2000.
- Page 14 Explanation of operating and control elements MINIPRESS top R= D - T Residue material thickness adjustment knob [35]: Adjustment range: 2 - 37 mm NOTE ■ The residue material thickness pertains to drill length 57 mm...
- Page 15 Explanation of operating and control elements MINIPRESS top 10 - 25 mm Board thickness adjustment knob [34] Setting the board thickness also sets the brake point (rapid speed/creep speed). The creep speed can be set using this revolving knob [33].
- Page 16 Explanation of operating and control elements MINIPRESS top...
- Page 17 Explanation of operating and control elements MINIPRESS top 0 - 50 mm Drilling depth adjustment knob [15] for horizontal drilling. Drilling depth adjustment range: 0 - 50 mm. 6 - 20 mm Height adjustment knob [6] for horizontal drilling. Drilling height adjustment range: 6 - 20 mm.
- Page 18 Explanation of operating and control elements MINIPRESS top Test mode: Low feed rate. (creep speed) No drilling possible. Work mode: Normal feed rate Vertical and horizontal drilling possible. Drilling mode: vertical drilling. *Drilling mode: horizontal drilling. * The horizontal drilling function is not available with type M70E2000.
- Page 19 Explanation of operating and control elements MINIPRESS top Start button [20] flashes slowly: ■ Horizontal drilling mode [61] - Horizontal hold down clamp [11] not clamped. ■ Horizontal drilling mode [61] - EASYSTICK ruler [9] is together. ■ Drilling / knock-in mode [62] the Y measurement...
- Page 20 Explanation of operating and control elements MINIPRESS top [51] USB port: used for importing EASYSTICK computer updates, and importing Blum planning data. [52] Power switch: switches the EASYSTICK computer on/off. [53] used to exit menus, dialog boxes. [54] used to navigate without a touch screen.
- Page 21 Air consumption per work cycle is 1.5 litres. Connecting the extraction system ➢ Insert the extraction hose into the upper extraction socket [42, 43] and secure it. ➢ Insert the extraction hose into the lower extraction socket [36] and secure it. ➢ Accessories, see www.blum.com.
- Page 22 Start-up MINIPRESS top NOTE ■ Ensure that the average air velocity for the extraction system is at least 20 m/sec. ■ The negative pressure should be 250 - 300 mbar. ■ Volume flow 570 m³/h. Earthing the extraction system ➢ Connect the spiral wire of the suction hose to the assembly machine.
- Page 23 Start-up MINIPRESS top Adjusting the motor rotation ➢ Main switch [63] to "OFF" pos. ➢ Disconnect the assembly machine from the power supply. ➢ Rotate the turnover plate [71] in the plug [70] by 180 deg. by pressing and turning.
- Page 24 Start-up MINIPRESS top RB00016 Ref. No.: MZD.2000 Julius Blum GmbH Industriestrasse 1 6973 Hoechst Austria 24 V 1.4 A EASYSTICK S3 25% 2019W02 Made in Austria ➢ Read off the serial number on the rating plate [C] of the EASYSTICK ruler.
- Page 25 Start-up MINIPRESS top Updating EASYSTICK Blum updates are software updates that keep your EASYSTICK computer updated to the latest version with ■ new Blum fitting solutions ■ new and improved functions ■ performance and troubleshooting optimisations ➢ Log in to the EASYSTICK portal.
- Page 26 Setup MINIPRESS top Setup WARNING Serious cuts. Failure to heed this warning may result in personal injury. ➢ Only one person at a time should operate the assembly machine. ➢ Set the work mode selector switch [60] to TEST for all set-up work.
- Page 27 Setup MINIPRESS top Basic settings Vertical drilling Operator panel ➢ Set the main switch [63] to "ON". ➢ Set the work mode selector switch [60] to"TEST". Setting the board thickness ➢ Set the board thickness [34]. For more information, see chapter "Description of operating elements".
- Page 28 Setup MINIPRESS top *Basic settings Horizontal drilling * The horizontal drilling function is not available with type M70E2000. ➢ Set the main switch [63] to "ON". ➢ Set the work mode selector switch [60] to"TEST". Setting the horizontal drilling height NOTE ■...
- Page 29 Setup MINIPRESS top Vertical drilling setup (Drilling head) Equip the drilling head [25]. Illustration ➢ Always unclamp the drilling head [25] when equipping. ➢ Park the drilling head [25] in the drilling head storage [16]. (press-in frame not part of scope of delivery - optional)
- Page 30 Setup MINIPRESS top Clamping the drill bit Length must be 57 mm. Illustration ➢ Clamp the drill bit [24] in the drilling head [25]. Pay attention to the direction of rotation. Clamping the insertion ram Illustration ➢ Install the insertion ram [23] on the drilling head [25].
- Page 31 Setup MINIPRESS top Illustration WARNING Ejecting parts can cause injury. Damage to the coupling or drilling head possible. ➢ Push up the locking lever [19]. WARNING Drill bits can cause serious injury. ➢ When using the MZK.224S (11 spindles) drilling head, the additional table [14] must be used.
- Page 32 Drill bit equipment ➢ Set the work mode selector switch [60] to"TEST". black ➢ Only use Blum original drill bits. ➢ Slide the drill bit [83] onto the drilling spindle up to the stop [82]. ➢ Tighten the screws securely.
- Page 33 Setup MINIPRESS top ➢ The length of the drill bit [83] can be adjusted. Use a screwdriver. ➢ Insert the horizontal hold down clamp [11]. ➢ Close the locking lever [19].
- Page 34 Setup MINIPRESS top EASYSTICK ➢ The EASYSTICK computer carries out the planning. ➢ Do not press the start button [20] during the EASYSTICK process, this will cancel the process.
- Page 35 Drilling and insertion MINIPRESS top WARNING Drill bits can cause serious injury. ➢ Only one person at a time should operate the assembly machine. ➢ All items except for the work piece should be removed from the work area [A] of the assembly machine.
- Page 36 Drilling and insertion MINIPRESS top ➢ Check the work table for soiling and remove dirt as necessary. ➢ Push the work piece against the stop and ruler. NOTE Hold down clamp ■ We recommend using hold down clamps to ensure safe and precise processing of the work piece.
- Page 37 Drilling and insertion MINIPRESS top Vertical drilling ➢ Set the main switch [63] to "ON". ➢ Set the work mode selector switch [60] to"WORK". NOTE ■ The extraction system must always be switched on in order to remove wood chips and dust.
- Page 38 Drilling and insertion MINIPRESS top The following requirements must be met so that the drilling process can be initiated: ➢ No horizontal hold down clamp [13] may be clamped. Clamp in the drilling head [25]. ➢ The emergency off button [21] must be released.
- Page 39 Drilling and insertion MINIPRESS top Vertical drilling and knock-in ➢ Set the drilling mode selector switch [61] to vertical drilling. NOTE ■ We always recommend using the hold down clamps to ensure safe and precise processing of the work piece.
- Page 40 Drilling and insertion MINIPRESS top The following requirements must be met so that the drilling process can be initiated: ➢ No horizontal hold down clamp [11] may be clamped. Clamp in the drilling head [25]. ➢ The emergency off button [21] must be released.
- Page 41 Drilling and insertion MINIPRESS top ➢ Clip the fitting [22] on to the insertion ram. ➢ Swivel down swing arm [80]. Insertion NOTE ■ The knock-in process is not stopped automatically. The following requirements must be satisfied in order to trigger the knock-in stroke: ➢...
- Page 42 Horizontal drilling MINIPRESS top Horizontal drilling* * The horizontal drilling function is not available with type M70E2000. ➢ Set the drilling mode selector switch [61] to horizontal drilling. The following requirements must be met so that the drilling process can be initiated: ➢...
- Page 43 Horizontal drilling MINIPRESS top WARNING Serious cuts. Failure to heed this warning may result in personal injury. ➢ Only one person at a time should operate the assembly machine. ➢ All items except for the work piece should be removed from the work area [A] of the assembly machine.
- Page 44 Remove work piece MINIPRESS top Remove work piece ➢ Remove the work piece [13]. ➢ Clean the work table [17], ruler [9] and stops [84]. ➢ Set the selector switch [60] to TEST after processing the work piece. ➢ Set the main switch [63] to the "OFF" position if the machine will not be used...
- Page 45 Maintenance MINIPRESS top Overview of maintenance points S: perform a visual inspection, clean with a microfibre cloth if necessary.
- Page 46 ■ Wear eye protection during cleaning work. NOTE ■ Replace damaged parts immediately. Only use BLUM original parts. ■ Do not use oil or lubricants during cleaning. All runners and bearings are maintenance-free. ■ Dust and wood chips must not be removed using sharp-edged or metallic objects.
- Page 47 ➢ Set the main switch to "0FF". ➢ Unclamp the drilling head [25]. ➢ Change the drill bits [24, 83] and note the direction of rotation see chapter "Setup". Repairs ➢ Please contact a Blum partner for repairs. Blum partners worldwide can be found at: www.blum.com/adresses...
- Page 48 Troubleshooting MINIPRESS top Error during drilling Problem Possible cause Solution Drill bit is jammed in the wood. Drill bits are dull. ➢ Repoint drill bits or replace. Incorrectly rotating drill bit inserted. ➢ Install anti-clockwise drill bits into chucks marked in red and clockwise drill bits into chucks marked in black.
- Page 49 Work piece thickness less than 16 mm. Machine is running into an object. ➢ Remove object. A Blum work table is not being used. ➢ Only use original accessories and spare parts. Error during insertion. Chips in the drilling.
- Page 50 Troubleshooting MINIPRESS top Error in the work piece Problem Possible cause Solution Error during insertion. Work piece is offset. ➢ Use hold down clamp. Insertion ram is offset. ➢ Set insertion ram. Work piece is scratched. Work table is dirty or damaged.
- Page 51 Motor is dusty. ➢ Clean the assembly machine. Drilling head runs with difficulty. ➢ Send the drilling head to a Blum repair centre. Clamps do not function. Incorrect setting of the hold down clamp ➢ Change selector switch setting.
- Page 52 Troubleshooting MINIPRESS top Assembly machine malfunctions Problem Possible cause Solution Horizontal drilling not possible. Work selector switch - setup is at the ➢ Change setting. incorrect setting. Drilling mode selector switch at the ➢ Change setting. incorrect setting Horizontal hold down clamp is not ➢...
- Page 53 Simplified EU declaration of conformity for MINIPRESS top Simplified EU declaration of conformity Julius Blum GmbH hereby declares that all electrical and electronic article types of Julius Blum GmbH conform to the Directives 2009/125/EC and 2011/65/EU. Julius Blum GmbH hereby declares that the electrical and electronic article types M70.*, M70.*, M70.* conform to the Directives 2006/42/EC and 2014/30/EU.
- Page 54 Additional information MINIPRESS top Technical data Only use in dry, enclosed rooms. MINIPRESS top Ambient atmosphere: Transport/storage: ________________________________________________ -20 to 85°C Operation: __________________________________________________________0 to 50°C Relative humidity (operation) ___________________________ 5 - 93 % non-condensing Dimensions / weight: Height: ______________________________________________________________ 976 mm...
- Page 55 Input (supplied via the Blum transformer) Output Other • 24 VDC • 24 VDC • Protection class: • max. 96 W, limited by the Blum • max. 1.6 A, limited via a PTC • Protection category: IP54 transformer fuse in the HMI box (computer) •...
- Page 56 Electrical assembly devices must not be disposed of with household waste at the end devices of their service life. Ask your local authority for information on how to proceed. BLUM electrical assembly devices meet the requirements of the WEEE Directive 2012/19/ Electrical and electronic appliances are collected separately, which enables old appli- ances to be reused or recycled, and their materials to be reused.
- Page 57 Notes MINIPRESS top...
- Page 58 Notes MINIPRESS top...
- Page 59 Notes MINIPRESS top...
- Page 60 Notes MINIPRESS top...
- Page 61 Notes MINIPRESS top...
- Page 62 Notes MINIPRESS top...
- Page 63 Notes MINIPRESS top...
- Page 64 Blum partners worldwide can be found at: www.blum.com/addresses Julius Blum GmbH Furniture Fittings Mfg. 6973 Höchst, Austria Tel.: +43 5578 705-0 Fax: +43 5578 705-44 E-mail: info@blum.com www.blum.com Our sites in Austria, Poland and China are certified to the international standards mentioned below.
Need help?
Do you have a question about the MINIPRESS top and is the answer not in the manual?
Questions and answers