Table of Contents
Advertisement
Quick Links
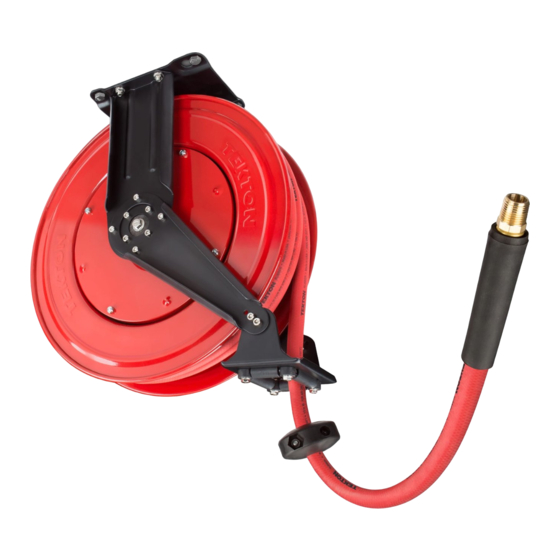
AUTO REWIND AIR HOSE REEL
NEED HELP?
Save time, contact us first.
888-648-3371
support@tekton.com
WARNING: BEFORE USE, READ AND UNDERSTAND OPERATOR'S MANUAL. Wear impact-resistant protective
eyewear in work area at all times. This reel must only be mounted to a load bearing structural object such as a
stud, rafter, or floor which can support the combined weight of reel and hose and can withstand pulling forces on
hose when in use. Air hose is designed for use on regulated air compressor systems delivering less than 250 PSI.
DO NOT EXCEED 250 PSI. Be sure to restrain hose as it rewinds—do not allow hose to rewind at full speed.
Never exceed air pressure rating for any air tool. Read and follow all guidelines specified in the air tool owner's
manual. Certain air tools, such as paint spray guns, sanders, grinders, and sandblasting equipment, present
specific dangers and hazards. Consult applicable material safety data sheet for precautions and possible respirator
recommendation.
®
OPERATOR'S MANUAL
STORE THIS MANUAL IN A SAFE
PLACE FOR FUTURE REFERENCE
Items
46875, 46878
Advertisement
Table of Contents

Subscribe to Our Youtube Channel
Related Manuals for tekton 46875


Summary of Contents for tekton 46875
- Page 1 Items 46875, 46878 ® AUTO REWIND AIR HOSE REEL OPERATOR’S MANUAL STORE THIS MANUAL IN A SAFE PLACE FOR FUTURE REFERENCE NEED HELP? Save time, contact us first. 888-648-3371 support@tekton.com WARNING: BEFORE USE, READ AND UNDERSTAND OPERATOR'S MANUAL. Wear impact-resistant protective eyewear in work area at all times.
-
Page 2: Air Inlet
Model # 46875 Model # 46878 • Air Hose Size: 3/8" x 50' • Air Hose Size: 1/2" x 50' • Reel Air Inlet (F): 1/4" NPT • Reel Air Inlet (F): 1/2" NPT • Air Hose Outlet (M): 1/4" NPT •... - Page 3 OPERATING AIR HOSE REEL BEFORE MOUNTING AIR HOSE REEL, please take a few minutes to understand how it works. Practice operating it a few times, pulling hose out and rewinding it back onto the drum. This will familiarize you with basic functions and can help you understand where best to mount the air hose reel.
- Page 4 MOUNTING HOSE REEL Choosing a Location DO NOT MOUNT HOSE REEL OUTDOORS OR ON VEHICLE. This hose reel is not designed to resist constant exposure to weather or continuous vibration. Mount under cover in an area not directly exposed to weather. Reel can be mounted on the floor, ceiling, or wall, wherever it is convenient.
-
Page 5: Typical Installation
TYPICAL FASTENERS AND HARDWARE COMBINATIONS WOOD METAL MASONRY Lag bolt, lock washer, Machine bolt, two flat Machine bolt, lock washer, and flat washer washers, lock washer, flat washer, and anchor and nut TYPICAL INSTALLATION WALL STUDS MOUNTING PLATE Example: 2x10 lumber INSTALLATION KEYHOLE SLOTS... -
Page 6: Parts List
ARTS 1. Recoil Spring Cover 16. Rollers (4) 31. Locking Pawl 2. Recoil Spring 17. Roller Pins (4) 32. Tension Spring 3. Recoil Spring Hub 18. Bolt (4) 33. Locking Pawl Axle 4. Spring Cover Bolt 19. Washer (4) 34. Retaining Ring 5. - Page 7 FITS THIS HOSE REEL ASSEMBLY DESCRIPTION 46845 46848 • 99011 3/8" Air Inlet Assembly • • 99012 Locking Pawl Assembly • • 99013 Guide Rollers and Pins • 99014 3/8" Hose Stopper Assembly • • 99015 Main Spring • 99016 1/2"...
-
Page 8: Making Adjustments
MAKING ADJUSTMENTS Adjusting Hose Stopper Position The hose stopper determines the length of hose that remains outside of reel. To adjust stopper position: 1. First pull hose out past the desired position of hose stopper. Lock drum in position. 2. Loosen (but do not remove) both stopper bolts just enough so stopper can slide along hose. 3. - Page 9 Adjusting Recoil Tension Hose reel is shipped with spring tension properly set. Be aware that spring tension is calibrated to rewind entire length of air hose. If you are working with only a portion of total air hose length or if you feel hose rewinds too quickly or too slowly, you can easily adjust the tension of the main recoil spring.
- Page 10 ATTACHING INCOMING AIR For consistent leak-free performance, air inlet is made of solid brass. Brass is a soft metal and extra care should be taken to avoid cross threading. For a tight, leak-free connection, follow all instructions carefully. Option 1 Wrap incoming air hose end with thread sealing tape.
- Page 11 Replacing Air Inlet O-rings The O-ring seals inside the air inlet assembly wear over time. If leaking around air inlet is observed, O-rings should be replaced. An O-ring replacement kit is shipped with this hose reel. Store in a safe place for future use. For complete parts diagram, see page 6-7, centerfold of book 1.
- Page 12 Reconnect lead-in hose and turn on incoming air supply. Check all connections to verify there are no leaks. Install Remove air hose air hose Hub outlet Hub outlet Michigan Industrial Tools © Copyright 2015 3707 Roger B Chaffee SE Michigan Industrial Tools Grand Rapids, MI 49548 WWW.TEKTON.COM Printed in China...
Need help?
Do you have a question about the 46875 and is the answer not in the manual?
Questions and answers