
Related Manuals for timecode systems mini basestation

Summary of Contents for timecode systems mini basestation
- Page 1 mini basestation For the latest user guide, please visit: www.timecodesystems.com/support/product-manuals :pulse User Guide...
- Page 2 All rights reserved. No part of this publication may be reproduced without the expressed written permission of Timecode Systems Ltd. Timecode Systems Ltd shall not be liable to the purchaser of this product or third parties for damages, losses, costs, or expenses incurred by the purchaser or third parties as a result of...
-
Page 3: Table Of Contents
Contents Welcome to :pulse Display and Controls Antenna OLED display Control Knob Ports Charge your :pulse Mounting Solutions Optional Extras Technical Specification Set Up :pulse for Synchronisation :pulse User Guide... - Page 4 Understanding the BLINK Network Quick Set Up :pulse in a BLINK Network Synchronising with a Sound Mixer/Recorder Quick Set Up :pulse Connected to Sound Mixer/Recorder Synchronising with a Camera Quick Setup :pulse Connected to Camera Free Running and Jamming Switch :pulse On and Off Set the RF Country/Area Set the Timecode Mode Set the RF Channel...
- Page 5 Main Screen Version Number and Serial Number Power and Battery Wi-Fi Status Ethernet Status BNC Sync Status Troubleshooting :pulse Slave not Connecting to Master :pulse has No Power :pulse Clock Freezes when in RF Slave Mode Camera Not Receiving Genlock from :pulse Sound Mixer Not Receiving Word Clock from :pulse Cannot Control Devices Connected to a Slave Pulse via BLINK Restore Factory Settings...
- Page 6 :pulse User Guide...
-
Page 7: Welcome To :Pulse
Welcome to :pulse Thank you for choosing Timecode Systems' :pulse as your mini base station solution. With its extremely accurate internal clock, :pulse is a reliable timecode/word clock/genlock generator and multi-channel digital timecode transceiver. In this user guide, you will find information on how to set up your :pulse for: ... -
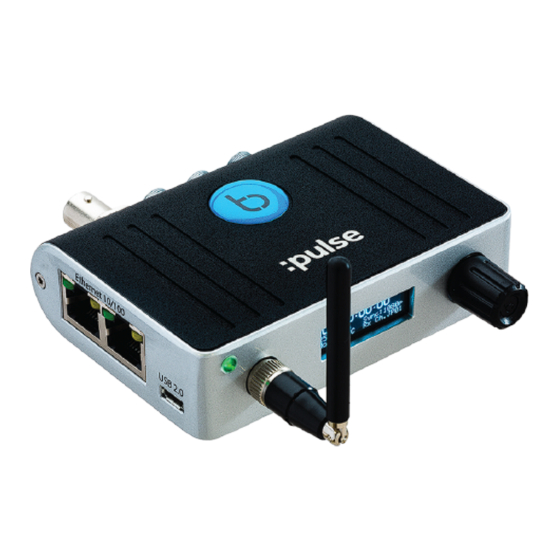
Page 8: Display And Controls
Display and Controls Antenna The antenna is for the digital transceiver module and it operates in the 868MHz to 923MHz ISM bands. OLED display The OLED display is a Blue 128 x 32 pixels pixels screen. When you switch on the :pulse, all status information, messages, and menus and options are shown on this screen. -
Page 9: Led
A flashing red LED shows that there are warning messages. The warning messages are displayed on the OLED. Simultaneous The LED acts as an indicator for synchronised Timecode Systems Flashing devices. If there are multiple Timecode Systems devices in a network, their LEDs will flash simultaneously when they are synchronised. - Page 10 To navigate through the available menus and options and to increase or decrease a value, you should turn the control knob. You can turn the control knob clockwise or anti-clockwise to cycle through the available options or values. :pulse User Guide...
-
Page 11: Ports
Ports Your :pulse has a variety of ports for connecting with other devices and chargers. Port Description LEMO 9- Power supply input. This is a LEMO 2 socket. 36V DC LEMO For connecting your :pulse to third-party equipment. This is a LEMO 9 DATA socket. - Page 12 Port Description Ethernet The Ethernet ports allow you to use our BLINK Hub or other apps via a wired connection rather than Wi-Fi. Simply connect your :pulse to a network via a wired Ethernet connection and then run the apps on your laptop PC or MacBook.
-
Page 13: Charge Your :Pulse
Charge your :pulse The :pulse unit has a built-in battery and can also be powered by an external power source. The battery is charged when the :pulse is connected to an external power source. There are three ways to power your :pulse: Connection LEMO port (9-36V DC) Mains power adaptor with LEMO compatible connection. -
Page 14: Mounting Solutions
Mounting Solutions The :pulse has flexible mounting options. Optional Extras Timecode Systems 7" articulated mounting arm kit TCB-32 Hot shoe adaptor TCB-34 :pulse User Guide... -
Page 15: Technical Specification
Technical Specification Category Specification Dimensions 94mm × 67mm × 23mm OLED Display Blue 128 × 32 Pixels Timecode generator TCX0 0.1ppm when free running. In practice, accuracy approximately 0.1-0.2 frame drift in 24 hours. Zero ppm when RF locked to a master. Supported FPS Modes 23.98 24.00... -
Page 16: Set Up :Pulse For Synchronisation
1) independently. It does not communicate with other Timecode Systems devices. When you know how you want to use your :pulse, you can set it to provide timecode to a sound mixer/recorder or video camera. -
Page 17: Understanding The Blink Network
Understanding the BLINK Network To set up your Timecode Systems devices, including your :pulse, you need to understand how a BLINK network works. In the following sections, we explain the key concepts of BLINK networks and answer some of the most common questions: ... - Page 18 Example: Let's say you are filming an action scene and you are using two video cameras, a sound mixer, and four SyncBac PROs with GoPro HERO4™s attached. You connect a :pulse to each camera and to the sound mixer. To synchronise, the devices all need to use the same RF channel and one device has to be set to run as a master with the others set to run as slaves.
- Page 19 Master and Slaves in the BLINK Network To synchronise, the devices in a BLINK network use a master and slave relationship. This allows the master's timecode data to be applied to all of the devices. The master-slaves relationship works like this: 1.
- Page 20 What if a Slave Can't Find a Master? When you switch a slave device on, it announces itself on the network so that it can be detected by a master device. But it will only be detected by a master device if: ...
- Page 21 Example: A camera crew are going to film an exciting river rafting scene in Europe. They fit GoProHERO4™ Silver cameras to the boats, and the HERO4™s are connected to SyncBac PROs. The SyncBac PROs are set to run as slaves. A technical centre is set up at the position where the climax to the scene will take place.
- Page 22 What if there are Multiple Masters in the Same BLINK Network? You should set up your Timecode Systems devices so that there is one master device per BLINK network. This ensures that all of the slave devices synchronise with the same timecode source (the master device's timecode).
- Page 23 To fix the problem, you turn all of the SyncBac PROs off and set :pulse A to run as a master and :pulse B to run as a slave. You then turn the SyncBac PROs back on and they all synchronise with :pulse A (as it is the only master). When they synchronise, the SyncBac PRO slaves store the name of the master :pulse (:pulse A).
-
Page 24: Quick Set Up :Pulse In A Blink Network
SyncBac PRO, :wave, or other :pulse units, you need to set up a BLINK network. This is a group of Timecode Systems devices that all use the same RF channel to communicate with each other, and one of the devices, typically a :pulse, has to be set to run in a master mode. - Page 25 RF Channel The RF Channel number that is used by the Set the RF other Timecode Systems devices in the same Channel (see BLINK network page 60) System Set the RF Country/Area to the country in...
- Page 26 Further Settings Option Information SYNC These settings are only used if the :pulse is Set up Generator connected to a camera, sound mixer or other Timecode device via the TC/SYNC BNC port. They are Output (see used for setting the :pulse to send timecode, page 69) genlock, or word clock data via BNC.
- Page 27 Mode (see page 53) RF Channel The RF Channel number that is used by the Set the RF other Timecode Systems devices in the same Channel (see BLINK network page 60) System Set the RF Country/Area to the country in...
- Page 28 Further Settings Option Information SYNC These settings are only used if the :pulse is Set up Generator connected to a camera, sound mixer or other Timecode device via the TC/SYNC BNC port. They are Output (see used for setting the :pulse to send timecode, page 69) genlock, or word clock data via BNC.
-
Page 29: Synchronising With A Sound Mixer/Recorder
1. Set the timecode mode for the :pulse. This defines its relationship with any other Timecode Systems devices and also sets the :pulse to either send or receive timecode data via its TC port. 2. Set the sound mixer/recorder to accept external word clock and timecode signals. - Page 30 The most common arrangement is to set your :pulse to send/receive timecode via the TC port and send word clock via the TC/SYNC port. It is possible for your :pulse to output timecode via the TC/SYNC port, but it cannot be used to output word clock at the same time.
-
Page 31: Quick Set Up :Pulse Connected To Sound Mixer/Recorder
Your :pulse as part of a BLINK network, where it can synchronise with other Timecode Systems devices as well as your sound mixer/recorder. To make it easier for you, we have split the quick set up instructions into two separate sections: ... - Page 32 53) and then pass the timecode on to your sound mixer/recorder. Your :pulse will not communicate with any other Timecode Systems devices. 4. Use the control knob to access the Wifi Settings and Ethernet Settings menus:...
- Page 33 5. Connect your external timecode source to the TC LEMO 5 port on your :pulse. When connected, use the control knob to access the TC Generator option and jam your :pulse to the external timecode. Further Settings Option Information Select Jam EXT T/C to synchronise your :pulse Free Generator with the external timecode source.
- Page 34 Quick Set Up BLINK Network :pulse to Sound Mixer/Recorder To set up your :pulse to run as part of a BLINK network and synchronise with a sound mixer/recorder: 1. Switch on your :pulse unit (see Switch :pulse On and Off on page 50).
- Page 35 If you are not going to use BLINK Hub or you are (see page going to use a wi-fi connection instead, turn Ethernet off to preserve battery power. 4. Apply the radio (RF) settings for communicating with other Timecode Systems devices: Further Settings...
- Page 36 5. This step only applies if your :pulse is set to run in the Int Gen-TX mode. If your :pulse is set to a different mode, ignore this step. Use the control knob to access the TC Generator menu, and set the timecode and metadata for your :pulse: Further Settings...
- Page 37 8. This step only applies if your sound mixer/recorder has a word clock input. Set up the sound mixer/recorder to receive word clock data from an external source. Please refer to the manufacturer's instructions for your sound mixer/recorder. 9. Connect your sound mixer/recorder to the timecode output on your :pulse. There are two ways of outputting timecode to a sound mixer/recorder.
-
Page 38: Synchronising With A Camera
Synchronising with a Camera One of the key features of your :pulse is that it can provide timecode and genlock to professional video cameras, such as the Sony F55. The timecode data provides the 'time stamp' information that is added to the recording, such as the time and any user-defined metadata. - Page 39 If it is the master in the BLINK network, it will send a genlock signal to the camera. For timecode, it will either send its own timecode to the camera and the slave devices or it will receive timecode from the camera and send it to the slaves. You control this by setting the master mode for the :pulse (see Set the Timecode Mode on page...
-
Page 40: Quick Setup :Pulse Connected To Camera
Your :pulse as part of a BLINK network, where it can synchronise with other Timecode Systems devices as well as your video camera. To make it easier for you, we have split the quick set up instructions into two separate sections: ... - Page 41 53) with any other Timecode Systems devices. 4. Choose the type of connection that your :pulse will use for communicating with the BLINK Hub app. Use the control knob to access the Wifi Settings and...
- Page 42 5. Connect your external timecode source to the TC LEMO 5 port on your :pulse. When connected, use the control knob to access the TC Generator option and jam your :pulse to the external timecode. Further Settings Option Information Select Jam EXT T/C to synchronise your pulse Free Generator with the external timecode source.
- Page 43 Quick Set Up BLINK Network :pulse to Video Camera To set up your :pulse to run as part of a BLINK network and synchronise with a video camera: 1. Switch on your :pulse unit (see Switch :pulse On and Off on page 50).
- Page 44 If you are not going to use BLINK Hub or you are (see page going to use a wi-fi connection instead, turn Ethernet off to preserve battery power. 4. Apply the radio (RF) settings for communicating with other Timecode Systems devices: Further Settings...
- Page 45 5. This step only applies if your :pulse is set to run in the Int Gen-TX mode. If your :pulse is set to a different mode, ignore this step. Use the control knob to access the TC Generator menu, and set the timecode and metadata for your :pulse: Further Settings...
- Page 46 8. This step only applies if your video camera has a genlock input. Use the control knob to access the SYNC Generator settings and choose the appropriate genlock settings: Further Settings Option Information Set BNC O/P Mode Set the BNC O/P Mode to the appropriate Set the genlock signal for your video camera.
-
Page 47: Free Running And Jamming
If you want to use your :pulse independently or in a third-party system instead of a BLINK network, you will need to set it to run in Free Run/Jam Ext mode. This is because for synchronisation with Timecode Systems products, :pulse uses our proprietary RF protocol and master-slave relationships, and these are not recognised by other systems. - Page 48 Set up your :pulse for Free Running and Jamming To set up your :pulse so that it is ready for free running and jamming: 1. Switch on your :pulse unit (see Switch :pulse On and Off on page 50). 2. Press the control knob. 3.
- Page 49 Jam your :pulse to the External Timecode Source When you have your :pulse in Free Run/Jam-Ext mode, you can synchronise it with an external timecode source, such as a camera. To do this, you will need to connect the timecode source to the :pulse via the TC port. You can then set the :pulse to start jamming to the timecode source.
-
Page 50: Switch :Pulse On And Off
Switch :pulse On and Off Your :pulse unit has an internal battery and can also be powered via the 9-36V DC LEMO socket or the USB 2.0 socket. As long as it has a power source, you can use the control knob to switch it on and off. To switch your :pulse on: 1. - Page 51 To switch your :pulse off: 1. Press the control knob and keep it pressed down. A countdown appears on the screen: Shutting down in 3. 2. Keep the control knob pressed down until the countdown is finished and the following message is displayed:Turn knob to switch off. 3.
-
Page 52: Set The Rf Country/Area
Set the RF Country/Area Your :pulse uses radio (RF) to communicate with other Timecode Systems devices in a BLINK network. It only uses our proprietary RF protocol for sending and receiving timecode data. The regulations for the use of radio frequencies vary in different countries, so it is important that you set your :pulse to use the correct frequencies for the country in which is it being used. -
Page 53: Set The Timecode Mode
Set the Timecode Mode For time synchronisation, your :pulse can be used independently (free running) or as part of a BLINK network, where it can be set as a master or slave. If it is set to be a master, it will send its timecode to the slave devices in the BLINK network, and if it is a slave, it will receive timecode from a master device. - Page 54 Timecode Operation Mode Ext-RF :pulse acts as a slave unit and receives its timecode from a master Slave device in the BLINK network. It communicates regularly with the master to make sure that its timecode matches the timecode of the master, and it also sends its status data to the master device.
- Page 55 Example: Free Run/Jam Ext Mode A sound engineer is working on a scene that is dangerous and so she needs to be able to put the sound mixer in place and then control it remotely, from a safe position. There is no need to synchronise the audio with any other sound or video recordings that are taking place.
- Page 56 When the jamming is complete, the engineer positions the sound mixer and :pulse in a suitable position for making the recording and then moves away to a safe position. The :pulse needs to be connected to the sound mixer via the DATA port to allow the sound mixer to be controlled remotely.
- Page 57 Example: Int-Gen TX Mode An outdoor scene is being filmed, using two cameras, with a sound mixer recording the audio. To synchronise all of the video and audio recordings, :pulse units are connected to the cameras and the sound mixer. To achieve this, the sound mixer is connected to a :pulse via the TC/SYNC port (for word clock) and TC port for timecode.
- Page 58 Example: Ext-TC TX Mode Let's say you are using multiple cameras and a sound mixer, all connected to :pulse units. The sound mixer's :pulse is set to run in Ext-TC TX mode, which is a master mode, and the camera :pulse units are set to run as RF slaves. The sound mixer is connected to its :pulse via the TC port for timecode and the TC/SYNC port for word clock.
- Page 59 Example: Ext-TC/C TX Mode Let's say you are using multiple cameras and a sound mixer, all connected to :pulse units. The sound mixer's :pulse is set to run in Ext-TC/C TX mode, which is a master mode, and the camera :pulse units are set to run as RF slaves. The sound mixer is connected to its :pulse via the TC port for timecode and the TC/SYNC port for word clock.
-
Page 60: Set The Rf Channel
Set the RF Channel Your :pulse uses radio to synchronise with other Timecode Systems devices. To do this, the :pulse and the other devices have to be set to use the same RF channel, which then creates a group, which we call a BLINK network. - Page 61 Note: Each :pulse can only be part of 1 BLINK network. If you need to remove a :pulse from a BLINK network and set it to join another one, simply change the :pulse's RF Channel. 1. Switch on your :pulse unit (see Switch :pulse On and Off on page 50).
- Page 62 Example 1: Join a BLINK network Let's say you are filming a chase sequence involving three cars. In each car, you have set up a SyncBac PRO with a GoPro HERO4™ Silver, and you want them to synchronise with a :pulse master. (You can also use the :pulse to monitor and control the cameras remotely, via the BLINK Hub app).
-
Page 63: Set The Timecode Data
Example 2: Multiple BLINK networks in range Let's say you have six SyncBac PROs and two :pulse units and you want to arrange them in separate BLINK networks. For the purpose of this example, we will assume you want three SyncBac PROs in each network, but you could allocate them differently if you wanted. -
Page 64: Set The User Bits
You need to set the timecode for the master :pulse unit, so that it has the correct timecode settings for your requirements. These timecode settings will be sent to any slave devices in the same BLINK network, and also to any connected cameras or sound mixers. - Page 65 To add metadata to the timecode of a :pulse, you need to use the Set U/B feature, which stands for Set User Bits. 1. Switch on your :pulse unit (see Switch :pulse On and Off on page 50). If your :pulse is running in EXT-RF Slave mode, continue from step 2. If your :pulse is free running or running in a master mode, ignore steps 2-8 and continue from step 9.
-
Page 66: Set The Frame Rate Per Second
12. Turn the control knob to scroll to the Set U/B option. 13. Press the control knob. 14. Turn the control knob to select the combination of letters and numbers you want for the first pair of characters in the user bits metadata. 15. -
Page 67: Set The Word Clock Output
7. Turn the control knob to select the appropriate frame rate for your recording. You need to set the FPS to match the FPS settings of the cameras being used for filming. 8. Press the control knob to confirm your selection. ... -
Page 68: Set The Genlock Output
BNC cable is connected correctly. If there is still no word clock signal, change the Set BNC O/P Level to High in the :pulse's settings. If that doesn't resolve the problem, contact Timecode Systems for assistance. Set the Genlock Output If your camera supports genlock, you should set your :pulse to output a genlock signal as well as timecode. -
Page 69: Set Up Timecode Output
Timecode Systems for assistance. Set up Timecode Output Your :pulse is designed to send timecode data to other devices, such as your sound mixer/recorder or other Timecode Systems products. By using the same timecode, the devices can all have synchronised time and user bits (metadata). - Page 70 Timecode output via TC/SYNC If you don't have a TCB-20 5-pin to 5-pin LEMO cable, you can set your :pulse to output timecode via the TC/SYNC port. But where possible, we recommend that you use the TC LEMO port for timecode output instead. 1.
-
Page 71: Remote Control And Monitoring
If you are familiar with the concept of using apps to monitor and control your Timecode Systems devices, you can set up your :pulse for data streaming. You can choose to use an Ethernet connection or the :pulse's built-in wi-fi for data streaming: ... -
Page 72: Blink Hub
Any supported devices that are physically connected to your :pulse Every Timecode Systems device in the BLINK network (if your :pulse is the master) Any supported devices that are connected to the slave devices in a BLINK network (if your :pulse is the master). - Page 73 Another great feature of BLINK Hub is that you can use it to change the settings of Timecode Systems devices remotely. Select the box for a device and BLINK Hub display the device's settings in the Settings sidebar. You can use the settings to monitor status, such as the battery level, and also to make changes to the configuration of a Timecode Systems device.
-
Page 74: Third-Party Apps
Movie Slate app. Which Apps Do You Need? The following table shows which apps you need to monitor and control your Timecode Systems and third-party equipment. As you can see, BLINK Hub meets most requirements. BLINK BLINK... -
Page 75: Set Up :Pulse To Connect To External Apps
However, wi-fi connections are less stable than a wired Ethernet connection, and can be prone to intermittent loss of connection. Note: :pulse only uses wi-fi and ethernet for communicating with external apps. It uses Timecode Systems' proprietary RF protocol to communicate with the devices in the BLINK network. ... -
Page 76: Quick Setup: Blink Hub And :Pulse
Quick Setup: BLINK Hub and :pulse To get your :pulse to communicate with BLINK Hub or other apps: 1. First set up your :pulse to connect to other Timecode Systems devices, a Sound Devices 6 series sound mixer, or a video camera as appropriate. You can find instructions in the following sections: ... - Page 77 9. Use the control knob to put the following settings in place: Wi-Fi Connection Ethernet Connection Wi-Fi Settings > Turn On/Off > Turn Wi-Fi Settings > Turn On/Off > Turn Ethernet Settings > Turn On/Off > Ethernet Settings > Turn On/Off > Turn Off Turn On Network Type >...
-
Page 78: Set Up Wi-Fi For Data Streaming
Set up Wi-Fi for Data Streaming Your :pulse can use its built-in wi-fi to communicate with external applications, such as Timecode Systems' BLINK Hub. To set up wi-fi, you first need to turn it on (see Turn Wi-Fi On or Off on page 79). - Page 79 Turn Wi-Fi On or Off If you want :pulse to use its built-in wi-fi for connecting to external apps, you first need to turn wi-fi on. Tip: If you are not going to use external apps with your :pulse, it makes sense to turn wi-fi off as a power saving measure.
- Page 80 6. Press the control knob. 7. Turn the control knob to select the SoftAp option. Do not use the Infrastructure option unless advised to do so by a Timecode Systems customer support agent. 8. Press the control knob to confirm your selection.
- Page 81 Power Saving with Stealth Mode With Stealth Mode, you can set your :pulse to turn wi-fi off automatically if there is no external power. This is a power saving feature, designed to keep your :pulse on for as long as possible when it has to use its internal battery (the battery has a limited amount of charge, and this will be used up more quickly if wi-fi is enabled).
- Page 82 Set the Wi-Fi Channel Your :pulse supports eleven wi-fi channels, and is set to use Channel 01 by default. If you are using :pulse in close proximity to other wi-fi or bluetooth enabled devices, you may need to change the channel to avoid connection conflicts. (The other devices may be using the same channel).
- Page 83 Re-Start Wi-Fi If your :pulse's wi-fi connection goes offline or there is a long delay when connecting via wi-fi, try re-starting the wi-fi connection. A fresh restart often resolves any wi-fi connection issues. Note: You can see if your :pulse is offline by looking at the Wi-Fi Status screen (see Wi-Fi Status on page 90).
-
Page 84: Set Up Ethernet For Data Streaming
Set Up Ethernet for Data Streaming If your setup makes it easy to position a computer close to your :pulse , you may prefer to use an Ethernet connection instead of wi-fi. An Ethernet connection is stable and constant, and is not affected by other devices. ... -
Page 85: Change The Screen Brightness
Change the Screen Brightness In certain conditions, you may need to change the brightness of the screen. For example, if you are filming in dark conditions, you may want to lower the brightness to make it easier to see the settings. To change the brightness of the screen: 1. -
Page 86: Screen Saver For Preserving Battery Power
Screen Saver for Preserving Battery Power By default, your :pulse's screen is always lit. By using the Screen Saver feature, you can set the screen to turn off automatically after eight seconds of inactivity. This helps to preserve battery power. As soon as you turn the control knob, the screen will light up again. -
Page 87: Button Lock
Button Lock The :pulse unit's small design means it can be carried alongside other equipment with ease. But if your :pulse is likely to knock into other objects, the control knob could be turned and pressed accidentally, potentially changing the :pulse settings. To prevent this, you can turn on the Button Lock feature. -
Page 88: Status Information
Status Information Your :pulse has a collection of status displays that provide useful information about its current setup. The status displays include: Main Screen (see page 88) Version Number and Serial Number (see page 89) Power and Battery (see page 89) ... -
Page 89: Version Number And Serial Number
Version Number and Serial Number If you contact Timecode Systems technical support, you may be asked to provide the serial number of your :pulse. You may also be asked what version of the firmware your :pulse is running. To find this information: 1. -
Page 90: Wi-Fi Status
Wi-Fi Status You can use your :pulse's Wi-Fi status screen to find out if it has wi-fi enabled, and its IP address and network ID. This information is useful when diagnosing wi-fi connection problems. 1. Display the Main Screen (see page 88) 2. -
Page 91: Ethernet Status
Ethernet Status You can use the Ethernet status screen to find out: Whether your :pulse has Ethernet support turned on The internet protocol address that has been assigned to your :pulse for communicating via Ethernet. This information is useful when investigating connection problems that may be related to Ethernet settings and also for making sure Ethernet is turned off if not in use. -
Page 92: Bnc Sync Status
BNC Sync Status You can use the BNC Sync status screen to find out what settings are in place for the TC/SYNC output port (BNC). These are the settings that your :pulse uses for sending word clock, genlock, and possibly timecode signals to your sound mixer/camera. 1. -
Page 93: Troubleshooting
Troubleshooting If you are having difficulty with your :pulse, the following troubleshooting sections may help: :pulse Slave not Connecting to Master (see page 93) :pulse has No Power (see page 94) :pulse Clock Freezes when in RF Slave Mode (see page 94) ... -
Page 94: Pulse Has No Power
Your :pulse's timecode freezing is expected behaviour in this situation. If your :pulse does not get its timecode from a master device that is running EXT-TC TX mode, but still has frozen timecode, contact Timecode Systems for assistance. Camera Not Receiving Genlock from :pulse... -
Page 95: Sound Mixer Not Receiving Word Clock From :Pulse
You should also check that thesound mixer is set to receive word clock from an external source. If problems persist, contact Timecode Systems for assistance. Cannot Control Devices Connected to a Slave Pulse via BLINK Hub This is intended behaviour. -
Page 96: Restore Factory Settings
Restore Factory Settings You can reset your :pulse to its original state by selecting Restore Defaults. This can be useful if you want to use your :pulse in a different BLINK network or for a different purpose and you want to start with a completely fresh :pulse. 1. -
Page 97: Warranty
Warranty All products sold by Timecode Systems Limited are warranted to the original purchaser against defects in materials and workmanship for (1) year from the date of original purchase. However, this warranty excludes accessories, batteries and cables. Also, this warranty does not apply to any instrument determined by Timecode Systems Limited to have been subjected to customer alteration, modification, negligence or misuse. -
Page 98: Quality Declarations
Quality Declarations Use of External Antenna(s) This device has been approved by Industry Canada & FCC to operate with the antenna types listed below with the maximum permissible gain of 5.4 dBi and required antenna impedance of 50 Ohms for each antenna type indicated. Antenna types not included in this list, having a gain greater than the maximum gain indicated for that type, are strictly prohibited for use with this device. -
Page 99: Industry Canada Statements
Industry Canada Statements: This device complies with Industry Canada licence-exempt RSS standard(s). Operation is subject to the following two conditions: (1) This device may not cause interference, and (2) This device must accept any interference, including interference that may cause undesired operation of the device. Le présent appareil est conforme aux CNR d'Industrie Canada applicables aux appareils radio exempts de licence. -
Page 100: Ec Declaration Of Conformity
EC Declaration of Conformity Timecode Systems Ltd. Unit 6, Elgar Business Centre Moseley Road, Hallow, Worchester WR2 6NJ UK declare that the Declaration of Conformity is issued under our sole responsibility and belongs to the following product(s): Type of Product... - Page 101 The following harmonized standards and technical specifications have been applied: EN 300 220-2 V2.4.1:2012 EN 301 489-3 V1.6.1:2013 EN 55024 2010 EN 55032 2012 Paul Scurrell Timecode Systems :pulse User Guide...
-
Page 102: Index
Index Setup 40 Synchronisation 38 Canada 52 Channel for Wi-Fi 82 9-36V DC 11, Charging 13 China 52 Control Knob 9 Accuracy 15 Controls 8 Antenna 8 Country 52 Area 52 kit 14 Australia 52 DATA port 11 Data streaming Ethernet 84 Battery 89 Wi-Fi 78 BLINK Hub Dimensions 15 Quick set up 76 Display 8 BLINK network 17, Drift 15 Concept 17 Quick set up 24 Blue LED 9... - Page 103 Ext-TC/C TX 53 LED 9 Blue 9 Factory settings 96 Green 9 FPS 66 LEMO 13 master 66 LEMO 2 11, Modes 15 LEMO 5 11 Frame drift 15 LEMO 9 11 Frame rate per second 66 Local or EXT U/B 65 Free Run/Jam-Ext 48, Free running 47 Main screen 88 Mains Power 13 Genlock 11, Master 19, Signals 15 Multiple masters in the same Green LED 9 network 22...
- Page 104 Zealand 52 Remote Monitoring 71 Restore defaults 96 Channel 60 Off 51 country/area 52 OLED 8, Slave 54 On 50 Screen brightness 85 Pixels on screen 8 Screen pixels 8 Ports 11 Screen saver 86 Power 13, Serial number 89 Down 51 Set BNC O/P Level 67-68 Off 51 Set BNC O/P Mode 67-68 On 50 Brightness 85 Up 50 Set T/C 63, Power saving 81, Timecode 63 Prelude live logger 74...
- Page 105 Network type 80 Timecode mode 53 Off 79 Timecode output 69 On 79 Timecode output via TC 69 Re-start 83 Timecode output via TC/SYNC 69 Reset 83 Timecode Systems address 97 Stealth mode 81 Troubleshooting 93 Turn off if no external power 81 Turn Off 50-51 Wi-Fi settings 78 Turn on 50 Wi-Fi status 90 :pulse User Guide...
- Page 106 Word clock 11, Standards 15 :pulse User Guide...
- Page 107 :pulse User Guide...
- Page 108 Timecode Systems Unit 6, Elgar Business Centre, Hallow Worcester, WR2 6NJ, UK +44 (0) 1700 808 600 contact@timecodesystems.com http://www.timecodesystems.com...
Need help?
Do you have a question about the mini basestation and is the answer not in the manual?
Questions and answers