Advertisement
Quick Links
*PLEASE READ THESE INSTRUCTIONS COMPLETELY BEFORE ATTEMPTING TO ASSEMBLE YOUR NEW Hanging Bird Feeder
CONTENTS:
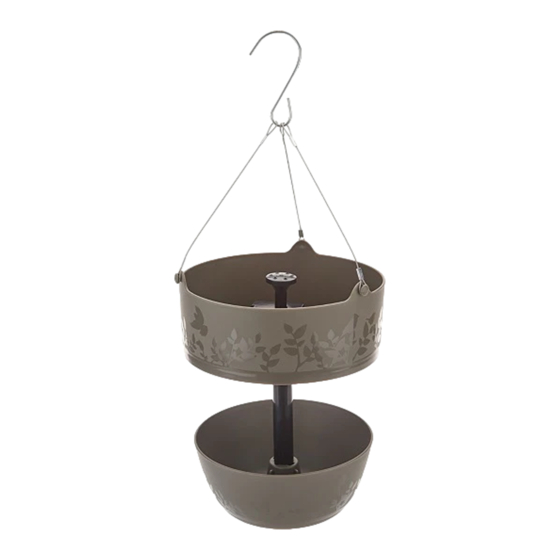
Top Bowl - Water
Center Post
Battery
Covers
Bottom Bowl - Feed
2.
Assembly
Alignment
Alignment
Notch
Notch
Alignment
Alignment
Notch
Notch
Figure 1a
Figure 1b
Figure 1c
Figure 1d
1. Take the Center Post and slide it into the bottom of the Bottom Bowl aligning the notch in the Bottom Bowl and the notch in the Center
Post. Push in until the center post snaps into place. (Figure 1a, 1b, 1c and 1d).
2. Screw the center post into the screw in the center of the bottom of the Top Bowl (Figure 2a).
3. Attach the 3 cables to the 3 attachment spots on the Top Bowl (Figure 2b). Take the other end of the 3 cables and slide them onto the
small end of the hook (Figure 2c). You may need to close the small end of the hook to prevent the cables from coming loose in the future.
4. Choose a Dancing Water Attachment and place it on the water outlet on the top side of the water pump (Diagram 1a)
5. Fill the Top Bowl with water, the water level should cover the top of the Water Pump (Diagram 1a). Fill Bottom Bowl with
bird seed.
6. Hang the Hanging Bird Feeder in your favorite location, turn on and enjoy!
3.
OPERATING YOUR HANGING BIRD FEEDER'S WATER FOUNTAIN:
Turning the Water Fountain on: The Water Fountain is programmed to run for one hour daily, then turn off automatically. The Water Fountain will again automaticlly turn on
each day for 1 hour.
Press the button once to turn the Water Pump on; the LED light will flash to indicate the Water Pump has been turned on (Figure 5a and 5b). The Water Fountain will automatically turn off
after one hour daily. The Water Fountain will then turn on again at the same time each day daily, simply press the button and enjoy.
Turning the Water Fountain off: To stop the Water Fountain, manually press and hold the button for over 2 seconds (Figure 5a and 5b).
LED
LED
Button
Button
Light
Light
Figure 5a
Diagram 1a:
Dancing Water
Attachment
Dancing
Water
Attachment
Water
Hook
Pump
Battery
Compartment
(4AA Cell
Batteries
Not Included)
Hanging
Cables
Figure 2a
Figure 2b
Figure 2c
Press
Press
Button
Button
Figure 5b
Carina 3 In 1 Bird Feeder
Hook
(Figure 3a).
2. Place the Batteries in the Battery Compartment
(Figure 4a, 4b, 4c, 4d and 4e).
3. Insert 2 batteries with the (+) side facing up in
Hanging
Battery Compartment and 2 batteries with the (-)
Cable
facing up in Battery Compartment (Figure 4e).
4. Reinstall the Battery Covers by aligning the tabs
with the rectangular openings on the battery covers
and pushing down until you hear a click and battery
Water Level
Top
tabs lock into place (Figure 3b).
Bowl -
Water
CHANGING BATTERIES:
Button
& LED
1. When changing batteries you may find it easier to remove water
Light
and bird seed that is in the Hanging Bird Feeder and unscrew/
disassemble the Bottom Bowl from the rest of the Hanging Bird
Center
Post
Feeder and lay on its side for easy access to the battery
compartments (Figure 2a). During the battery changing
process, it is important to ensure Battery Compartment
Bottom
remains completely dry. It is important that no water enters
Bowl -
the Battery Compartment.
Feed
2. See Installing Batteries Section above on how to reinstall
batteries and reassemble.
Figure 3a
Figure 3b
Dancing Water Attachments
Figure 6a
O W N E R S M A N U A L
INSTALLING BATTERIES:
(1) Squeeze tabs, (2) lift off battery cover
Please note, images of parts are
not to scale with one another.
Figure 4a
Figure 4b
Figure 4c
Figure 4d
Figure 4e
Need Help?
Call us for assistance at:
1+ (619) 449-2392
or you can email us at:
customercare@berninifountains.com
Our Customer Care Department is available:
Monday - Friday 8:30am to 4:00pm PST
11:30am - 7:00pm EST
Figure 6b
TM
Advertisement

Subscribe to Our Youtube Channel
Related Manuals for Bernini Carina 3 In 1 Bird Feeder


Summary of Contents for Bernini Carina 3 In 1 Bird Feeder
- Page 1 Carina 3 In 1 Bird Feeder O W N E R S M A N U A L *PLEASE READ THESE INSTRUCTIONS COMPLETELY BEFORE ATTEMPTING TO ASSEMBLE YOUR NEW Hanging Bird Feeder CONTENTS: Diagram 1a: INSTALLING BATTERIES: (1) Squeeze tabs, (2) lift off battery cover Hook (Figure 3a).
- Page 2 This warranty gives you specific legal rights and you may also have other rights which vary from state to state. This product has a one year limited warranty on all materials and workmanship. Bernini® warrants the original purchaser of this product that the product will be free from manufacturing defects in workmanship and material for a period of one (1) year from the date of original purchase.
Need help?
Do you have a question about the Carina 3 In 1 Bird Feeder and is the answer not in the manual?
Questions and answers