Advertisement
Quick Links
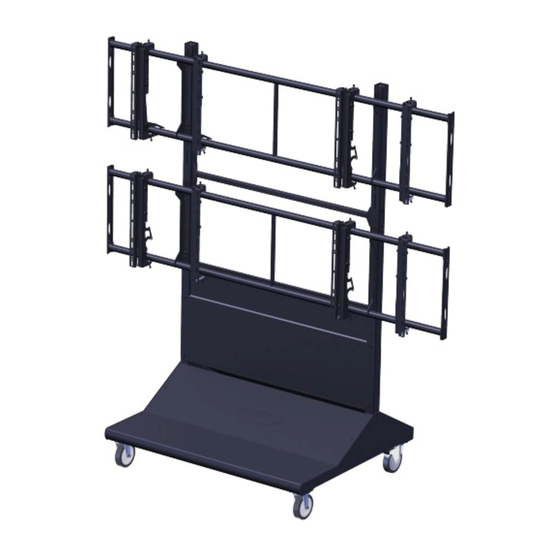
mvwc-2x2
Installation Guide
Installationsanleitung, Guía de Instalacíon, Guida de Installazione, Guide d'Installation, Installatie gids
Warranty, Garantie, Garantía, Garanzia, Garantie, Waarborg: http://www.mounts.com/warranty
9531-010-001-00
www.mounts.com | North America 800.368.9700 | International +1-714-632-7100 | Europe +44 (0) 24 7664 4105
1321 S. State College Blvd., Fullerton, CA 92831 USA
Advertisement

Subscribe to Our Youtube Channel
Related Manuals for Premier Mounts MVWC-2X2


Summary of Contents for Premier Mounts MVWC-2X2
- Page 1 Installation Guide Installationsanleitung, Guía de Instalacíon, Guida de Installazione, Guide d’Installation, Installatie gids Warranty, Garantie, Garantía, Garanzia, Garantie, Waarborg: http://www.mounts.com/warranty 9531-010-001-00 www.mounts.com | North America 800.368.9700 | International +1-714-632-7100 | Europe +44 (0) 24 7664 4105 1321 S. State College Blvd., Fullerton, CA 92831 USA...
-
Page 2: Required For Installation
MVWC-2x2 Installation Guide Installationsanleitung, Guía de Instalacíon, Guida de Installazione, Guide d’Installation, Installatie gids M8 x 60mm M6 x 10mm M4 x 12mm M4 x 16mm M4 x 25mm M5 x 12mm M5 x 16mm M5 x 25mm M6 x 12mm... - Page 3 MVWC-2x2 Installation Guide Installationsanleitung, Guía de Instalacíon, Guida de Installazione, Guide d’Installation, Installatie gids Loosely install the front upper cover to the front of the cart Lay the leg assembly as shown . Securely install the four with the four M6 x 1.0 x 10mm”button head” Allen screws casters on the front and rear of the leg assemblies using the supplied.
- Page 4 MVWC-2x2 Installation Guide Installationsanleitung, Guía de Instalacíon, Guida de Installazione, Guide d’Installation, Installatie gids Install the lower front panel cover to the frame front and The rear oval panel cover can be installed before or after secure to the frame assembly with the four each M6 x 1.0 x final assembly of the cart with the four each M6 x 10mm 10mm “button head”...
- Page 5 MVWC-2x2 Installation Guide Installationsanleitung, Guía de Instalacíon, Guida de Installazione, Guide d’Installation, Installatie gids From this point on it is recommended that minimum two people to properly install the cross bar assemblies to the frame rails. 1/16"(1.3MM) Y+ 1/16"(1.3MM) Z = 46"(117CM) Z = 50"(127CM) - 52"(132CM)
- Page 6 MVWC-2x2 Installation Guide Installationsanleitung, Guía de Instalacíon, Guida de Installazione, Guide d’Installation, Installatie gids Refer to the diagram on the previous page to find the proper spacing for the cross bars. Once you have the proper clear- ance height for placement of the second cross bar install,...
- Page 7 MVWC-2x2 Installation Guide Installationsanleitung, Guía de Instalacíon, Guida de Installazione, Guide d’Installation, Installatie gids Starting with the lower level cross bar, confirm the lower Once center and level of the brackets are confirmed secure bracket security screws are wide open and install the first the bracket firmly to the display.
- Page 8 MVWC-2x2 Installation Guide Installationsanleitung, Guía de Instalacíon, Guida de Installazione, Guide d’Installation, Installatie gids Once your mobile video wall is installed, make sure displays are aligned with 1 /16” heat expansion clearance. The dual purpose kickstand and safety lock is secured by pulling the...
- Page 9 MVWC-2x2 Installation Guide Installationsanleitung, Guía de Instalacíon, Guida de Installazione, Guide d’Installation, Installatie gids Upper three stage precision alignment screws. Each bracket has its own three part Allen head screw adjusters that can be aligned independently to maximize the overall alignment to flat in both the vertical and horizontal mode as well as in and out.
- Page 10 MVWC-2x2 Installation Guide Installationsanleitung, Guía de Instalacíon, Guida de Installazione, Guide d’Installation, Installatie gids ITEM NO. QTY. PART NO. DESCRIPTION 3201-000-010-XX VERTICAL LEFT LEG ASSEMBLY 2X2 3201-000-020-XX VERTICAL RIGHT LEG ASSEMBLY 2X2 0725-DCG-W02-13 PLUG PUSH-IN RIBBED SQUARE CAP 2 X 2"...
- Page 11 What Premier Mounts Will Do At the sole option of Premier Mounts, Premier Mounts will repair or replace any product or product part that is defective. If Premier Mounts chooses to replace a defective product or part, a replacement product or part will be shipped to you at no charge, but you must pay any related labor costs.
Need help?
Do you have a question about the MVWC-2X2 and is the answer not in the manual?
Questions and answers