Table of Contents
Advertisement
Quick Links
Advertisement
Table of Contents

Related Manuals for jbc CA-QF


Summary of Contents for jbc CA-QF
- Page 1 INSTRUCTION MANUAL Compact Solder Feed Station Ref. CA-QF...
-
Page 2: Packing List
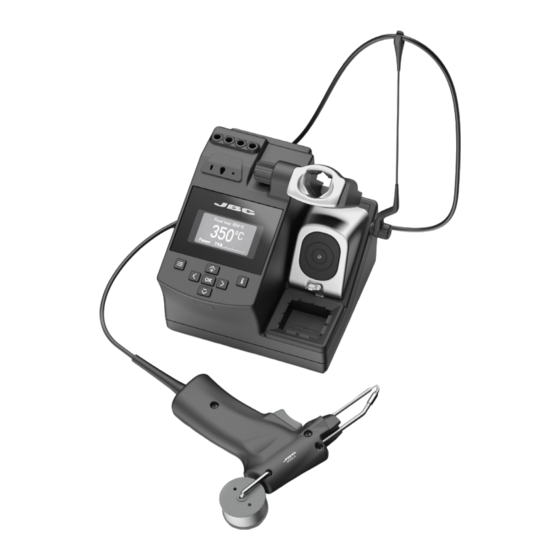
Packing List The following items are included: Solder Feed Iron ........1 unit * Ref. AP250-A Supplied with guide tube for wire Ø 0.8 - 1mm CA Control Unit ......... 1 unit Ref. CA-1F (120V) CA-2F (230V) CA-9F (100V) Feeder Nozzle Ø 1.5mm ......1 unit Ref. - Page 3 w w w.jbctools.com Features Cable Collector Adjustable Stand: Intelligent Heat Management Cartridge Storage Tip Aligner Process Screen Tip Cleaner Brass Wool with Antisplash Membrane and Wiper Solder Feed Iron Ref. AP250-A Equipotential Connection Main Switch Earth Fuse Fuse USB-B Connector Power Socket Fume Extractor Connector...
-
Page 4: Adjustable Stand
If the tip is very dirty, AP250-A AP250-A JBC recommends first AP250-A cleaning it with the wiper to remove excess solder. Wiper Ref. CL0160 A temperature resistant receptacle for removing excess solder by gently tapping or wiping. - Page 5 w w w.jbctools.com Removing the Splashguard: 1. Unlock the splashguard. 2. Lift off. Lock More cleaning options (not supplied): Inox Wool Metal Brush Ref. CL6205 Ref. CL6220 Stronger cleaning When used carefully, method than brass it provides a more wool. thorough cleaning.
- Page 6 AP250-A Changing Cartridge To change a catridge safely, unplug the tool or turn off the station before following these guide- lines. AP250-A 1. Removing 2. Inserting Mark AP250-A AP250-A AP250-A AP250-A Loosen the screw and remove the cartridge. Important: Insert the cartridge as far as the Use a flat pliers if still hot.
-
Page 7: Compatible Cartridges
w w w.jbctools.com Compatible Cartridges The CA stations work with C250 cartridges and AP250 Solder Feed Iron. Find the model that best suits your soldering needs in www.jbctools.com ø 3,5 1,8x0,8 ø 1,5 Conical Bent Chisel Chisel Bent Bevel Replacing Solder Wire 1. - Page 8 Changing Feeder Nozzle Unplug the tool or turn off the station before following these guidelines 1. Unscrew the rear screw, than remove the reel and the solder wire from the nozzle. 2. Unscrew the two screws on the other side of the solder feeder.
- Page 9 AP250-A w w w.jbctools.com 4. Take out the feeder nozzle and replace it with the new one while holding the three components, identified in the picture, in AP250-A place. Reassemble the cover and tighten the three screws. Feeder Nozzle The 3 components Regulating Feeder Nozzle 1.
-
Page 10: Operation
TOOL TOOL TOOL Operation The JBC Most Efficient Soldering System This revolutionary technology is able to recover tip temperature extremely quickly. This allows the user to work at a lower temperature. As a result, tip life increases by 5. 1. Work 2. -
Page 11: Control Process
w w w.jbctools.com Control Process Work Screen Displays a specific fixed temp. Fixed temp. 3 5 0 3 5 0 Shown when you have selected Levels ºC 2 7 0 2 7 0 3 5 0 3 5 0 4 0 0 4 0 0 temp. - Page 12 (e. g. riveting). (e.g. multilayered or high Min. temp. by default is 200ºC dissipation boards), JBC (392ºF). This is considered to strongly recommends using be a proper starting point for other aids like preheaters.
- Page 13 w w w.jbctools.com Tool Settings Parameter Description Recommendations Warnings Ideal for soldering more than Fix One Temperature Fix a value within the one component at a specific temperature range of the temperature. The station will station (90-450ºC/190-840ºF). reject any attempt to change the temperature.
- Page 14 Set values within ±50°C It provides a more precise (± 90°F) to achieve zero error. When the user changes adjustment between the JBC strongly recommends the cartridge type, the selected temperature and the the use of TID-A or TIA-A parameter should be reset actual one.
-
Page 15: Usb Connector
Update the station software via USB connection: Cable USB AB AP250-A Updater JBC Manager www.jbctools.com/manager.html TOOL Manage and monitor as many stations as your PC can handle by using the JBC Manager. You can export data to another PC. TOOL AP250-A AP250-A any JBC station... -
Page 16: Maintenance
2. Insert the new fuse into the fuse holder AP250-A and return it to the station. EARTH TOOL When this warning appears on the FUSE main screen Earthing Fuse must be replaced - Repairs should only be performed by a JBC authorized technical service. - Page 17 w w w.jbctools.com Safety It is imperative to follow safety guidelines to prevent electric shock, injury, fire or explosion. - Do not use the units for any purpose other than soldering or rework. Incorrect use may cause fire. - The power cord must be plugged into approved bases. Be sure that it is properly grounded before use.
- Page 18 Notes...
-
Page 19: Specifications
w w w.jbctools.com Specifications CA-1QF 120V 50/60Hz. Input fuse: 2A. Output: 23.5V. Control Unit model: CA-1F CA-2QF 230V 50/60Hz. Input fuse: 1A. Output: 23.5V. Control Unit model: CA-2F CA-9QF 100V 50/60Hz. Input fuse: 2A. Output: 23.5V. Control Unit model: CA-9F - Output Peak Power CA-F: 130 W - Temperature Range:... - Page 20 In order for the warranty to be valid, equipment must be returned, postage paid, to the dealer where it was purchased. Get 1 extra year JBC warranty by registering here: https://www.jbctools.com/productregistration/ within 30 days of purchase. This product should not be thrown in the garbage.
Need help?
Do you have a question about the CA-QF and is the answer not in the manual?
Questions and answers